
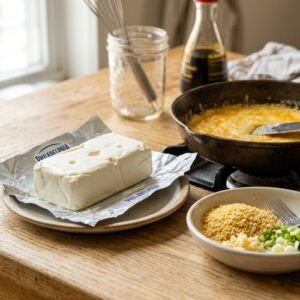
Ingredients
Method
Step 1: Prepare Your Filling Base
- Remove your cream cheese (or selected substitute based on your dietary version) from the refrigerator and let it rest at room temperature for 15 minutes. Cold cream cheese will be lumpy and difficult to combine smoothly. While it softens, measure out your sugar and onion powder into a small bowl. For the vegan version specifically, blend your soaked cashews until completely smooth before proceeding—any graininess will affect your final texture. For the dairy-free version, if using coconut cream, scoop only the thick cream from the top of the can (save the liquid for another use).
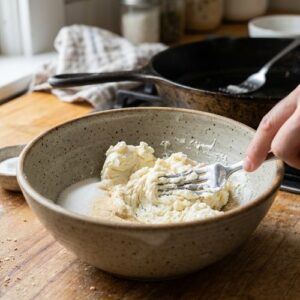
Step 2: Mix the Filling Until Completely Uniform
- Using a fork (never an electric mixer—this isn't a dessert and you want control), combine your softened cream cheese with the sugar and onion powder. Stir in one direction for about 20 seconds until you see no streaks of unmixed ingredients. The filling should be pale, smooth, and spreadable but still hold its shape. For keto versions, be especially careful not to overmix, as this can cause separation in the fat content. Taste a tiny bit (using a clean spoon each time) and adjust seasoning—you might add a whisper more onion powder if you prefer deeper savory notes. This is your moment to personalize it before it goes into the wontons.
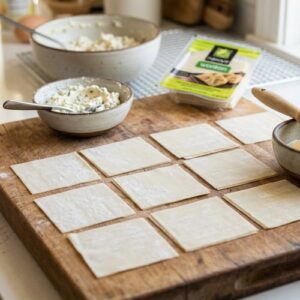
Step 3: Set Up Your Wonton Assembly Station
- Lay out your wonton wrappers on a clean, dry surface—I use a wooden cutting board or a large dinner plate. Pour your beaten egg (or aquafaba mixture for vegan) into a small shallow bowl. Have a damp paper towel nearby to keep unused wrappers from drying out—this is especially important if you're using gluten-free wrappers, which can become brittle quickly. Set out your cream cheese filling in a small bowl with a teaspoon dedicated to scooping. Organization here prevents frustrated moments mid-folding.
Step 4: Fill and Fold Each Wonton
- Take one wrapper and place it on your work surface as a diamond (corner pointing toward you). Using your teaspoon, place approximately ¾ teaspoon of filling in the dead center. Using your fingertip or a small pastry brush, apply a thin line of egg wash around all four edges of the wrapper—this is your glue. For vegan versions using aquafaba, apply it slightly generously as aquafaba doesn't adhere quite as firmly as egg. Now, bring the top corner down to meet the bottom corner, creating a triangle, and press to seal. Fold this triangle in half again (corner to corner) to make a smaller triangle. Finally, bring the two ends of this smaller triangle together so they overlap slightly, and press firmly to seal—you should have a little purse shape. Repeat with remaining wrappers and filling until you have 24 assembled wontons.

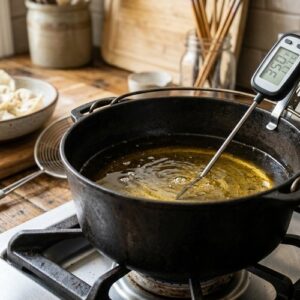
Step 5: Heat Your Oil to the Perfect Temperature
- Pour oil into a deep, heavy-bottomed saucepan or Dutch oven to a depth of 4 inches. Use a deep-fry thermometer (I recommend instant-read digital ones for accuracy) and heat the oil to exactly 350°F. This temperature is critical across all versions—too cool and your wontons will absorb oil and feel greasy; too hot and the outside will burn before the inside heats through. While the oil heats, line a plate with several layers of paper towels. Never skip the thermometer—this is where most home cooks lose quality. I've seen people guess at temperature for decades and then finally get a thermometer and wonder why everything suddenly tastes better.
Step 6: Fry in Batches for Even Browning
- Working with no more than 5-6 wontons at a time (overcrowding drops oil temperature significantly), carefully lower them into the hot oil using a slotted spoon or skimmer basket. They'll sink initially, then float. Once they float, gently turn them with a slotted spoon every 30-40 seconds to ensure even browning on all sides. The entire process should take 3-5 minutes total. For gluten-free wrappers specifically, watch carefully—they can brown slightly faster than wheat versions, so begin checking color at the 2-minute mark. You're looking for a deep golden-brown color, almost the shade of a honey-roasted almond. Remove each batch with your slotted spoon and transfer immediately to your paper towel-lined plate.

Step 7: Season and Serve Immediately
- While wontons are still steaming, sprinkle them with a pinch of fine salt and your minced fresh chives. The residual heat will slightly wilt the chives, intensifying their flavor. Serve within 2-3 minutes of frying for maximum crispness. These are best served with a dipping sauce—sweet and sour sauce, soy-based dipping sauce, or even a simple honey-sriracha blend all work beautifully. For dairy-free and vegan versions, a peanut dipping sauce made with tamari creates a cohesive flavor profile.