
Ingredients
Method
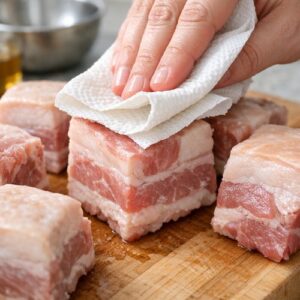
Step 1: Prepare Your Pork and Understand Your Canvas
- Pat your pork belly pieces completely dry with paper towels. Moisture on the surface prevents the Maillard reaction—that golden, flavorful crust you're after. Wet surfaces steam instead of sear, and you'll end up with gray, disappointing meat. Take your time here. This isn't rushing. Season each piece generously with salt and a few grinds of black pepper on all sides. Let the meat sit at room temperature for 15 minutes while you gather your other ingredients. Room temperature meat cooks more evenly than cold meat—this is an absolute principle of cooking. The outside won't overcook while you wait for the inside to catch up.
Step 2: Create the Maillard Reaction Through Strategic Searing
- Heat a heavy-bottomed braising pot or Dutch oven over medium-high heat for 3 full minutes. You want it genuinely hot. Add a thin film of neutral oil (I use avocado oil for its high smoke point). Once it shimmers—and this is important—you'll see the oil move like water across glass, creating that characteristic ripple—you're ready to sear. Working in batches so you don't overcrowd the pan, place the pork belly pieces skin-side down first. Don't move them. I mean it. Let them sit undisturbed for 4-5 minutes. You're building flavor through contact with heat. When you peek, you should see a deep golden-brown crust forming. Flip each piece and sear the other sides for 3-4 minutes each. Once all pieces are seared, transfer them to a plate. The pot will have brown, crusty bits stuck to the bottom—those are flavor bombs called the fond, and we're about to use them. Don't wash the pot.

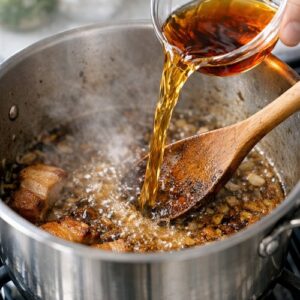
Step 3: Build the Braising Liquid Base Through Deglazing
- Reduce heat to medium. Pour in your cup of Shaoxing rice wine. Use a wooden spoon to scrape all those brown bits from the bottom of the pot—this is called deglazing, and it's releasing all that concentrated flavor into your liquid. You should hear a gentle sizzle. Let this bubble away for 2 minutes, then add your broth. Now add both the light and dark soy sauces. The mixture should smell intensely savory, almost overwhelming. That's exactly right. This concentrated aroma tells you the umami compounds are already beginning to work. Add your rock sugar—it'll seem like a small amount, but it's balanced deliberately to be barely perceptible sweetness.
Step 4: Create an Aromatic Infusion Layer
- Add your ginger slices, star anise, and bay leaves to the liquid. Gently nestle the seared pork belly pieces back into the pot, skin-side up. The liquid should come about three-quarters of the way up the meat—if it's completely covered, you have too much liquid. If only a quarter is submerged, you have too little. You're aiming for that three-quarter mark because you want the top surface exposed to the gentler, drier heat of the oven. Pour a drizzle of sesame oil over the top—not mixed in, but sitting on the surface. This volatile oil will infuse the topmost meat as it braises. This is a technique detail most recipes skip, but it creates incredible fragrance.

Step 5: Control Your Heat Environment for Even Cooking
- Cover your pot with a lid (or tightly fitting foil if you don't have one) and transfer to a 325°F oven. This low, steady heat is critical. Stovetop braising on low heat works, but oven braising is superior because the heat surrounds the pot evenly from all sides, creating consistent, gentle cooking. Set a timer for 2 hours and 45 minutes. Don't open the pot to check. Every time you lift that lid, you release heat and moisture, extending cooking time. You're building an environment where collagen can gradually transform into gelatin, and that process doesn't appreciate interruptions.

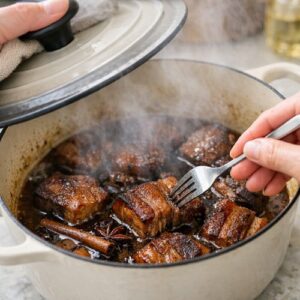
Step 6: Recognize Doneness Through Touch and Appearance
- After 2 hours and 45 minutes, carefully remove the pot from the oven. Lift the lid away from you so the steam escapes away from your face. Insert a fork into one of the largest pork pieces. If it slides through with no resistance, like the meat is already giving up, you're there. The meat should be absolutely tender but still holding its shape—not falling apart, but easily yielding to any pressure. The surface of the braising liquid should look glossy and dark, almost mahogany-colored. The aroma should be complex—you should smell the anise and ginger beneath the soy depth. If the meat still offers slight resistance, give it another 20 minutes and check again. Some pork bellies are fattier than others, and fat takes time to fully render.
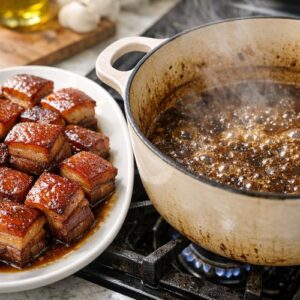
Step 7: Finish and Enhance Through Reduction and Resting
- Transfer the cooked pork belly pieces to a serving platter, arranging them skin-side up. Place the uncovered pot on the stovetop over medium-high heat. Let the braising liquid bubble gently for 5-8 minutes. You're reducing it—evaporating excess liquid and concentrating flavors. The sauce should become noticeably glossier and darker, coating a spoon when you dip it in. Pour this reduced sauce over the pork belly. Let everything rest for 5 minutes before serving. This resting period allows the meat fibers to relax and reabsorb some of the juices, ensuring every bite is moist and flavorful.
Notes
- Searing in a Wet Pot - if your seared pork comes out gray instead of golden-brown, your pot wasn't hot enough or dry enough at the start. The fix: preheat for a full 3 minutes, ensure your meat is completely dry with paper towels, and only proceed when oil is actually shimmering. This is non-negotiable
- Cooking at Too High a Temperature - if your liquid is boiling vigorously instead of gently simmering, your meat will become tough and dry. The braising temperature should barely move the surface of the liquid. If you see rolling boils, lower your oven to 300°F or reduce your stovetop heat
- Not Reducing the Sauce - if your finished dish tastes delicious but the sauce is thin and watery, you skipped the reduction step. Bring that liquid to a gentle boil on the stovetop and let it reduce by about half. This concentrates flavors and creates that glossy, elegant finish
- Opening the Pot Too Often - every time you peek, you extend cooking time by 10-15 minutes. Set a timer, trust the process, and resist the urge to check. One peek at the beginning (around 2 hours) is fine; constant checking is not
- Using Meat That's Too Cold - if your pork goes straight from the refrigerator to the pot, it will cook unevenly. Always bring it to room temperature first. This takes 20-30 minutes and makes a visible difference