Braised Pork Belly Recipe
This post contains affiliate links. As an Amazon Associate I earn from qualifying purchases.
Learning to make braised pork belly isn’t just about this one dish—it’s about mastering a technique that unlocks dozens of other recipes in your kitchen forever. When I was training as a dietitian, I realized something crucial: the most nourishing meals aren’t always the fanciest ones. They’re the ones made with patience, intention, and time. Braising taught me that. It’s the same fundamental technique behind everything from Asian Beef Shank to tender BBQ Chinese Pork, and once you understand it in your bones, your cooking transforms completely.
Master the Technique Behind Braised Pork Belly (And Never Struggle in the Kitchen Again)
I still remember the exact moment braising clicked for me. I was seventeen, standing in my grandmother’s kitchen on a gray Sunday afternoon. She’d pulled out a massive clay pot—the kind that felt older than time itself—and began arranging thick-cut pork belly inside with such ceremony you’d have thought she was arranging precious stones. I watched as she seared the meat until the fat rendered and the edges turned golden, filling the kitchen with a smell so rich and alive it made my chest tight.
“Willie,” she said, without looking at me, “cooking isn’t about rushing. It’s about inviting flavors to become friends.” She poured in rice wine, soy sauce, and aromatics, covered the pot, and let the oven do the work. Three hours later, when she lifted that lid, the meat fell apart at the gentlest touch of a spoon. I understood then that cooking was chemistry, but it was also love made visible.

The Core Technique Explained
Braising is the marriage of high heat and low-and-slow cooking, and it’s one of the most transformative techniques in the kitchen. Here’s how it works: you begin with intense, direct heat to sear the protein on all sides. This isn’t just for color—it’s searing in flavor through the Maillard reaction, a chemical process where proteins and sugars bond at high temperatures, creating entirely new flavor compounds that didn’t exist before.
Once that golden crust is achieved, you transfer everything to a covered pot with liquid (in this case, a mixture of rice wine, soy sauces, and aromatics) and move to gentle, even heat—either in a low oven or on the stovetop. The liquid never boils; it barely simmers. This slow environment does something miraculous: the collagen in the pork belly—all that connective tissue that makes raw belly tough and chewy—breaks down into gelatin over hours. The meat becomes impossibly tender while the fat renders into silky smoothness that coats your mouth.
The aromatics (ginger, star anise, bay leaf) infuse the braising liquid, which in turn gets reabsorbed by the meat. It’s a two-way conversation between ingredient and cooking medium. The soy sauces add umami depth—those savory compounds that make food taste more like itself—while the rock sugar balances the saltiness and adds a subtle gloss to the finished dish.
What This Technique Unlocks
Once you master the braising method, you’re not just making one dish—you’re opening a door to an entire world of tender, soul-satisfying meals. The same principles that create perfect pork belly work for beef shanks, chicken thighs, lamb shoulders, and even vegetables. Here are the dishes that suddenly become accessible:
- Asian Beef Shank – uses identical searing and braising technique with different aromatics and cooking time
- Barbecued Chinese Pork – applies the same Maillard reaction and glazing principles for a caramelized finish
- Pork Belly Bao Filling – uses your braised pork as the foundation for a completely different presentation
- Long-Cooked Lamb Shoulder – teaches you how braising transforms tougher cuts into luxury in three hours
- Wine-Braised Chicken Thighs – shows how the technique adapts perfectly to poultry with less cooking time
- Root Vegetable Braises – demonstrates that braising works beautifully for vegetables too, creating incredible depth
The Ingredients – Chosen to Teach the Technique
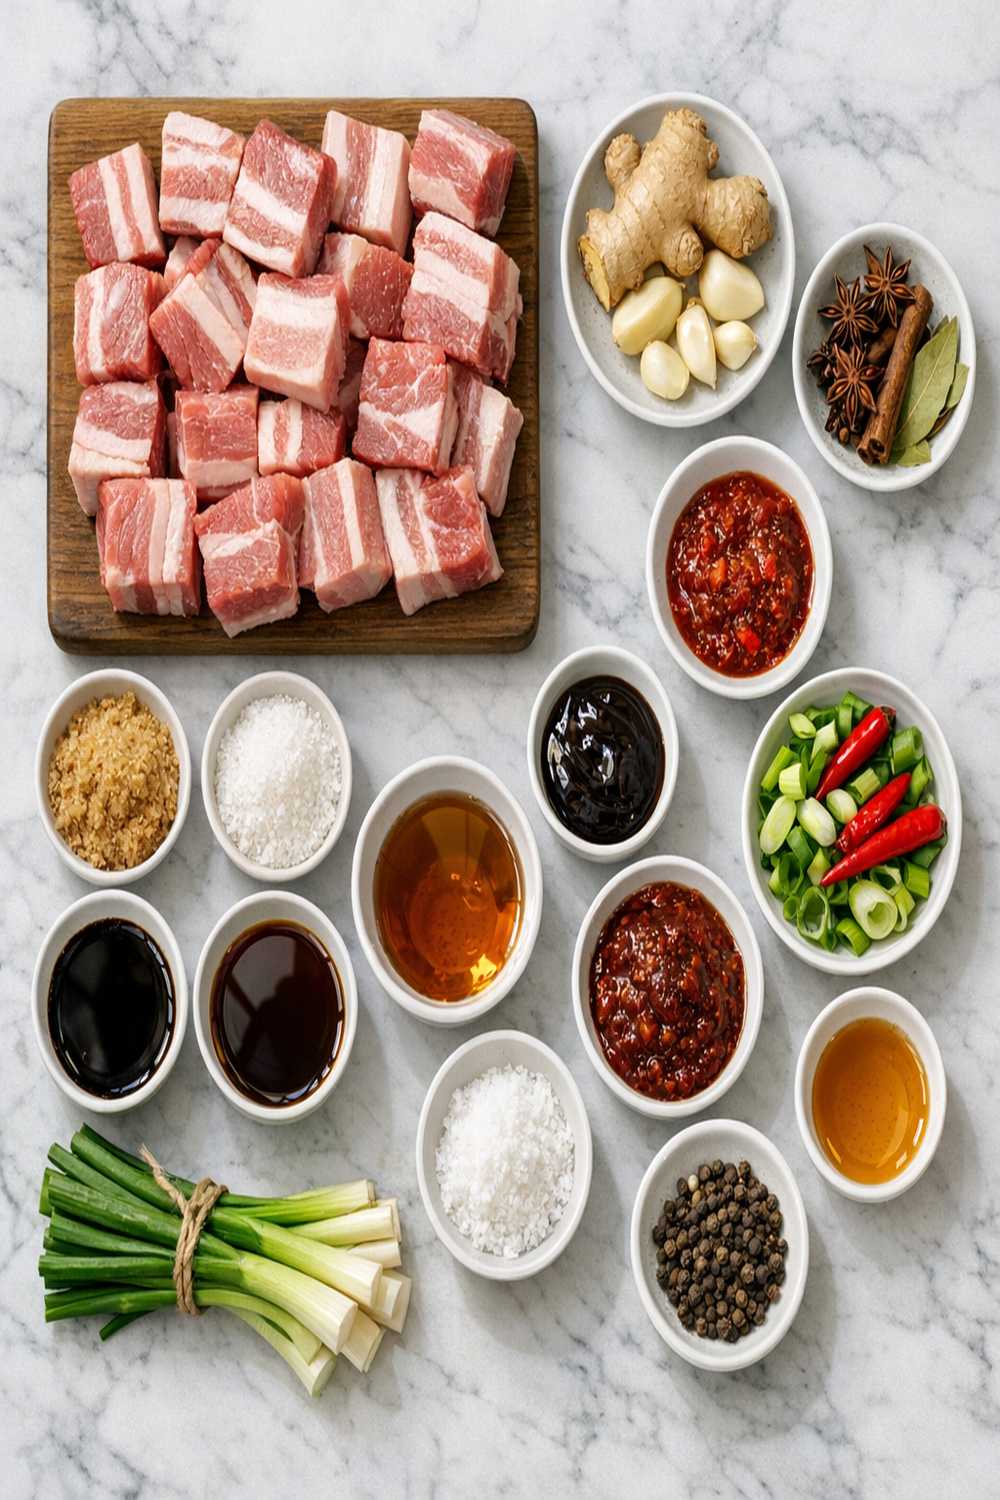
Every single ingredient in this recipe was chosen deliberately because it teaches you something essential about braising. There are no filler ingredients here—each one has a specific role in demonstrating why this technique works so beautifully. I’ve arranged them by their function so you can see how different elements contribute to the finished dish.
The Foundation
- 600 grams pork belly, skin-on and cut into 2-inch cubes (this specific size allows even cooking and showcases how connective tissue transforms)
- 1 cup Shaoxing rice wine or dry sherry (the acidity cuts through richness while the alcohol burns off, leaving only subtle complexity—this is critical for demonstrating why liquid selection matters)
- 3 tablespoons light soy sauce (provides umami and saltiness without overpowering)
- 1 tablespoon dark soy sauce (adds color depth and a slightly sweeter note that balances the brine)
The Aromatic Layer
- 2 bay leaves (teaches the principle of understated aromatics that work in the background)
- 6 thin slices fresh ginger, unpeeled (the skin contains volatile oils that infuse the braising liquid; this teaches you why peeling matters less than you think)
- 2 whole star anise (each point contains anethole, a compound that gives that licorice note—demonstrates how a tiny amount of the right spice creates enormous impact)
The Balancing Elements
- 1 cup low-sodium chicken or vegetable broth (extends the braising liquid and demonstrates the importance of dilution in preventing oversaltiness)
- 1 tablespoon sesame oil for finishing (added at the very end; this teaches how volatile flavor compounds work best when introduced late)
- 20 grams rock sugar, or 1 tablespoon regular granulated sugar (rock sugar dissolves slowly, teaching patience; it also adds shine to the finished glaze through a process called caramelization)
Expert’s Nutritional Tip: Pork belly contains significant amounts of B vitamins—particularly B12 and niacin—which are crucial for energy metabolism. The braising technique doesn’t diminish these nutrients; in fact, the slow cooking breaks down some cell structures, potentially making certain minerals more bioavailable. The collagen that transforms into gelatin also provides amino acids your body uses for joint, skin, and gut health. This isn’t health food in the modern sense, but it’s genuinely nourishing food in the way our ancestors understood nutrition.
The Masterclass: How to Make Braised Pork Belly
I’m going to walk you through this recipe as if you’re standing in the kitchen with me, and I want you to focus on understanding why each step matters. That’s how you become a real cook instead of someone just following instructions.
Step 1: Prepare Your Pork and Understand Your Canvas
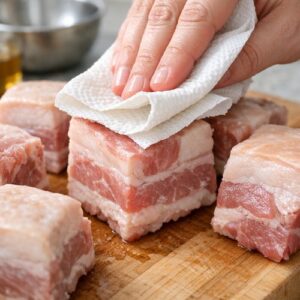
Pat your pork belly pieces completely dry with paper towels. Moisture on the surface prevents the Maillard reaction—that golden, flavorful crust you’re after. Wet surfaces steam instead of sear, and you’ll end up with gray, disappointing meat. Take your time here. This isn’t rushing.
Season each piece generously with salt and a few grinds of black pepper on all sides. Let the meat sit at room temperature for 15 minutes while you gather your other ingredients. Room temperature meat cooks more evenly than cold meat—this is an absolute principle of cooking. The outside won’t overcook while you wait for the inside to catch up.

Step 2: Create the Maillard Reaction Through Strategic Searing
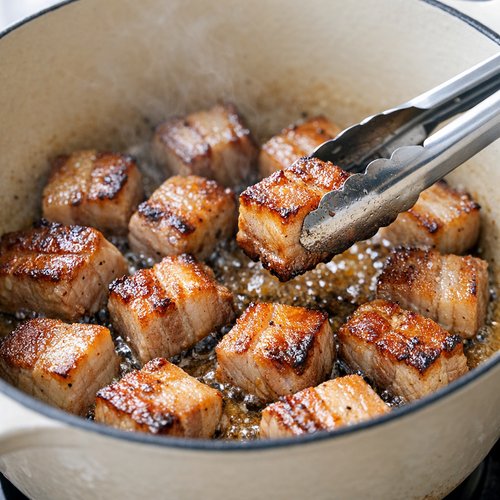
Heat a heavy-bottomed braising pot or Dutch oven over medium-high heat for 3 full minutes. You want it genuinely hot. Add a thin film of neutral oil (I use avocado oil for its high smoke point). Once it shimmers—and this is important—you’ll see the oil move like water across glass, creating that characteristic ripple—you’re ready to sear.
Working in batches so you don’t overcrowd the pan, place the pork belly pieces skin-side down first. Don’t move them. I mean it. Let them sit undisturbed for 4-5 minutes. You’re building flavor through contact with heat. When you peek, you should see a deep golden-brown crust forming. Flip each piece and sear the other sides for 3-4 minutes each.
Once all pieces are seared, transfer them to a plate. The pot will have brown, crusty bits stuck to the bottom—those are flavor bombs called the fond, and we’re about to use them. Don’t wash the pot.
Step 3: Build the Braising Liquid Base Through Deglazing
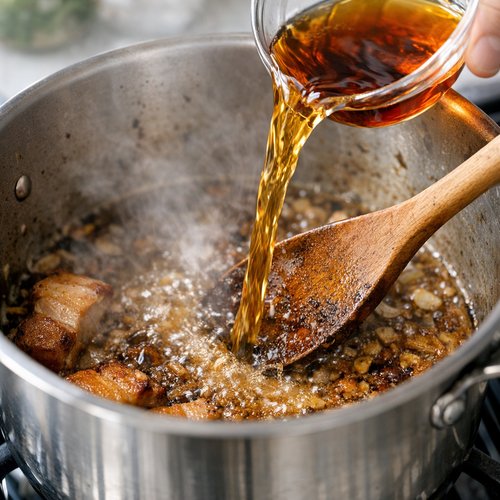
Reduce heat to medium. Pour in your cup of Shaoxing rice wine. Use a wooden spoon to scrape all those brown bits from the bottom of the pot—this is called deglazing, and it’s releasing all that concentrated flavor into your liquid. You should hear a gentle sizzle. Let this bubble away for 2 minutes, then add your broth.
Now add both the light and dark soy sauces. The mixture should smell intensely savory, almost overwhelming. That’s exactly right. This concentrated aroma tells you the umami compounds are already beginning to work. Add your rock sugar—it’ll seem like a small amount, but it’s balanced deliberately to be barely perceptible sweetness.
Step 4: Create an Aromatic Infusion Layer
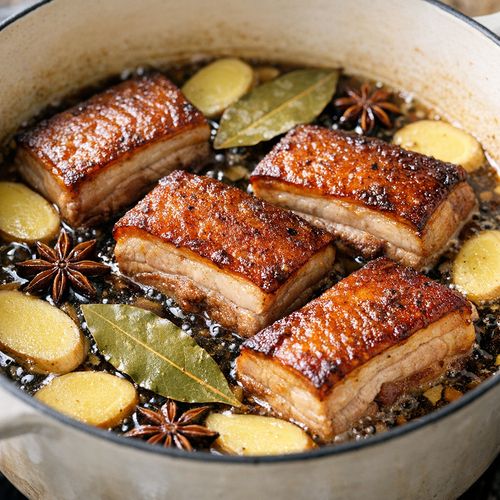
Add your ginger slices, star anise, and bay leaves to the liquid. Gently nestle the seared pork belly pieces back into the pot, skin-side up. The liquid should come about three-quarters of the way up the meat—if it’s completely covered, you have too much liquid. If only a quarter is submerged, you have too little. You’re aiming for that three-quarter mark because you want the top surface exposed to the gentler, drier heat of the oven.
Pour a drizzle of sesame oil over the top—not mixed in, but sitting on the surface. This volatile oil will infuse the topmost meat as it braises. This is a technique detail most recipes skip, but it creates incredible fragrance.
Step 5: Control Your Heat Environment for Even Cooking
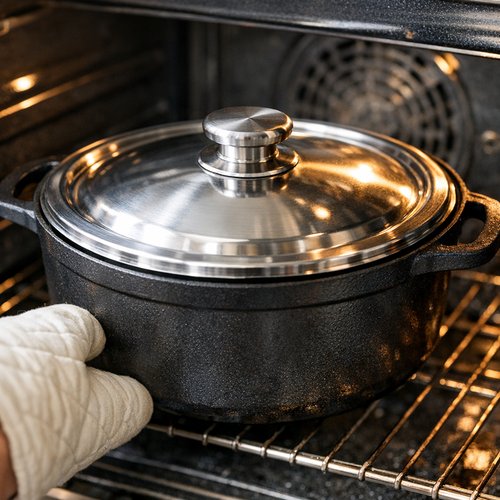
Cover your pot with a lid (or tightly fitting foil if you don’t have one) and transfer to a 325°F oven. This low, steady heat is critical. Stovetop braising on low heat works, but oven braising is superior because the heat surrounds the pot evenly from all sides, creating consistent, gentle cooking.
Set a timer for 2 hours and 45 minutes. Don’t open the pot to check. Every time you lift that lid, you release heat and moisture, extending cooking time. You’re building an environment where collagen can gradually transform into gelatin, and that process doesn’t appreciate interruptions.
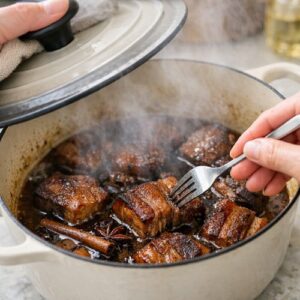
Step 6: Recognize Doneness Through Touch and Appearance
After 2 hours and 45 minutes, carefully remove the pot from the oven. Lift the lid away from you so the steam escapes away from your face. Insert a fork into one of the largest pork pieces. If it slides through with no resistance, like the meat is already giving up, you’re there. The meat should be absolutely tender but still holding its shape—not falling apart, but easily yielding to any pressure.
The surface of the braising liquid should look glossy and dark, almost mahogany-colored. The aroma should be complex—you should smell the anise and ginger beneath the soy depth. If the meat still offers slight resistance, give it another 20 minutes and check again. Some pork bellies are fattier than others, and fat takes time to fully render.

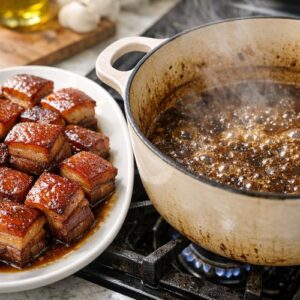
Step 7: Finish and Enhance Through Reduction and Resting
Transfer the cooked pork belly pieces to a serving platter, arranging them skin-side up. Place the uncovered pot on the stovetop over medium-high heat. Let the braising liquid bubble gently for 5-8 minutes. You’re reducing it—evaporating excess liquid and concentrating flavors. The sauce should become noticeably glossier and darker, coating a spoon when you dip it in.
Pour this reduced sauce over the pork belly. Let everything rest for 5 minutes before serving. This resting period allows the meat fibers to relax and reabsorb some of the juices, ensuring every bite is moist and flavorful.

How to Know You’ve Mastered the Technique
Technique mastery isn’t theoretical—it’s sensory. Here’s exactly what tells you when you’ve truly understood braising:
- The Fork Test – when you insert a fork into the largest piece of pork and it slides through like the meat is butter, offering zero resistance, you’ve achieved proper collagen breakdown. If it requires any pressure at all, you need more time. If it shreds apart completely, you’re past the sweet spot (though not ruined—it’ll still taste good)
- The Appearance of the Sauce – properly reduced braising liquid should coat the back of a spoon with a glossy sheen that’s almost jewel-like in its darkness. If it still looks thin and watery, you haven’t reduced it enough. If it’s thick and syrupy, you’ve gone too far
- The Aroma Development – when you first open the pot, you should smell not one dominant note but layers: the underlying pork richness, then the ginger and anise complexity, then the soy depth. If it smells one-dimensional, the aromatics haven’t had time to infuse properly
- The Skin Texture – the pork belly skin should still have a slight chew to it—not crispy, but not rubbery either. Perfectly braised skin is tender but holds its shape and has a gentle tackiness from the sauce
Common Technique Mistakes and How to Fix Them
- Searing in a Wet Pot – if your seared pork comes out gray instead of golden-brown, your pot wasn’t hot enough or dry enough at the start. The fix: preheat for a full 3 minutes, ensure your meat is completely dry with paper towels, and only proceed when oil is actually shimmering. This is non-negotiable
- Cooking at Too High a Temperature – if your liquid is boiling vigorously instead of gently simmering, your meat will become tough and dry. The braising temperature should barely move the surface of the liquid. If you see rolling boils, lower your oven to 300°F or reduce your stovetop heat
- Not Reducing the Sauce – if your finished dish tastes delicious but the sauce is thin and watery, you skipped the reduction step. Bring that liquid to a gentle boil on the stovetop and let it reduce by about half. This concentrates flavors and creates that glossy, elegant finish
- Opening the Pot Too Often – every time you peek, you extend cooking time by 10-15 minutes. Set a timer, trust the process, and resist the urge to check. One peek at the beginning (around 2 hours) is fine; constant checking is not
- Using Meat That’s Too Cold – if your pork goes straight from the refrigerator to the pot, it will cook unevenly. Always bring it to room temperature first. This takes 20-30 minutes and makes a visible difference
Practice Variations to Build Your Skill
Mastery comes through repetition with intentional variation. Here are three progressively more challenging versions that will deepen your understanding:
Beginner Level: Classic Version (What You Just Made)
Make the recipe exactly as written. Your only job is to nail the searing, understand the timing, and learn what proper doneness feels like. Don’t improvise. Don’t substitute. Master the foundation first.
Intermediate Level: Temperature Control Challenge
Make the recipe again, but this time use stovetop braising instead of oven braising. Place the covered pot on the lowest heat your stove offers. Your challenge: keep the liquid at a bare simmer—just a few lazy bubbles breaking the surface every few seconds. This requires more attention than oven braising (you’ll need to check temperature every 30 minutes with a thermometer), but it teaches you heat control in a way oven braising never will. Cooking time may extend to 3.5 hours.
Advanced Level: Ratio Mastery and Improvisation
Make the recipe using only the proportions, no specific measurements. Use 600 grams of meat, then decide: how much liquid does this need? Should it be more wine or more broth? More aromatics or fewer? How much sugar balances your specific soy choice? This version teaches you that braising is a ratio-based technique, not a rigid formula. You’re thinking like a chef now, not following a recipe.
Can I Store Braised Pork Belly?
Refrigerator Storage (Best Option): This dish actually improves in the refrigerator. The pork belly can be stored in its braising liquid in an airtight container for up to 4 days. The flavors meld and deepen overnight. To reheat, warm gently on the stovetop over medium-low heat, covered, for about 10 minutes, stirring occasionally. The sauce will re-emulsify and the meat will become silky again.
Freezer Storage: Pork belly freezes beautifully for up to 3 months, as long as it’s stored with its braising liquid. Freeze in portion-sized containers or heavy-duty freezer bags, removing as much air as possible. Thaw overnight in the refrigerator before reheating. The long freezing actually helps—when you thaw and reheat, the flavors seem even more integrated.
Make-Ahead Guide: Here’s how I approach this dish for entertaining: I braise the pork belly the day before your gathering. Cool it completely, then refrigerate overnight. The next day, reheat it gently on the stovetop while you finish other elements of your meal. This actually reduces your stress on the cooking day and guarantees perfectly executed pork belly. You can also braise it and immediately cool it in an ice bath, then refrigerate for up to 4 days before the event.
Nutrition Information
Based on USDA food data, one serving of braised pork belly (approximately 150 grams of meat with 3 tablespoons of sauce) contains:
- Calories: 420-450 per serving
- Protein: 32 grams (crucial for muscle maintenance and satiety)
- Fat: 32 grams, primarily from rendered pork fat (contains beneficial compounds like oleic acid found in olive oil)
- Carbohydrates: 3-4 grams (mainly from the rock sugar and soy sauces)
- Sodium: 680-720 mg (about 30% of daily recommended intake)
- Iron: 2.1 mg (about 12% of daily value—pork is an excellent source of heme iron, which your body absorbs efficiently)
- B12: 0.6 mcg (about 25% of daily value)
- Selenium: 35 mcg (about 64% of daily value—important for thyroid function)
Nutritional Context: This is not a light dish, and it shouldn’t be. Pork belly is nutrient-dense rather than calorie-light. The rendered fat aids absorption of fat-soluble vitamins (A, D, E, K), and the collagen provides amino acids your body uses for joint and digestive health. Serve in proper portions (100-150 grams per person) with vegetables and grains, and you have a genuinely balanced meal despite the richness.
What to Serve With Braised Pork Belly?
The pork belly’s richness demands complementary sides that provide contrast and balance. These aren’t random pairings—each one works because of specific flavor and texture principles:
- Steamed White Rice or Jasmine Rice – the simplest pairing, and genuinely the best. Mild, slightly sweet rice provides neutral territory where the complex braising sauce shines. The starch absorbs excess sauce so nothing goes to waste
- Sautéed Bok Choy or Gai Lan – these Asian greens have mineral bitterness that cuts through pork richness perfectly. Sauté in garlic and sesame oil for 4 minutes until just tender
- Quick Pickled Vegetables – try thin-sliced daikon radish or cucumber tossed with rice vinegar, sugar, and salt for 30 minutes. The acidity provides brightness that prevents the dish from feeling heavy
- Steamed Buns or Mantou – if you want something special, try Bao with Pork Belly Filling, which transforms this braised meat into an entirely different experience while highlighting the exact same cooking technique
- Stir-Fried Bamboo Shoots – their delicate, slightly sweet flavor and crisp texture provide textural contrast to the tender pork. Try the Bamboo Sprouts Recipe as a guide
- Miso Soup or Simple Broth – a small bowl of something light and salty helps cleanse your palate between rich, meaty bites
Braised Pork Belly Recipe
Ingredients
Method
- Pat your pork belly pieces completely dry with paper towels. Moisture on the surface prevents the Maillard reaction—that golden, flavorful crust you're after. Wet surfaces steam instead of sear, and you'll end up with gray, disappointing meat. Take your time here. This isn't rushing. Season each piece generously with salt and a few grinds of black pepper on all sides. Let the meat sit at room temperature for 15 minutes while you gather your other ingredients. Room temperature meat cooks more evenly than cold meat—this is an absolute principle of cooking. The outside won't overcook while you wait for the inside to catch up.
- Heat a heavy-bottomed braising pot or Dutch oven over medium-high heat for 3 full minutes. You want it genuinely hot. Add a thin film of neutral oil (I use avocado oil for its high smoke point). Once it shimmers—and this is important—you'll see the oil move like water across glass, creating that characteristic ripple—you're ready to sear. Working in batches so you don't overcrowd the pan, place the pork belly pieces skin-side down first. Don't move them. I mean it. Let them sit undisturbed for 4-5 minutes. You're building flavor through contact with heat. When you peek, you should see a deep golden-brown crust forming. Flip each piece and sear the other sides for 3-4 minutes each. Once all pieces are seared, transfer them to a plate. The pot will have brown, crusty bits stuck to the bottom—those are flavor bombs called the fond, and we're about to use them. Don't wash the pot.

- Reduce heat to medium. Pour in your cup of Shaoxing rice wine. Use a wooden spoon to scrape all those brown bits from the bottom of the pot—this is called deglazing, and it's releasing all that concentrated flavor into your liquid. You should hear a gentle sizzle. Let this bubble away for 2 minutes, then add your broth. Now add both the light and dark soy sauces. The mixture should smell intensely savory, almost overwhelming. That's exactly right. This concentrated aroma tells you the umami compounds are already beginning to work. Add your rock sugar—it'll seem like a small amount, but it's balanced deliberately to be barely perceptible sweetness.

- Add your ginger slices, star anise, and bay leaves to the liquid. Gently nestle the seared pork belly pieces back into the pot, skin-side up. The liquid should come about three-quarters of the way up the meat—if it's completely covered, you have too much liquid. If only a quarter is submerged, you have too little. You're aiming for that three-quarter mark because you want the top surface exposed to the gentler, drier heat of the oven. Pour a drizzle of sesame oil over the top—not mixed in, but sitting on the surface. This volatile oil will infuse the topmost meat as it braises. This is a technique detail most recipes skip, but it creates incredible fragrance.

- Cover your pot with a lid (or tightly fitting foil if you don't have one) and transfer to a 325°F oven. This low, steady heat is critical. Stovetop braising on low heat works, but oven braising is superior because the heat surrounds the pot evenly from all sides, creating consistent, gentle cooking. Set a timer for 2 hours and 45 minutes. Don't open the pot to check. Every time you lift that lid, you release heat and moisture, extending cooking time. You're building an environment where collagen can gradually transform into gelatin, and that process doesn't appreciate interruptions.

- After 2 hours and 45 minutes, carefully remove the pot from the oven. Lift the lid away from you so the steam escapes away from your face. Insert a fork into one of the largest pork pieces. If it slides through with no resistance, like the meat is already giving up, you're there. The meat should be absolutely tender but still holding its shape—not falling apart, but easily yielding to any pressure. The surface of the braising liquid should look glossy and dark, almost mahogany-colored. The aroma should be complex—you should smell the anise and ginger beneath the soy depth. If the meat still offers slight resistance, give it another 20 minutes and check again. Some pork bellies are fattier than others, and fat takes time to fully render.
- Transfer the cooked pork belly pieces to a serving platter, arranging them skin-side up. Place the uncovered pot on the stovetop over medium-high heat. Let the braising liquid bubble gently for 5-8 minutes. You're reducing it—evaporating excess liquid and concentrating flavors. The sauce should become noticeably glossier and darker, coating a spoon when you dip it in. Pour this reduced sauce over the pork belly. Let everything rest for 5 minutes before serving. This resting period allows the meat fibers to relax and reabsorb some of the juices, ensuring every bite is moist and flavorful.
Notes
FAQs
What’s the difference between braising and stewing, and does it matter for this technique?
Braising and stewing are actually different cooking methods often confused. Braising uses less liquid (your meat is about three-quarters submerged), higher heat, and typically cooks larger cuts whole or in large pieces. Stewing uses more liquid (everything is covered), slightly lower heat, and breaks meat into smaller chunks. For pork belly specifically, braising is superior because keeping pieces larger prevents them from breaking apart and allows you to develop that beautiful seared crust. The technique teaches you precision in controlling your cooking environment.
Can I use a slow cooker or Instant Pot instead of the oven?
You can, but you’re losing the crucial searing step if you skip it. You must sear the pork in a separate pot first, then transfer to your slow cooker with the liquid. For slow cooker: cook on low for 6-8 hours. For Instant Pot: pressure cook on high for 25 minutes after searing, then do a natural release. Both work, but neither teaches you heat control the way oven braising does. If convenience is essential, do it—the result is still delicious. But if you’re learning technique, oven braising is your best teacher.
Why Shaoxing wine specifically? Can I substitute with something else?
Shaoxing rice wine has a specific flavor profile—slightly sweet, with warm undertones—that complements pork beautifully. You can substitute with dry sherry in a 1:1 ratio, or even dry white wine, though the result will be slightly different. You can’t substitute with rice vinegar (too acidic) or mirin (too sweet) without adjusting other ingredients. If you truly can’t find Shaoxing wine, dry sherry is genuinely your best alternative. The technique principle: the liquid should have enough acidity to cut through fat, but also enough body to become part of the final sauce. Choose your substitute with that principle in mind.
How do I know if my pork belly is cooked through safely?
Pork doesn’t need to reach the high temperatures beef sometimes does. Your braised pork belly is safely cooked at 160-165°F internal temperature, but here’s the better indicator: texture. Fully braised pork belly should pull apart easily, show no resistance to a fork, and have completely rendered fat (the meat should feel silky, never grainy or dry). If you want to be precise, use an instant-read thermometer in the thickest piece. Once it hits 160°F, it’s safe. The braising liquid’s gentle environment actually keeps it moist even at higher temperatures, unlike roasting.
My sauce seems too salty—what do I do?
First, don’t add more sugar to mask saltiness—that’s not the solution. If you’ve already reduced the sauce and it’s still oversalty, here’s the fix: add more of the non-salty components. A splash of water or a splash of rice wine can dilute the saltiness while bringing back some of the original balance. Alternatively, serve with something completely bland—white rice, plain steamed vegetables, or plain bread. The richness of the pork with some of that salty sauce on mild starches actually becomes balanced. For future batches, reduce your soy sauce amounts slightly. Soy saltiness is forward—it hits immediately—so you often need less than recipes suggest.
Can I braise different vegetables in this same liquid after removing the pork?
Absolutely, and this teaches you something important about braising liquid as a multi-use tool. After you remove the pork, strain the braising liquid if you like, or leave the aromatics in. Return it to a pot and bring to a simmer. Add cut vegetables—potatoes, carrots, turnips, anything you like—and braise until tender (30-45 minutes depending on size and density). The vegetables will absorb all that developed pork flavor, and you’ll have an intensely flavored vegetable side that seems like you’ve been cooking all day. This is technique mastery: understanding that braising liquid is precious and reusable.
More Recipes Using This Technique
- Banh Mi Burger Recipe – uses shredded braised pork as the protein foundation with bright pickled vegetables for contrast
- Bacon Ramen Recipe – teaches you how to build rich braising-style broths for noodle dishes
You’ve just learned one of cooking’s most powerful techniques, and I want you to feel genuinely proud of that. Braising isn’t trendy or flashy, but it’s ancient wisdom passed down because it works. My grandmother understood that patience and proper technique transform humble ingredients into something magical. That same understanding now lives in your hands.
Every time you sear meat until it’s golden, every time you let something simmer gently in a covered pot, every time you wait for the fork to slide through with no resistance—you’re doing exactly what my grandmother did decades ago. You’re building nourishment and flavor the slow way, the right way.
Now go braise something. Make it twice. Make it three times. Make it until you can do it without thinking about the recipe, until your hands know the temperature by feel and your nose can tell when aromatics have infused the liquid. That’s when you’ll truly own this technique.
Happy Cooking!