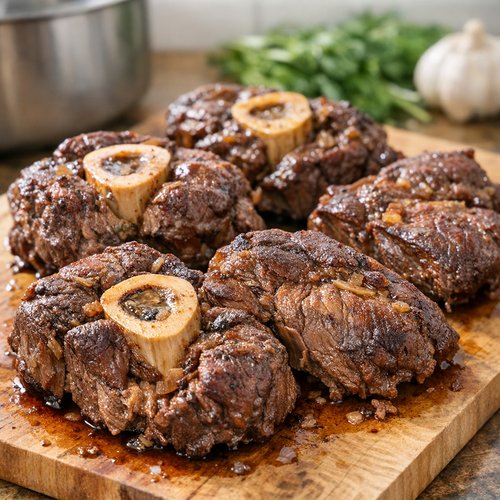
Asian Beef Shank Recipe
This post contains affiliate links. As an Amazon Associate I earn from qualifying purchases.
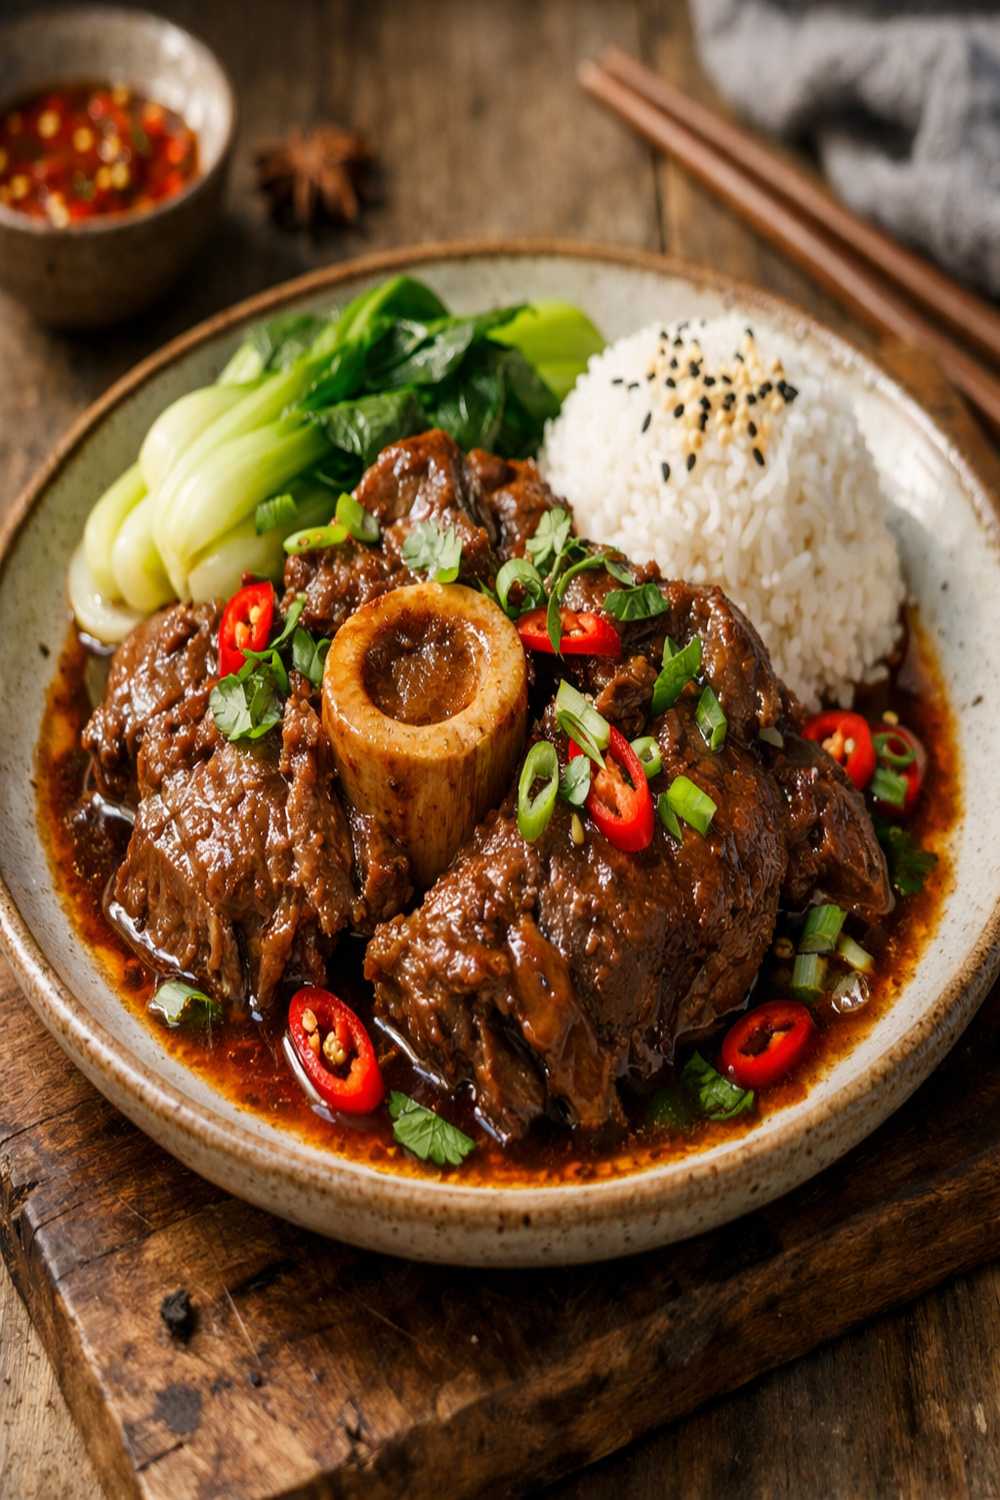
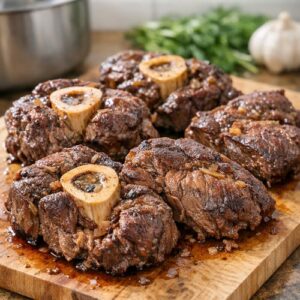
There’s something sacred about a dish that asks you to slow down, to trust the process, and to let time do the heavy lifting. This braised beef shank carries the warmth of Asian spice traditions—a recipe that transforms humble collagen-rich meat into something tender, deeply flavorful, and nourishing. Pair it with steamed rice, fresh greens, or even alongside authentic shrimp fried rice, and you’ve built a meal that feels both celebratory and comforting.
A Pot, Some Spices, and a Lifetime of Memories
I still remember watching my grandmother in her Worcester kitchen on Sunday afternoons, the whole house filling with that unmistakable aroma—cinnamon, star anise, the faint sweetness of liquorice. She’d have beef shanks simmering low and slow for hours, the braising liquid turning mahogany-dark and glossy. I’d sit at the kitchen table doing homework, occasionally peeking into that pot, mesmerized by how such an unassuming cut of meat could become so incredibly tender and flavorful.
What she didn’t tell me then—what I learned years later as a registered dietitian—was that she was also building nutrition into every bowl. Those long cooking times broke down connective tissue into gelatin and collagen, creating a broth rich in amino acids and minerals. The aromatic spices she used weren’t just for flavor; they’ve been used in traditional medicine for generations to aid digestion and reduce inflammation.
What is Asian Beef Shank Recipe?
Braised beef shank is one of those dishes that exists across cultures—from Vietnamese bo kho to Chinese red-braised beef to Korean jjim. This particular version draws from the Chinese tradition of low-and-slow braising, where a complex blend of warm spices, soy, and aromatics infuse beef shank with depth and soul-satisfying richness.
The beauty of beef shank lies in its structure. This is a working muscle, loaded with connective tissue and collagen. When you braise it properly—keeping the temperature low and the time patient—that collagen converts to gelatin, and the meat becomes fork-tender. The result is a dish that’s not just delicious but genuinely nourishing, providing bioavailable collagen, iron, zinc, and B vitamins.
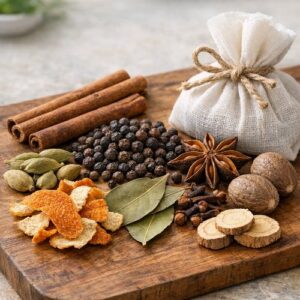
The spice blend you’ll build is called 五香 (wu xiang), or “five-spice,” though traditional versions often contain more than five. Each spice serves a purpose: cinnamon for warmth, star anise for subtle licorice sweetness, cloves for depth, Sichuan peppercorns for gentle numbing heat, and cardamom for aromatic complexity.
Why You’ll Love This Asian Beef Shank Recipe
- It’s genuinely low-effort cooking. Once you’ve prepared your ingredients and brought everything to a boil, you’re simply letting time and gentle heat do the work. No constant stirring, no fussy techniques. Perfect for home cooks who want restaurant-quality results without the stress.
- The nutritional profile is exceptional. Beef shank is one of the most nutrient-dense cuts available. You’re getting bioavailable iron for energy, zinc for immune function, vitamin B12 for neurological health, and a full amino acid profile. The long cooking time actually increases bioavailability of these nutrients.
- It makes your entire home smell incredible. The aromatic spices fill your kitchen with a warm, welcoming fragrance that no candle could replicate. This is the smell of home, of care, of intention.
- Leftovers are your secret weapon. This dish actually improves after a day or two in the refrigerator as flavors deepen and meld. It freezes beautifully and reheats into a comforting bowl faster than you can cook fresh.
- You can make it with ingredients you likely already have. No specialty shopping required. Soy sauce, garlic, ginger—these are pantry staples that create something extraordinary when layered thoughtfully.
- It’s endlessly adaptable. Keep the base braising liquid the same, but swap in different aromatics, vegetables, or broth types based on what you have on hand and the season.
The Ingredients
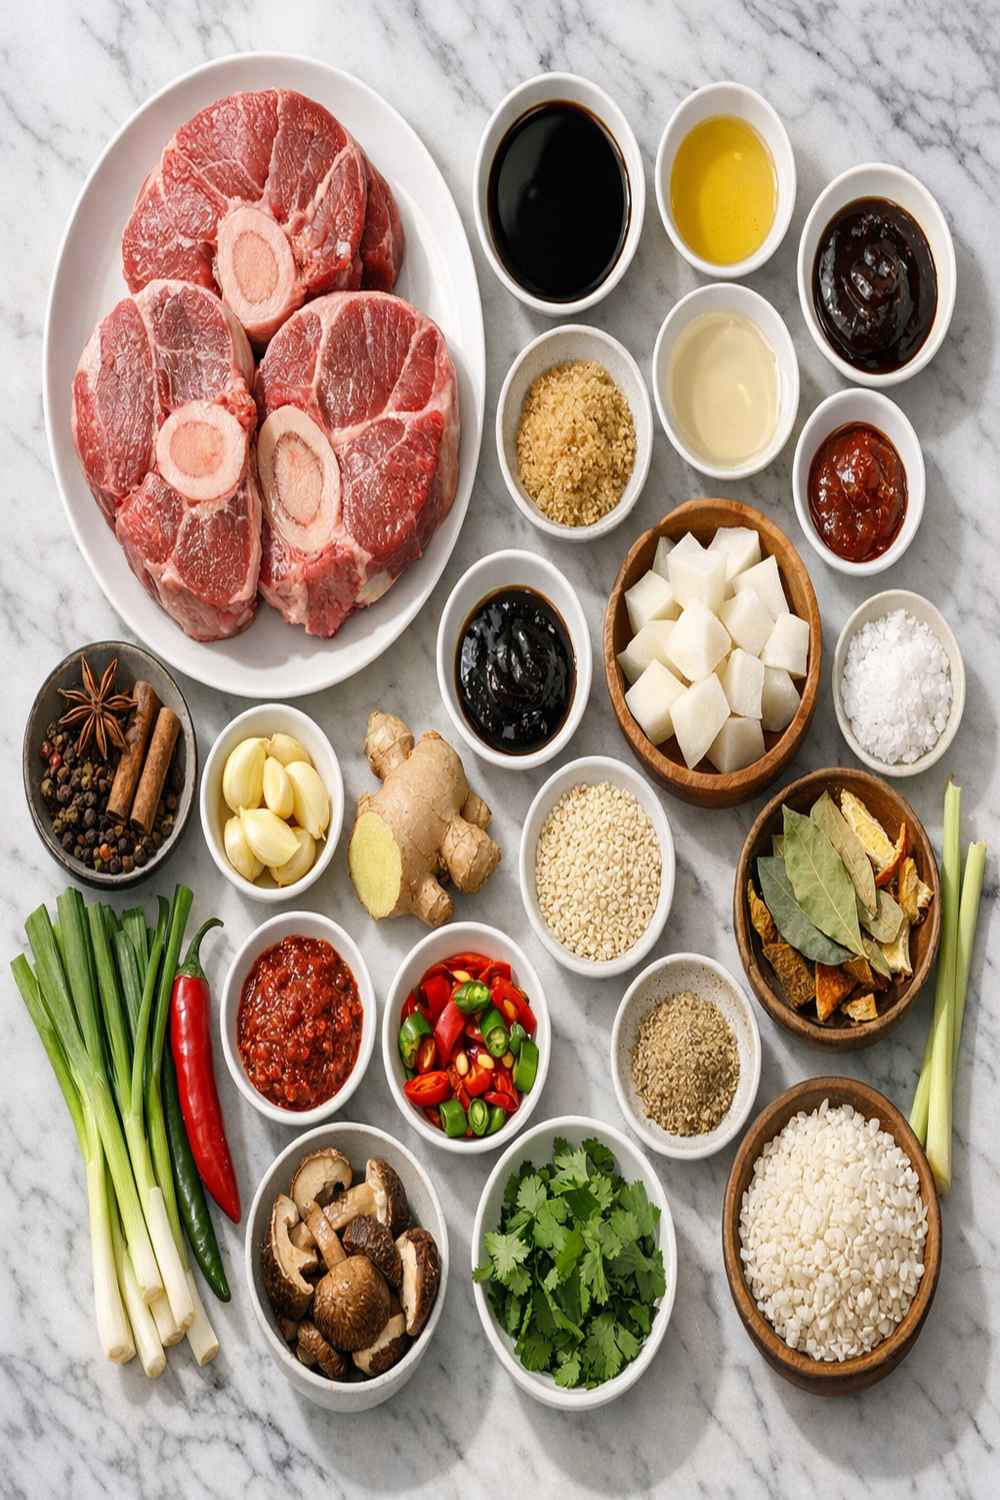
This recipe serves 4 generous portions with enough broth left for reheating. I’ve organized these by category to make shopping and prep intuitive. Don’t worry if you can’t find every single spice—the core flavors come from cinnamon, star anise, and cardamom. The others add nuance and depth, but the dish works beautifully without them.
For the Spice Blend
- 1 whole nutmeg (optional, adds warm spice undertones)
- 2 bay leaves (use fresh bay if available)
- 1 tablespoon fennel seeds (optional, reinforces the anise-forward aromatics)
- 1 black cardamom pod (also called hill cardamom, smokier than green varieties)
- ½ tablespoon Sichuan peppercorns (creates the signature gentle numbing sensation)
- 8 whole cloves (use fresh ones for better potency)
- 1 piece dried tangerine peel (or orange peel, adds brightness to the braise)
- 3 dried liquorice slices (optional but recommended for subtle sweetness and depth)
- 2 cinnamon sticks (Ceylon cinnamon if possible, slightly more delicate and sweet)
- 1 teaspoon white or black peppercorns (balance and gentle heat)
- 2 star anise (the eight-pointed pod with subtle licorice notes)
For the Braised Beef
- 15 grams rock sugar (or 1 tablespoon regular granulated sugar, balances salt and adds glossy finish)
- ¼ cup light soy sauce (the primary seasoning liquid)
- 4 cups water or homemade stock (enough to cover beef by about an inch; beef or chicken stock elevates the braise)
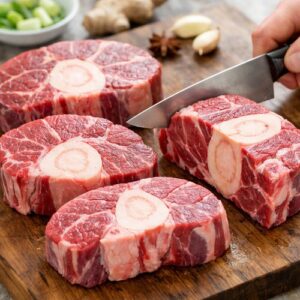
- 2½ pounds beef shank (one piece or cross-sections, ask your butcher to cut it into 2-3 equal portions)
- 2 tablespoons dark soy sauce (adds color, umami depth, and slight sweetness)
- 3 slices fresh ginger (about ¼-inch thick, unpeeled)
- ¼ cup Shaoxing wine (a rice-based cooking wine with natural sweetness and depth)
- 1 teaspoon kosher salt (to taste, add gradually)
- 2 tablespoons rice vinegar (a finishing touch to brighten flavors, optional but recommended)
- 4 scallions (cut into 3-inch pieces, white and green parts separated)
- 5 cloves fresh garlic (lightly crushed to release aromatics)
How to Make Asian Beef Shank Recipe?
The entire process takes approximately 2 hours from start to finish, with about 10 minutes of active preparation and 90 minutes of gentle, hands-off braising. I’ll walk you through each step with the sensory cues that tell you everything is on track.
Step 1: Prepare Your Aromatics and Spice Sachet
Start by gathering all your spices—the cinnamon sticks, cardamom, peppercorns, star anise, cloves, tangerine peel, bay leaves, liquorice slices, nutmeg, and fennel seeds. You have two options here: place them all in a small tea infuser ball, or wrap them securely in a small piece of cheesecloth tied with kitchen twine. I prefer cheesecloth because it allows more contact between the spices and the braising liquid, creating deeper flavor penetration. Double-check that your sachet is tightly sealed—you don’t want loose spices floating through your finished dish.
While you’re preparing the spice sachet, smash your garlic cloves gently (no need to peel them), and slice your ginger into thin rounds without peeling. The skin of the ginger is where much of the flavor lives, and leaving it on adds subtle complexity. Cut your scallions into 3-inch pieces, keeping white and light green sections separate from the darker green tops—you’ll add the whites and light greens during braising and the dark tops as a fresh garnish at the end.

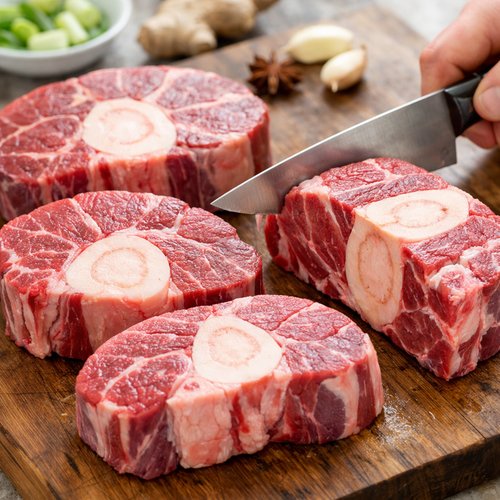
Step 2: Prepare Your Beef Shank for Braising
Ask your butcher to cut the beef shank into 2 to 3 cross-sectional pieces, each about 5 to 6 inches long. If you’re cutting it yourself, use a sharp chef’s knife or have your butcher do this with a saw—it’s much easier and cleaner than you might expect. The cross-sections allow more surface area for the braise to penetrate while keeping the meat structurally intact throughout cooking.
Pat the beef dry with paper towels. This step matters more than you might think—moisture on the surface prevents proper contact between meat and braise, and it can promote sticking. Set your prepared beef on a clean plate and keep it nearby.
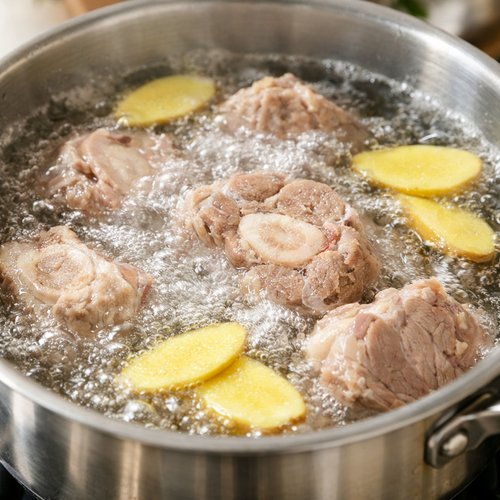
Step 3: Blanch and Clean Your Beef
Fill a medium to large pot with water (about 2 quarts) and bring it to a rolling boil. Carefully add your beef shank pieces and the ginger slices. You’re not cooking the beef here—you’re blanching it. After about 3 to 4 minutes, you’ll see a grayish, foamy film rise to the water’s surface. This is myoglobin and other impurities releasing from the meat. This step is crucial in traditional Chinese cooking because it creates a cleaner, clearer braising liquid and a more refined finished dish.
Once that film appears consistently, carefully pour everything into a fine-mesh colander set in your sink. Rinse the beef pieces thoroughly under cool running water, rubbing them gently to remove any remaining film. Rinse your pot completely as well—we’re starting fresh from here.
Step 4: Build Your Braising Liquid
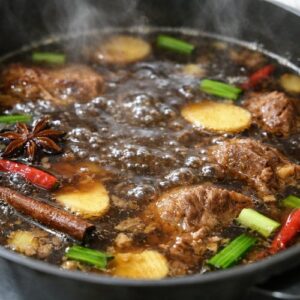
Return your cleaned beef and ginger to the pot. Add your spice sachet, the Shaoxing wine, crushed garlic, scallion whites and light greens, rock sugar, light soy sauce, dark soy sauce, and your 4 cups of water (or stock if you’re using it). The liquid should come up to about an inch above the beef. If it doesn’t quite cover, add a touch more water. Season with approximately 1 teaspoon of kosher salt—this seems conservative, but the soy sauces are already quite salty, and you can always adjust at the end.
Take a moment to look at what you’ve built: the beef resting in this amber-colored liquid surrounded by aromatics and spices. This is where the magic happens. Bring everything to a rolling boil over high heat—you’ll notice the liquid darkening slightly as the flavors begin to marry.

Step 5: Transition to a Gentle Simmer
Once you reach a full boil, immediately reduce the heat to the lowest setting your stove allows. You want a barely perceptible simmer—just the occasional lazy bubble breaking the surface, not an active boil. This is the most important step. Low-and-slow cooking is what transforms that tough, collagen-rich meat into something impossibly tender. Too much heat, and the muscle fibers tighten and squeeze out moisture.
If your stovetop runs hot, you might need to place the pot on a diffuser ring to ensure truly gentle heat. Alternatively, you can transfer everything to a heavy Dutch oven and finish the braise in a 275°F oven, which provides more even, controlled heat. Set a timer for 60 minutes and resist the urge to check constantly. The lid should be left off or just slightly ajar—you want some liquid to reduce and concentrate.

Step 6: Test for Doneness
At the 60-minute mark, pierce the thickest part of a beef shank piece with a fork or small knife. The meat should offer almost no resistance—it should pierce as easily as butter. If there’s still significant resistance, continue simmering for another 15 to 20 minutes. The difference between perfectly tender and overcooked is sometimes just 10 minutes, so check frequently toward the end. You want the meat to be fork-tender but still holding its shape, not falling apart or falling off the bone.
The braising liquid should have reduced by about one-third and turned a beautiful mahogany-brown color. Taste a spoonful of liquid and adjust seasoning with salt and a splash of rice vinegar if desired—the vinegar adds brightness that cuts through the richness of the braise.

Step 7: Cool and Rest Your Beef
Carefully remove the beef shank pieces from the braising liquid and transfer them to a cutting board or serving platter. Let them cool for about 10 minutes—they’ll be extremely hot. While they cool slightly, you can strain the braising liquid if you prefer a clear sauce, or keep it rustic with the aromatics. Remove the spice sachet (and the ginger and garlic pieces if you like, though they add wonderful flavor if left in).
For absolute maximum flavor development, let the beef cool completely to room temperature, then return it to the braising liquid and refrigerate overnight. The cold overnight rest allows flavors to penetrate even deeper into the meat, and when you reheat it gently the next day, the result is phenomenal. The fat will also solidify on top, making it easy to lift off if you prefer a leaner version.
Step 8: Slice and Serve
Once the beef has cooled, slice it crosswise (perpendicular to the bone) into ½-inch-thick pieces. The meat should slice cleanly without shredding. If it does shred slightly, that’s actually a sign you’ve nailed the texture—it’s incredibly tender. Arrange the slices in a shallow bowl, ladle the braising liquid generously over top, and garnish with the reserved scallion greens, a few sesame seeds if you have them, and perhaps a drizzle of chili oil for those who like heat.
Serve immediately with steamed jasmine rice, white rice, or even rice noodles to soak up that precious braising liquid.
Expert’s Nutritional Tip: Understanding Collagen and Bioavailability
As a registered dietitian, I want to highlight why this dish is nutritionally exceptional beyond just being delicious. Beef shank is roughly 10-12% collagen by weight—far higher than most cuts. During the long, low-temperature braise, collagen denatures into gelatin, which provides amino acids including glycine, proline, and hydroxyproline. These amino acids support joint health, skin elasticity, and gut integrity in ways that a quick-cooking cut simply cannot.
What’s equally important is bioavailability. The vitamin B12 in beef—which is otherwise challenging to absorb from plant sources—becomes more accessible when cooked gently and long. The iron in beef shank is heme iron (more bioavailable than plant-based non-heme iron), and the acidic braising liquid actually enhances iron absorption. The spices themselves have biological activity: curcumin-like compounds in turmeric relative foods, gingerol in ginger for anti-inflammatory support, and cinnamaldehyde in cinnamon for blood sugar regulation. You’re not just eating; you’re nourishing.
Tips and Tricks
- Make the spice sachet a day ahead. Measuring and tying spices beforehand removes any last-minute stress and allows you to grab everything quickly when you’re ready to braise. Store it in a small container on your counter.
- Use beef or pork stock instead of water for deeper flavor. If you have homemade stock on hand, use it instead of plain water. The gelatin and collagen in the stock creates an even more luxurious final braise. Chicken stock works too, though it’s slightly more delicate.
- Don’t skip the blanching step, even though it seems extra. This is traditional for a reason. The clearer braising liquid looks more refined, and the process removes flavors you don’t want—primarily the “raw” iron taste that can make beef broths taste metallic. It takes five minutes and elevates the entire dish.
- Invest in a meat thermometer if you’re unsure about doneness. The meat is perfectly done at an internal temperature of 190-195°F, which is higher than most people think but crucial for the collagen breakdown you’re after. The meat is safe to eat at 145°F, but it won’t be the melt-in-your-mouth texture you’re seeking.
- Save every drop of that braising liquid. This is liquid gold in culinary terms. Use it as a base for soups, a cooking liquid for grains, or simply as a sauce for other proteins. It freezes beautifully for up to three months.
- Room-temperature beef shank is actually delicious. Leftover braised beef is phenomenal sliced thin and eaten at room temperature with a drizzle of the sauce. It makes an incredible sandwich filling or a composed salad when paired with fresh greens and rice vinegar.
Can I Store Asian Beef Shank Recipe?
Absolutely, and storage is one of this dish’s greatest strengths. The braised beef actually improves over time as flavors continue to develop and deepen.
In the refrigerator: Store the beef and braising liquid together in an airtight container for up to 4 days. The fat will solidify on top, creating a protective seal that actually helps preserve the meat. Before reheating, lift off this fat cap (save it for cooking vegetables—it’s incredibly flavorful), then gently warm the beef and liquid over low heat until steaming.
In the freezer: This dish freezes beautifully for up to 3 months. I recommend portioning it into individual containers before freezing so you can thaw only what you need. Thaw in the refrigerator overnight, then reheat gently over low heat or in a 325°F oven for about 20 minutes, covered with foil.
Make-ahead strategy: Prepare the entire braise through the cooling stage the day before serving. This actually gives you a significant advantage: the overnight rest intensifies flavors exponentially, and you’ll notice the braising liquid thickens slightly as collagen and gelatin set. Reheat gently the next day and slice just before serving for optimal presentation.
Freezing tip: Leave a quarter-inch of headspace in your container if freezing in liquid. The liquid expands as it freezes, and you want room for that expansion to prevent the container from cracking.
Nutrition Information
Based on USDA food composition data, one serving of this braised beef shank (approximately 6 ounces of meat with braising liquid) provides:
- Calories: 320-350 per serving
- Protein: 38-42 grams (exceptional amino acid profile, including all nine essential amino acids)
- Fat: 14-16 grams (primarily from the beef; trimming visible fat reduces this)
- Iron: 3.2-3.8 mg (approximately 18-21% of daily value for adult women, 40-48% for adult men)
- Zinc: 7-8 mg (64-73% of daily value)
- Vitamin B12: 1.8-2.1 mcg (75-88% of daily value)
- Selenium: 25-30 mcg (45-55% of daily value)
- Collagen/Gelatin: 2-3 grams from the braise itself
- Sodium: 1100-1300 mg (primarily from soy sauce; reduce if sodium-conscious by using low-sodium soy sauce)
- Carbohydrates: 3-5 grams (mostly from rock sugar in the braise)
The beauty of this dish nutritionally is that it provides bioavailable micronutrients in forms your body recognizes and uses efficiently. The long cooking process actually increases nutrient density and accessibility compared to quick-cooking methods.
What Can I Serve With Asian Beef Shank Recipe?
The rich, deeply savory braised beef pairs beautifully with light, fresh accompaniments that balance its richness. Here are my favorite serving combinations:
- Steamed jasmine rice. The fragrant, slightly floral notes of jasmine rice complement the warm spices in the braise. Serve alongside or underneath the beef and braise, allowing the rice to absorb that precious liquid.
- White rice or brown rice. For a more neutral canvas, simple white or brown rice lets the beef shine. Brown rice adds nutty complexity and additional fiber if that matters for your nutritional goals.
- Rice noodles or egg noodles. Soft, absorbent noodles are phenomenal for soaking up the braising liquid. Serve the beef and braise over noodles, finished with fresh scallions and sesame seeds.
- Steamed bok choy or gai lan (Chinese broccoli). The slight bitterness and clean vegetable flavor cut through the richness of the braise. Finish with a drizzle of sesame oil and salt.
- Stir-fried vegetables. Build a quick stir-fry of broccoli, bell peppers, snap peas, or mushrooms with garlic and light soy sauce. The bright vegetable flavors balance the deep, warming spices of the beef.
- Braised greens or tender lettuces. Fresh greens with a light sesame-rice vinegar dressing provide brightness and help reset your palate between bites of rich, savory meat.
- Pickled vegetables. Quick-pickled radishes, cucumbers, or daikon add sharp acidity that’s essential for balance. The crunch and brightness are a textural and flavor contrast to the tender beef.
- A simple soup course. Serve bowls of the braising liquid as a light soup before or alongside the beef. It’s warming, deeply flavored, and genuinely nourishing—a broth in the best sense of the word.
For a complete meal, I also love pairing this with bao recipe filling options if you want to get creative, or serving the shredded beef as part of a rice bowl composition with fresh herbs and vegetables. The braising liquid becomes your dressing, tying everything together beautifully.
Common Mistakes to Avoid
- Braising at too high a temperature. I see this constantly. People want to speed up the process by increasing heat. Don’t. The whole point of braising beef shank is the low-and-slow methodology. High heat tightens the muscle fibers, squeezes out moisture, and creates tough, chewy meat. You’ll need that barely perceptible simmer the entire time. If you’re in a hurry, make this dish another night.
- Skipping the blanching step or stopping the braise too early. Some recipes skip the initial blanching entirely. This results in a cloudier, slightly “off” tasting braise. Others pull the beef at 45 minutes because they’re hungry. The collagen breakdown really accelerates between 60-90 minutes. Give it time. Patience is the primary ingredient in braising.
- Not adjusting seasoning at the end. Taste the braising liquid just before serving. Flavors concentrate as liquid reduces, and you might need to adjust salt or add brightness with a splash of rice vinegar or a squeeze of fresh lime. A finished dish should taste balanced—not overly salty, not flat, with enough acid to cut through the richness.
- Overcrowding the pot or using meat that’s too large. If your beef shank pieces are massive or if you’ve jammed too much meat into the pot, liquid can’t circulate properly, and you’ll get uneven cooking. Give yourself room. The pot shouldn’t be more than 60-70% full of solid ingredients.
Substitutes
- Other beef cuts for shank: Beef chuck (cut into 2-inch chunks), brisket, short ribs, or beef cheeks all braise beautifully. Chuck is probably the most accessible substitute and requires similar cooking times. Reduce the braising time slightly for smaller pieces.
- Other proteins entirely: This braising method works beautifully with pork shoulder, pork belly, chicken thighs (reduce cooking time to 45 minutes), or even lamb shoulder. The braising liquid complements all of these proteins gorgeously.
- Rock sugar → granulated sugar or honey: Rock sugar dissolves slowly and adds a subtle sweetness without being cloying. Regular granulated sugar works fine (use slightly less, about ¾ tablespoon), and honey adds depth but slightly changes the flavor profile.
- Shaoxing wine → dry sherry, sake, or even dry white wine: Shaoxing wine has a particular sweetness, but any dry cooking wine works. Avoid anything you wouldn’t drink—it needs to taste good to contribute good flavor to your braise.
- Soy sauce substitutes: If you need to avoid soy for allergies, tamari (gluten-free soy sauce alternative) works perfectly. For a completely different flavor direction, try coconut aminos, though the flavor will shift noticeably toward sweetness.
- Spices you can’t find: The core spices are cinnamon, star anise, and cardamom. These three alone create a beautiful braise. The others add nuance. If you can’t find Sichuan peppercorns, just use more regular black peppercorns. Missing liquorice root? Skip it—it’s optional. The dish won’t be identical, but it will still be delicious.
- Fresh ginger → dried ginger: Use about 1 tablespoon of ground ginger if fresh isn’t available. The flavor will be spicier and slightly less aromatic, but still excellent.
Seasonal Variations
One of my favorite aspects of this braised beef shank is how naturally it adapts to seasons. The base method stays the same, but you can shift the supporting flavors:
Spring variation: Add fresh spring vegetables like baby potatoes, young carrots, and asparagus in the last 20 minutes of braising. Include fresh ginger and a sprig of fresh tarragon for herbaceous lightness. Finish with fresh spring onions and pea shoots for brightness.
Summer variation: Keep the spice blend more restrained and add a splash of lime juice at the end for brightness. Serve the beef at room temperature alongside a cold rice noodle salad with fresh herbs, cucumber, and a sesame-lime dressing. The warm spices feel less heavy in warm weather when served this way.
Fall variation: Double down on warming spices. Add a cinnamon stick, a whole nutmeg, and increase the Sichuan peppercorns. Include chunked root vegetables—carrots, parsnips, and celery root—in the last 30 minutes of braising. The natural earthiness complements the deeper, more complex spice profile.
Winter variation: Embrace the richness. Add dried shiitake mushrooms to the braise for umami depth, and increase the dark soy sauce slightly for more color and intensity. Serve over creamy mashed potatoes or soft polenta instead of rice. The thick, luxurious sauce clings beautifully to these starches.
Asian Beef Shank Recipe
Ingredients
Method
- Start by gathering all your spices—the cinnamon sticks, cardamom, peppercorns, star anise, cloves, tangerine peel, bay leaves, liquorice slices, nutmeg, and fennel seeds. You have two options here: place them all in a small tea infuser ball, or wrap them securely in a small piece of cheesecloth tied with kitchen twine. I prefer cheesecloth because it allows more contact between the spices and the braising liquid, creating deeper flavor penetration. Double-check that your sachet is tightly sealed—you don't want loose spices floating through your finished dish. While you're preparing the spice sachet, smash your garlic cloves gently (no need to peel them), and slice your ginger into thin rounds without peeling. The skin of the ginger is where much of the flavor lives, and leaving it on adds subtle complexity. Cut your scallions into 3-inch pieces, keeping white and light green sections separate from the darker green tops—you'll add the whites and light greens during braising and the dark tops as a fresh garnish at the end.
- Ask your butcher to cut the beef shank into 2 to 3 cross-sectional pieces, each about 5 to 6 inches long. If you're cutting it yourself, use a sharp chef's knife or have your butcher do this with a saw—it's much easier and cleaner than you might expect. The cross-sections allow more surface area for the braise to penetrate while keeping the meat structurally intact throughout cooking. Pat the beef dry with paper towels. This step matters more than you might think—moisture on the surface prevents proper contact between meat and braise, and it can promote sticking. Set your prepared beef on a clean plate and keep it nearby.
- Fill a medium to large pot with water (about 2 quarts) and bring it to a rolling boil. Carefully add your beef shank pieces and the ginger slices. You're not cooking the beef here—you're blanching it. After about 3 to 4 minutes, you'll see a grayish, foamy film rise to the water's surface. This is myoglobin and other impurities releasing from the meat. This step is crucial in traditional Chinese cooking because it creates a cleaner, clearer braising liquid and a more refined finished dish. Once that film appears consistently, carefully pour everything into a fine-mesh colander set in your sink. Rinse the beef pieces thoroughly under cool running water, rubbing them gently to remove any remaining film. Rinse your pot completely as well—we're starting fresh from here.

- Return your cleaned beef and ginger to the pot. Add your spice sachet, the Shaoxing wine, crushed garlic, scallion whites and light greens, rock sugar, light soy sauce, dark soy sauce, and your 4 cups of water (or stock if you're using it). The liquid should come up to about an inch above the beef. If it doesn't quite cover, add a touch more water. Season with approximately 1 teaspoon of kosher salt—this seems conservative, but the soy sauces are already quite salty, and you can always adjust at the end. Take a moment to look at what you've built: the beef resting in this amber-colored liquid surrounded by aromatics and spices. This is where the magic happens. Bring everything to a rolling boil over high heat—you'll notice the liquid darkening slightly as the flavors begin to marry.

- Once you reach a full boil, immediately reduce the heat to the lowest setting your stove allows. You want a barely perceptible simmer—just the occasional lazy bubble breaking the surface, not an active boil. This is the most important step. Low-and-slow cooking is what transforms that tough, collagen-rich meat into something impossibly tender. Too much heat, and the muscle fibers tighten and squeeze out moisture. If your stovetop runs hot, you might need to place the pot on a diffuser ring to ensure truly gentle heat. Alternatively, you can transfer everything to a heavy Dutch oven and finish the braise in a 275°F oven, which provides more even, controlled heat. Set a timer for 60 minutes and resist the urge to check constantly. The lid should be left off or just slightly ajar—you want some liquid to reduce and concentrate.
- At the 60-minute mark, pierce the thickest part of a beef shank piece with a fork or small knife. The meat should offer almost no resistance—it should pierce as easily as butter. If there's still significant resistance, continue simmering for another 15 to 20 minutes. The difference between perfectly tender and overcooked is sometimes just 10 minutes, so check frequently toward the end. You want the meat to be fork-tender but still holding its shape, not falling apart or falling off the bone. The braising liquid should have reduced by about one-third and turned a beautiful mahogany-brown color. Taste a spoonful of liquid and adjust seasoning with salt and a splash of rice vinegar if desired—the vinegar adds brightness that cuts through the richness of the braise.

- Carefully remove the beef shank pieces from the braising liquid and transfer them to a cutting board or serving platter. Let them cool for about 10 minutes—they'll be extremely hot. While they cool slightly, you can strain the braising liquid if you prefer a clear sauce, or keep it rustic with the aromatics. Remove the spice sachet (and the ginger and garlic pieces if you like, though they add wonderful flavor if left in). For absolute maximum flavor development, let the beef cool completely to room temperature, then return it to the braising liquid and refrigerate overnight. The cold overnight rest allows flavors to penetrate even deeper into the meat, and when you reheat it gently the next day, the result is phenomenal. The fat will also solidify on top, making it easy to lift off if you prefer a leaner version.
- Once the beef has cooled, slice it crosswise (perpendicular to the bone) into ½-inch-thick pieces. The meat should slice cleanly without shredding. If it does shred slightly, that's actually a sign you've nailed the texture—it's incredibly tender. Arrange the slices in a shallow bowl, ladle the braising liquid generously over top, and garnish with the reserved scallion greens, a few sesame seeds if you have them, and perhaps a drizzle of chili oil for those who like heat. Serve immediately with steamed jasmine rice, white rice, or even rice noodles to soak up that precious braising liquid.
Notes
FAQs
Can I make this braised beef shank in a slow cooker or Instant Pot?
Absolutely. For a slow cooker: prepare your ingredients exactly as described, then transfer everything to the slow cooker after the blanching step. Cook on low for 8-10 hours or high for 5-6 hours. The advantage is hands-off cooking; the disadvantage is less control over final texture and less liquid reduction for concentrating flavors. For an Instant Pot: sauté the aromatics first in sauté mode, add the beef and braising liquid, seal, and cook on high pressure for 45 minutes, then allow natural pressure release for 15 minutes. Quick-release the remaining pressure. Both methods work, but the stovetop method gives you the most control and the best results.
What if my beef shank is still tough after 90 minutes?
This is rare but possible if your shank is from an older animal or was cut against the grain in an unusual way. Continue braising in 10-15 minute increments, testing with a fork each time. Once you hit fork-tender texture, stop immediately—don’t keep cooking or the meat will actually start to break apart. If you’ve been at it longer than 120 minutes, your heat might be too high, or your beef might be from a particularly tough part of the shank. For future reference, ask your butcher specifically for shank from younger beef, or request that they cut it from the meatier section.
Can I cook this on the stovetop without a lid?
Yes, and I often do. Without a lid, you get more liquid reduction, which concentrates flavors beautifully. This actually creates a glossier, more intense finishing sauce. The tradeoff is you’ll need to add slightly more liquid at the beginning (maybe ¼ cup extra) to account for more evaporation. Keep an eye on the liquid level—it should never drop below covering the meat by about half an inch. If it evaporates too quickly, add a splash of water or stock.
Is this recipe high in sodium, and can I reduce the salt content?
Yes, soy sauce is quite salty. The recipe as written contains approximately 1100-1300 mg of sodium per serving, which is significant. To reduce sodium: use low-sodium soy sauce (reduces sodium by roughly 40%), decrease the total soy sauce amount (though this impacts flavor), or add more fresh aromatics and spices to compensate for less salt while keeping flavors bright. You can also serve this alongside unsalted rice or vegetables to balance the overall meal’s sodium content.
How do I know when the beef is perfectly done versus overcooked?
A perfectly done beef shank will pierce easily with a fork—almost