Bonchon Soy Garlic Chicken Recipe
This post contains affiliate links. As an Amazon Associate I earn from qualifying purchases.
There’s one ingredient in this Bonchon Soy Garlic Chicken Recipe that does all the heavy lifting. Once you understand it, you’ll cook with it everywhere. I’m talking about garlic—that humble bulb that transforms from sharp and pungent into sweet, mellow gold when you give it time and heat. My grandmother taught me this years ago, back when I was just a kid watching her in the kitchen. She’d peel cloves with her weathered hands and say, “Willie, garlic is patience. Rush it, and it turns bitter. Treat it right, and it becomes magic.” When I started studying nutrition as a registered dietitian, I discovered she wasn’t just being poetic—she was speaking pure science. Just like the low-and-slow methods that built my career, this chicken recipe honors that philosophy. If you’re curious about other ways to transform simple ingredients through time and technique, check out our BBQ Chinese Pork Recipe, which uses similar principles.
The One Ingredient That Makes This Bonchon Soy Garlic Chicken Recipe Unforgettable
Garlic is the unsung hero of this recipe, and I mean that with complete sincerity. When I was developing this at home, I tested it three different ways—with powdered garlic, with frozen minced garlic, and with fresh cloves. The difference was staggering. Fresh garlic, cooked properly in that glossy soy glaze, creates a sweetness that’s almost caramelized. It’s the contrast between the umami-rich soy sauce and the gentle sweetness of properly treated garlic that makes people ask for the recipe.
I remember the first time I truly understood garlic’s potential. I was maybe twelve years old, and my grandmother was making her version of a braised chicken for Sunday dinner. She took fresh garlic cloves—not minced, not sliced, but crushed—and let them infuse slowly in warm oil. The kitchen filled with this aroma that was nothing like the garlic powder my mother kept in her spice rack. That moment, honestly, started my obsession. As I got older and began my career in nutrition, I realized garlic isn’t just about flavor—it’s about how our bodies respond to it. That’s what drives me to always use fresh garlic in recipes like this one.
Everything You Need to Know About Fresh Garlic
Fresh garlic comes from the allium family, the same family as onions and leeks, and it’s been cultivated for over 7,000 years. In this recipe, we’re using it as both a dry ingredient (garlic powder in the coating) and fresh (minced in the glaze), which creates layers of flavor that work together beautifully. The dry garlic powder gives you immediate pungency and helps with the crust, while the fresh garlic in the sauce develops sweetness as it cooks slowly in the soy mixture.
When selecting garlic for this recipe, look for bulbs that feel firm and heavy for their size. The papery skin should be intact, and there should be no soft spots or sprouting. There are two main varieties you’ll encounter:
- Hardneck Garlic – This is the type with a woody stem in the center, and it has larger cloves with thinner skin. Perfect for mincing and using fresh in your glaze. It has a more assertive, peppery flavor that mellows beautifully when cooked slowly.
- Softneck Garlic – This variety has smaller cloves packed tightly together and no woody core. It’s what you typically find in grocery stores and stores longer. Slightly milder in flavor, it works wonderfully for the powder component in your coating.
Storage is critical if you want garlic to perform at its best in this recipe. Keep whole bulbs in a cool, dark place—not your refrigerator—in a mesh bag or paper sack. They’ll stay fresh for 1-2 months this way. Once you break the bulb apart, individual cloves last about 3 weeks. Fresh minced garlic, once you’ve prepped it, should be used immediately or within a day for maximum flavor.
[FEATURED IMAGE PLACEHOLDER]The Nutritional Power of Fresh Garlic
As a registered dietitian, I get genuinely excited talking about garlic’s nutritional profile. According to USDA data, one clove of raw garlic (about 3 grams) contains just 4 calories but delivers manganese, vitamin B6, and vitamin C. But here’s what fascinates me most: garlic contains allicin, a sulfur compound that forms when you cut or crush the clove. Allicin is antimicrobial, anti-inflammatory, and may support cardiovascular health.
When you cook garlic, especially slowly as we do in this recipe’s glaze, the allicin transforms into other beneficial compounds like ajoene and diallyl disulfide. These are associated with improved cholesterol profiles and reduced inflammation. The key is not to overcook garlic to the point of burning—we want that sweet spot where it’s golden and caramelized but not charred. That’s the sweet spot where nutrition and flavor collide perfectly.
The four cloves in this recipe contribute negligible calories but meaningful phytonutrients. When combined with the protein from the chicken and the fermented benefits of soy sauce, you’re looking at a dish that’s nutritionally balanced and genuinely good for your body. This is what I mean by making traditional comfort food balanced and accessible.
The Ingredients – Supporting Cast for the Star
Every ingredient in this recipe exists to make that garlic shine. Think of them as musicians in an orchestra, each playing their part to let the lead instrument—fresh garlic—reach its full potential. The soy sauce provides umami depth. The mirin brings gentle sweetness that lets the garlic’s natural sugars develop. The cornstarch creates textural contrast. Even the ginger powder and sesame seeds exist to complement garlic’s complex flavor profile.
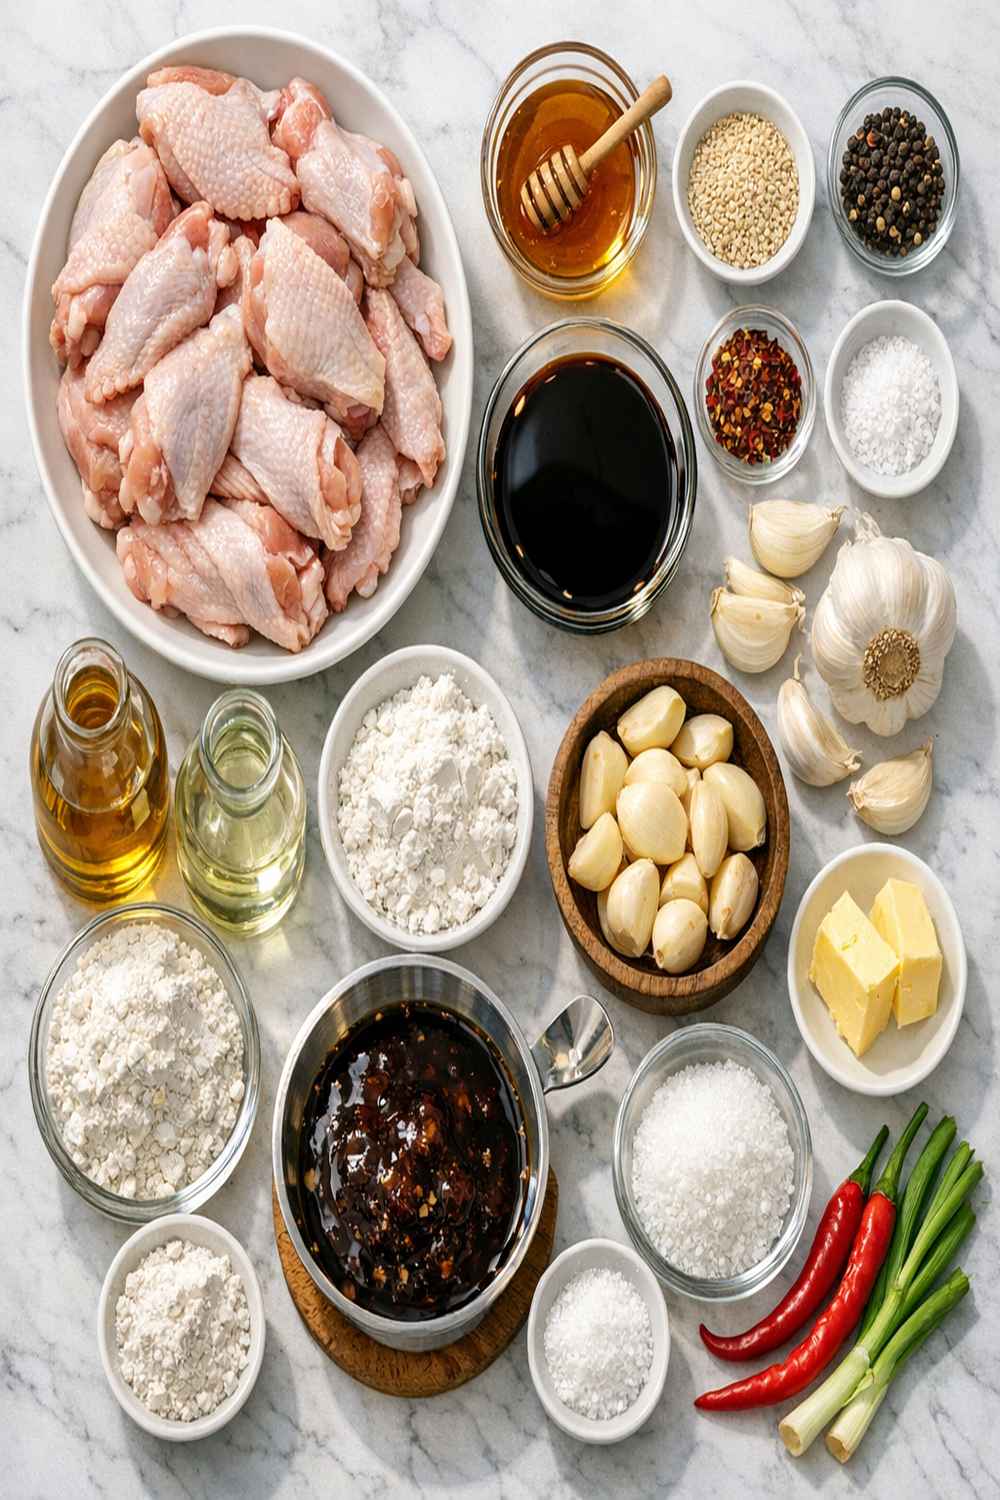
- Salt and freshly ground black pepper to taste (allows garlic to sing without competition)
- ½ teaspoon cornstarch (thickens the glaze to coat each wing perfectly)
- 2 tablespoons fresh chives, thinly sliced (bright green finish that prevents heaviness)
- ¼ small red onion, finely chopped (adds subtle sweetness and texture to the glaze)
- 1½ pounds fresh chicken wings (wings have the best fat-to-meat ratio for absorbing this glaze)
- 1½ tablespoons white sesame seeds (for garnish, adds nuttiness that echoes garlic’s complexity)
- ½ teaspoon ground ginger powder (adds warmth without overpowering fresh garlic)
- ½ cup light soy sauce (fermented umami that lets garlic’s sweetness emerge)
- 2 tablespoons brown sugar (enhances caramelization and complements garlic’s natural sweetness)
- ⅓ cup mirin (naturally sweet rice wine that balances the soy’s saltiness)
- 2 cups cornstarch (divided into two portions for even coating without clumping)
- 4 cloves fresh garlic, peeled and minced (the hero ingredient in all its glory)
- ⅔ teaspoon garlic powder (creates the seasoned crust that locks in moisture)
Yield: Serves 4 as a main course, or 6-8 as an appetizer
How to Make Bonchon Soy Garlic Chicken Recipe Letting the Hero Ingredient Shine
The technique here is about understanding how garlic behaves under heat. Raw garlic is harsh and sharp. Garlic cooked too fast burns and becomes bitter. But garlic given time and gentle heat becomes sweet, almost caramel-like. That’s what we’re after. The coating process ensures the chicken stays moist while developing a light crust, and the glaze—made with our fresh garlic—bathes everything in flavor that’s been carefully coaxed to its sweetest potential.
Step 1: Season and Coat Your Chicken Wings
Pat your chicken wings completely dry with paper towels. Moisture is the enemy of a good crust, so don’t skip this. In a large bowl, combine 2 cups cornstarch with the garlic powder, and season generously with salt and pepper. The garlic powder here is your dry-crust ally—it will caramelize alongside the chicken’s natural sugars, creating that restaurant-quality exterior that holds the glaze.
Working with a handful of wings at a time, toss them in the cornstarch mixture, ensuring every surface is evenly coated. This isn’t a flour dredging situation—cornstarch creates a lighter, crispier crust that won’t become gummy as it sits in the glaze. Set the coated wings on a wire rack for 10 minutes. This resting period lets the coating set and adhere better.

Step 2: Fry with Precision for Perfect Texture
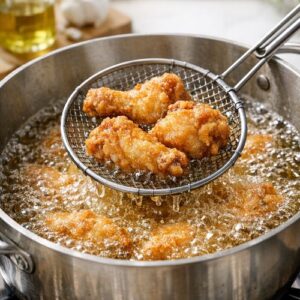
Heat neutral oil to 350°F in a heavy-bottomed pot or wok. The temperature is crucial here—too low and you get greasy wings; too high and the coating burns before the meat cooks through. Working in batches to avoid overcrowding (which drops the oil temperature), carefully lower your coated wings into the hot oil.
Fry for 12-14 minutes, turning occasionally so both sides cook evenly and develop a light golden-brown color. You’re looking for that perfect moment where the coating is crispy and the internal temperature reaches 165°F—not a degree more. When they’re done, transfer the wings to a wire rack lined with paper towels. The wire rack is essential here because it allows air circulation underneath, preventing the bottoms from steaming. Never just pile them on paper towels.

Step 3: Prepare Your Garlic-Forward Glaze
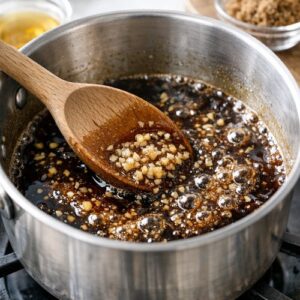
While your wings are frying, this is where the magic happens. In a medium saucepan over medium-low heat, combine your light soy sauce, mirin, and brown sugar. Stir gently until the sugar dissolves, about 2 minutes. Now add your minced fresh garlic and chopped red onion. This is the critical moment.
Let this simmer gently for 5-7 minutes, stirring occasionally. You want the garlic to soften and its edges to just barely begin turning golden. The aroma will become noticeably sweeter and less sharp. If you’re cooking too fast over high heat, the garlic will smell harsh and bite-y. You’re looking for that sweet, mellow fragrance that tells you the garlic’s sulfur compounds have transformed into something gentle and sweet. Add the ginger powder and the ½ teaspoon cornstarch (mixed with 1 tablespoon water to make a slurry), stirring until the glaze thickens slightly, about 1 minute. It should coat the back of a spoon but still flow freely.

Step 4: Toss Wings in the Glaze
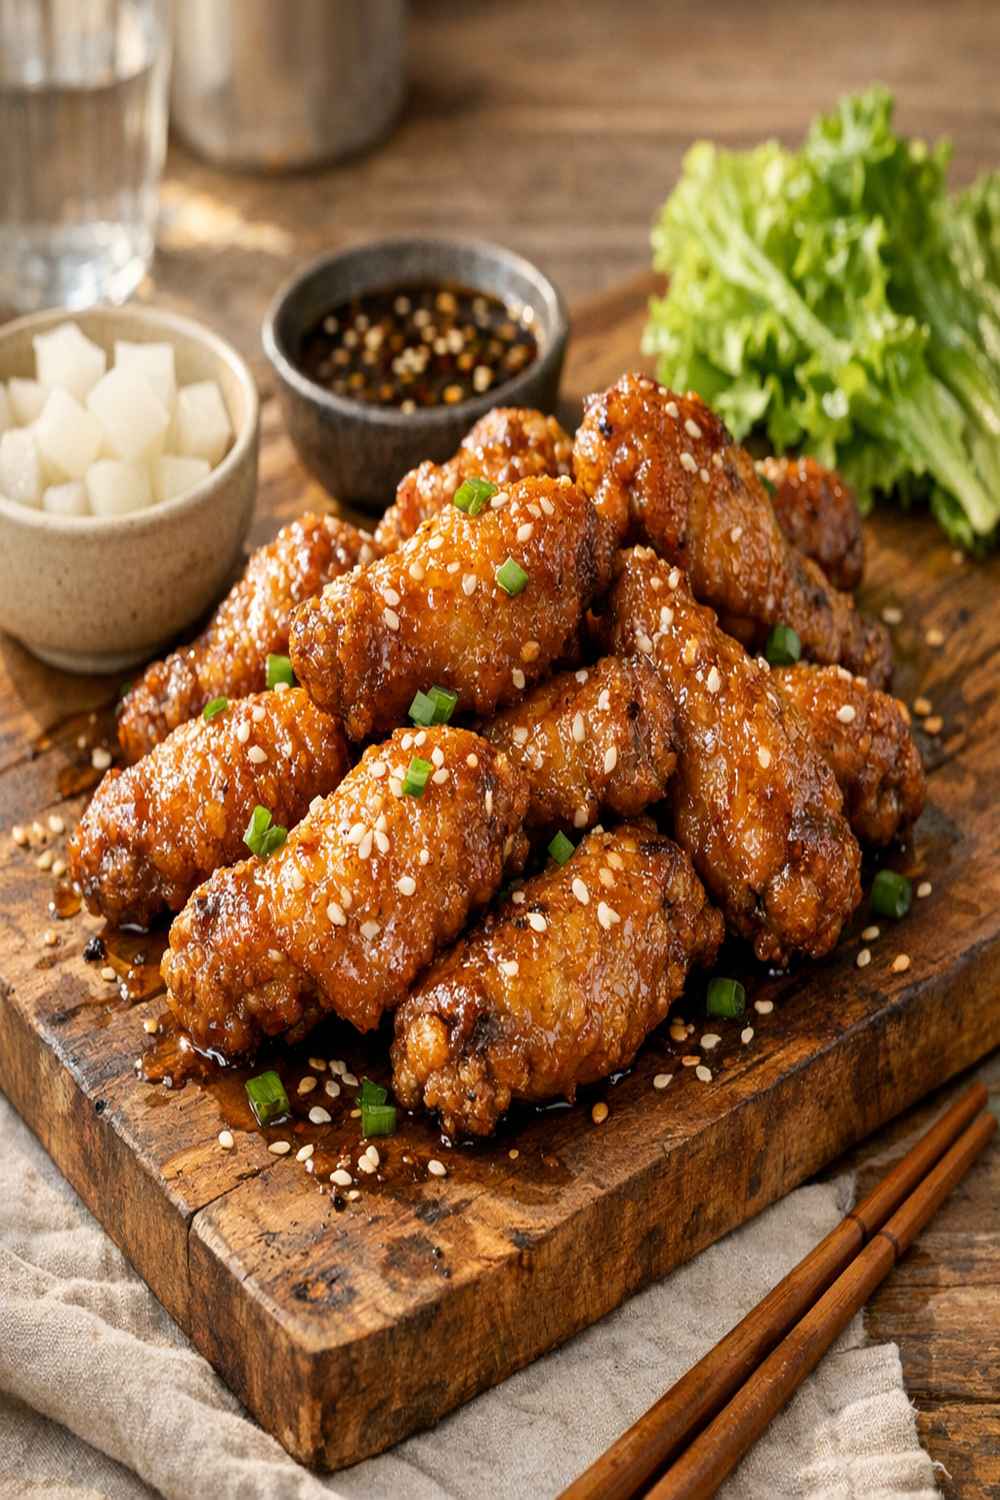
Remove your glaze from heat. In a large bowl, combine your hot, crispy wings with the warm glaze, tossing gently but thoroughly. Every wing should be coated, but work quickly so the wings stay crispy. The heat from the wings will warm the glaze without breaking down its delicate texture, and the fresh garlic flavor will penetrate the crispy coating.
Transfer to a serving platter and immediately garnish with white sesame seeds and fresh chives. The chives especially are important—their bright, fresh bite prevents the dish from becoming too heavy and cuts through the richness of the glaze beautifully.

5 Other Ways to Use Fresh Garlic Beyond This Recipe
- Garlic Confit – Slow-roasted whole garlic cloves in olive oil until they’re spreadable and sweet. Use on bread, in vinaigrettes, or stirred into grains.
- Garlic-Infused Broth – The foundation for deeply flavored soups and grains. Smash cloves and simmer low for 30 minutes to extract maximum flavor without bitterness.
- Roasted Garlic Paste – Halve a bulb, roast cut-side down at 375°F for 35 minutes, then squeeze out the soft cloves. Mix with olive oil for a versatile sauce.
- Pickled Garlic – Peeled cloves in vinegar, sugar, and spices. Ferments for weeks but stores for months and adds brightness to any plate.
- Black Garlic – Aged garlic that develops deep umami sweetness. Use in dressings, grain bowls, or alongside other Asian-inspired dishes.
How to Buy and Store Fresh Garlic
The best garlic comes from farmers’ markets in late summer and early fall, when the new harvest arrives. Look for bulbs with papery skin that’s mostly intact, no sprouting, and a firm feel when you squeeze gently. Avoid any bulbs with soft spots or visible mold. At the grocery store, buy from the produce section rather than the pre-peeled jarred version—jarred garlic lacks the complexity we need here.
Store whole, unbroken bulbs in a cool, dark place—a pantry, kitchen cupboard, or root cellar works beautifully. Don’t refrigerate whole garlic; the cold promotes sprouting and breakdown. They’ll last 1-2 months stored this way. Once you break the bulb apart, individual cloves keep for about 3 weeks before they start to dry out or sprout.
If you’ve already minced garlic, use it within a few hours for maximum flavor. You can freeze minced garlic in ice cube trays with a small amount of oil and store cubes in a freezer bag for up to 3 months, though the flavor won’t be quite as fresh. For this recipe specifically, fresh garlic is non-negotiable—use it the same day you mince it.
Can I Store Bonchon Soy Garlic Chicken Recipe?
Yes, and this is where having a registered dietitian’s perspective comes in handy. Store leftovers in an airtight container in the refrigerator for up to 3 days. The glaze will thicken as it cools, and the chicken will firm up slightly—this is normal.
To reheat, I recommend using a 350°F oven for 8-10 minutes, which allows the coating to re-crisp slightly without drying out the meat. You can also reheat gently in a wok over medium heat, tossing occasionally for about 5 minutes. Avoid the microwave, which will make the coating tough and chewy.
The wings freeze beautifully for up to 1 month if you store them without the glaze. Cool the wings completely, freeze them on a sheet tray for 2 hours, then transfer to a freezer bag. Store the glaze separately. When ready to eat, thaw overnight in the refrigerator, reheat the wings in a 375°F oven until warmed through (about 10 minutes), then toss with freshly warmed glaze. This actually tastes remarkably fresh because the glaze hasn’t had time to oxidize.
Expert’s Nutritional Tip
Here’s something I share with nutrition clients all the time: the allicin in garlic is most potent when it’s freshly minced and has had a few minutes to sit before cooking. When you cut garlic, the enzyme alliinase needs about 5-10 minutes of exposure to air to convert alliin into allicin. In this recipe, I recommend mincing your garlic and letting it sit in a small bowl for 5-10 minutes before adding it to the warm glaze. This ensures you’re capturing maximum health benefits without compromising flavor. You’ll also notice the aroma becomes noticeably sweeter during this resting period—that’s the chemical transformation happening right before your eyes.
Make-Ahead Guide
This recipe is wonderfully flexible for meal prep, which is part of why I love it. You can prepare components up to 2 days ahead. Coat your chicken wings completely and refrigerate on a sheet tray covered with plastic wrap. When you’re ready to cook, you don’t need to thaw—just add 2-3 minutes to the frying time.
The glaze can be made up to 24 hours ahead and stored in an airtight container in the refrigerator. When you’re ready to use it, gently warm it in a saucepan over low heat. The flavors actually deepen if it’s made ahead, which is a bonus. Don’t combine the wings with the glaze more than 2 hours before serving, or the coating will begin to soften from the moisture.
For busy weeknights, I recommend this workflow: Make the glaze the morning of, coat and refrigerate the wings after work, fry when your guests arrive or 30 minutes before dinner. The whole cooking process takes just 20 minutes once you start.
Common Mistakes to Avoid
Mistake 1: Using Ground Garlic Powder Instead of Fresh – Powdered garlic is convenient, but it’s already oxidized and has lost its allicin content. For this recipe, the fresh garlic in the glaze is non-negotiable. Powder is fine for the coating, but the sauce needs fresh cloves.
Mistake 2: Overcooking the Garlic in the Glaze – High heat makes garlic bitter and harsh. Keep the temperature at medium-low, and watch for that moment when the edges just barely turn golden. Once you smell burnt garlic, you’ve gone too far. Start over with a new batch of fresh cloves.
Mistake 3: Skipping the Wire Rack – Letting your fried wings sit directly on paper towels allows moisture to accumulate underneath, creating a soggy bottom. A wire rack solves this completely and only takes an extra minute to set up.
Mistake 4: Not Patting the Wings Dry Before Coating – Wet wings won’t coat evenly, and moisture creates steam during frying instead of a crispy exterior. Pat them completely dry, and your results will transform.
Seasonal Variations
Spring brings fresh green garlic, which has a milder flavor and is completely edible—use it thinly sliced in your glaze in place of some of the mature garlic cloves. Summer garlic is at peak flavor around July and August; this is the best time to make this recipe because the garlic is absolutely singing.
Fall brings the new harvest, which is what I consider the sweet spot for flavor and storage potential. Winter garlic is older and slightly more fibrous, but perfectly fine to use. If you notice garlic has begun sprouting (green shoots emerging from the clove), remove the shoot first—it can taste bitter.
You can also adapt this recipe seasonally by varying your garnish. Spring chives are mild and delicate. Summer brings fresh green onions. Fall suggests toasted white sesame seeds and perhaps a touch of white miso in the glaze. Winter calls for the richness of toasted black sesame seeds and perhaps gochugaru (Korean red pepper flakes) for warmth.
Nutrition Information
Per serving (based on 4 servings): 485 calories, 28g protein, 32g fat (8g saturated), 18g carbohydrate, 1g fiber, 8g net carbs, 1,240mg sodium. The chicken wings provide lean protein and collagen-rich connective tissue, which supports joint and gut health. The four cloves of fresh garlic (about 12 grams total) contribute 18 calories, 1.3g protein, 4.2g carbohydrate, and meaningful amounts of manganese and vitamin B6.
The soy sauce provides fermented umami and sodium for flavor and electrolyte balance. The mirin adds gentle carbohydrates that fuel your body while letting the garlic’s natural sweetness emerge. The fresh garlic’s allicin content—estimated at 4-8 mg per raw clove but transforming during cooking—supports cardiovascular and immune function. This isn’t a “diet” dish, but it’s genuinely nutritious, which is exactly how I approach cooking.
USDA nutrition data references show that the chicken wing is approximately 88 calories per ounce with roughly 7g protein and 6.6g fat. The garlic cloves contribute negligible calories but significant phytonutrients including sulfur compounds and flavonoids that research suggests support anti-inflammatory pathways in the body.
What Pairs Perfectly With Bonchon Soy Garlic Chicken Recipe
The soy-garlic glaze is rich and umami-forward, so you need sides that provide brightness and textural contrast. The fresh chives garnish is a clue: you want something fresh and light alongside the richness of these wings.
Steamed jasmine rice works beautifully—it’s neutral enough to let the glaze shine while providing a canvas for soaking up every drop. A simple cucumber salad with rice vinegar and sesame oil adds cooling contrast. Pickled vegetables—carrots, daikon, or ginger—cut through the richness perfectly. Steamed bok choy with garlic (naturally) adds another layer of that garlic-forward theme without repetition.
If you want something more substantial, try pairing with our Baozi Recipe Vegetarian, which provides steamed comfort alongside these crispy, garlicky wings. The soft dough creates a textural play that’s genuinely satisfying. For appetizer service, serve alongside our Banh Mi Burger Recipe for a fusion-inspired spread that celebrates bold Asian flavors.
- Steamed Jasmine Rice – Neutral and absorbent, letting the glaze’s umami take center stage
- Quick Cucumber Salad – Rice vinegar and sesame oil brighten the rich, garlicky sauce
- Pickled Vegetables – The acidity cuts through richness while their crunch contrasts with crispy chicken
- Steamed Bok Choy – Tender greens with subtle bitterness that plays beautifully with sweet garlic
- Kimchi or Spicy Pickles – Heat and fermentation echo the umami of the glaze
Bonchon Soy Garlic Chicken Recipe
Method
- Pat your chicken wings completely dry with paper towels. Moisture is the enemy of a good crust, so don't skip this. In a large bowl, combine 2 cups cornstarch with the garlic powder, and season generously with salt and pepper. The garlic powder here is your dry-crust ally—it will caramelize alongside the chicken's natural sugars, creating that restaurant-quality exterior that holds the glaze. Working with a handful of wings at a time, toss them in the cornstarch mixture, ensuring every surface is evenly coated. This isn't a flour dredging situation—cornstarch creates a lighter, crispier crust that won't become gummy as it sits in the glaze. Set the coated wings on a wire rack for 10 minutes. This resting period lets the coating set and adhere better.

- Heat neutral oil to 350°F in a heavy-bottomed pot or wok. The temperature is crucial here—too low and you get greasy wings; too high and the coating burns before the meat cooks through. Working in batches to avoid overcrowding (which drops the oil temperature), carefully lower your coated wings into the hot oil. Fry for 12-14 minutes, turning occasionally so both sides cook evenly and develop a light golden-brown color. You're looking for that perfect moment where the coating is crispy and the internal temperature reaches 165°F—not a degree more. When they're done, transfer the wings to a wire rack lined with paper towels. The wire rack is essential here because it allows air circulation underneath, preventing the bottoms from steaming. Never just pile them on paper towels.
- While your wings are frying, this is where the magic happens. In a medium saucepan over medium-low heat, combine your light soy sauce, mirin, and brown sugar. Stir gently until the sugar dissolves, about 2 minutes. Now add your minced fresh garlic and chopped red onion. This is the critical moment. Let this simmer gently for 5-7 minutes, stirring occasionally. You want the garlic to soften and its edges to just barely begin turning golden. The aroma will become noticeably sweeter and less sharp. If you're cooking too fast over high heat, the garlic will smell harsh and bite-y. You're looking for that sweet, mellow fragrance that tells you the garlic's sulfur compounds have transformed into something gentle and sweet. Add the ginger powder and the ½ teaspoon cornstarch (mixed with 1 tablespoon water to make a slurry), stirring until the glaze thickens slightly, about 1 minute. It should coat the back of a spoon but still flow freely.
- Remove your glaze from heat. In a large bowl, combine your hot, crispy wings with the warm glaze, tossing gently but thoroughly. Every wing should be coated, but work quickly so the wings stay crispy. The heat from the wings will warm the glaze without breaking down its delicate texture, and the fresh garlic flavor will penetrate the crispy coating. Transfer to a serving platter and immediately garnish with white sesame seeds and fresh chives. The chives especially are important—their bright, fresh bite prevents the dish from becoming too heavy and cuts through the richness of the glaze beautifully.

FAQs
Can I Use Pre-Minced Garlic From a Jar for This Recipe?
Technically, yes, but I won’t recommend it. Pre-minced garlic has already oxidized and lost much of its allicin content. It also contains preservatives that can affect the glaze’s flavor. For this specific recipe where fresh garlic is the hero ingredient, buying a fresh bulb and mincing it yourself makes a noticeable difference. It takes literally two minutes to peel and mince four cloves, and the flavor payoff is significant.
What if My Garlic Turned Green or Black While Cooking?
Green or black streaks in garlic during cooking are caused by a chemical reaction between sulfur compounds and copper in your cookware. This is harmless and actually indicates the presence of those beneficial sulfur compounds. However, if you want to avoid it, use stainless steel or non-reactive cookware rather than unlined copper or cast iron when cooking the glaze.
Can I Make This Recipe With Chicken Breasts Instead of Wings?
You can, but I don’t recommend it. Chicken wings have a higher fat content that keeps them moist during frying and allows the glaze to coat evenly and stick properly. Chicken breasts are leaner and tend to dry out more easily, and they don’t have the same bone structure that helps them stay crispy. If you must use breast meat, pound it to ¾-inch thickness and reduce frying time to 8-10 minutes.
How Do I Know When the Garlic in the Glaze Is Done Cooking?
Look for two clues: aroma and appearance. Raw minced garlic smells sharp and pungent—almost harsh. As it cooks gently over medium-low heat, the aroma softens and becomes sweeter, almost honey-like. Visually, the garlic pieces will lose their bright white color and develop a pale golden tone. The moment the edges are just barely golden—not brown, not dark—you’re at the sweet spot. If you go any further, it’ll taste bitter.
Can I Grow My Own Garlic for This Recipe?
Absolutely, and as a nutrition enthusiast, I love this question. Garlic grows in fall, overwinters, and harvests in summer. Plant individual cloves in October in most zones, and you’ll harvest full bulbs by July. Home-grown garlic tends to have more complex flavor than commercial varieties because you can choose heritage cultivars. The flavor intensity from garlic you grew yourself is genuinely remarkable. If you have garden space, I highly recommend it.
What’s the Difference Between Fresh and Roasted Garlic, and Can I Use Roasted?
Fresh raw garlic has sharp pungency and high allicin content. Roasted garlic is mellow, slightly sweet, and has lost much of its allicin through heat. For this recipe, roasted garlic won’t work because you need the garlic to provide that initial flavor pop in the glaze before it gently softens. Use roasted garlic in other applications—spreads, mashed potatoes, dressings—where its sweetness is the goal. Here, we want fresh.
More Recipes Featuring Fresh Garlic
- Asian Beef Shank Recipe – Slow-braised with fresh garlic, ginger, and soy for deep umami complexity
- Bao Recipe Filling – Soft steamed buns with garlic-infused braised meat
- Bamboo Sprouts Recipe – Fresh vegetables seasoned with garlic and aromatic spices
Bringing It All Together
This Bonchon Soy Garlic Chicken Recipe is about understanding one ingredient deeply. My grandmother taught me that cooking isn’t about following instructions blindly—it’s about understanding why each component matters. She showed me that garlic, when treated with respect and patience, becomes something transcendent. That’s the lesson I carry into everything I do as a registered dietitian and cook.
These crispy, garlicky wings are comfort food elevated—not because they’re fancy, but because every element has been considered. The coating is purposeful. The glaze is carefully timed. The fresh garlic is the star, and everything else supports its moment to shine. When you make this recipe, you’re not just following steps. You’re practicing patience. You’re learning how heat transforms flavor. You’re discovering why fresh ingredients matter. You’re creating something that nourishes both body and soul.
The next time you walk past the garlic in your market, pick up a bulb. Smell it. Feel its weight. Remember that inside that papery skin is the potential for magic. Then come home and make this recipe. Let garlic teach you what your grandmother probably already knew: that the simplest ingredients, treated with care, become unforgettable.
Happy Cooking!