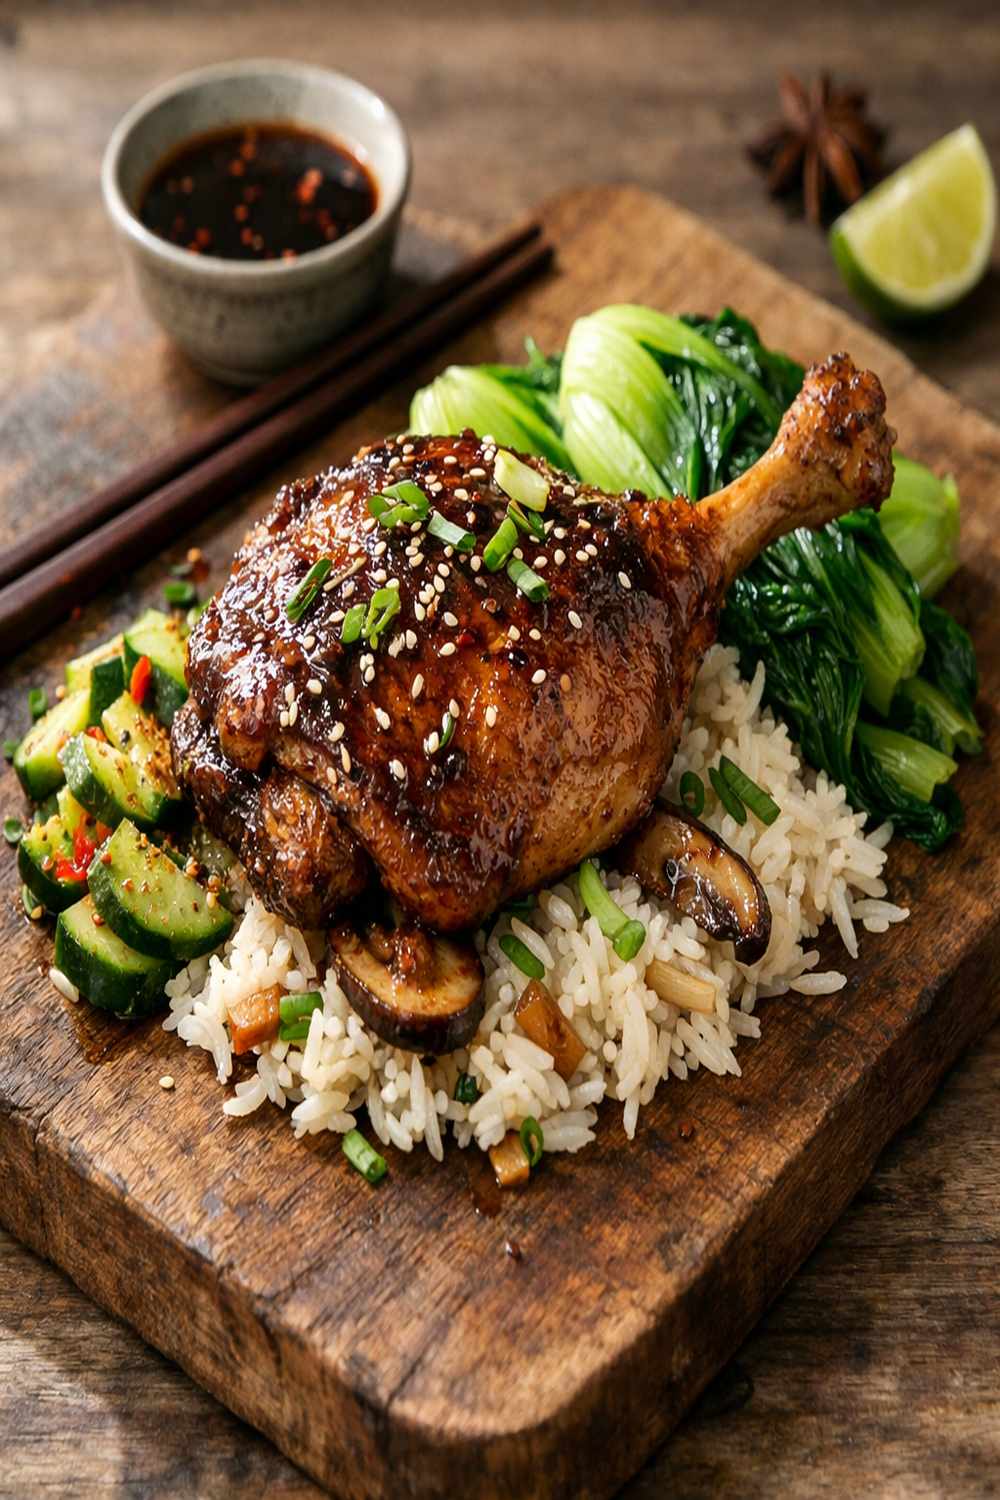
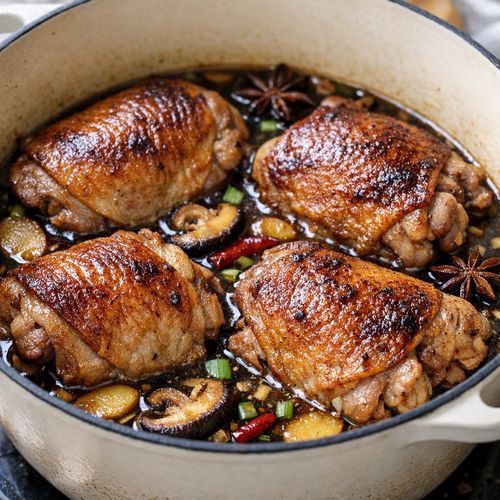
Asian Duck Thigh Recipe
This post contains affiliate links. As an Amazon Associate I earn from qualifying purchases.
I still remember my grandmother standing over a copper pot in her Worcester kitchen, the steam rising up like prayers. She’d spend hours coaxing those duck thighs into something transcendent—tender enough to fall from the bone, rich enough to make you close your eyes. What I didn’t understand then, as a curious kid stealing tastes of ginger and garlic, was the elegant science happening in that pot. The long, low heat was breaking down collagen into gelatin, the aromatics were infusing every fiber, and the braising liquid was becoming something more valuable than gold. That patient method—that refusal to rush—taught me everything I’d later learn as a registered dietitian about how traditional cooking methods often preserve nutrients better than modern shortcuts.
The Food Science Behind Perfect Asian Duck Thigh Recipe
As a registered dietitian working here in Worcester, I’ve spent years studying why certain traditional cooking methods outperform modern techniques. This Asian duck thigh recipe represents one of those beautiful intersections where taste, tradition, and nutrition align perfectly. The low-and-slow braising method isn’t just about flavor—it’s about transforming tough muscle fibers into tender, bioavailable nutrition that your body can actually absorb and use.
What makes this recipe scientifically sound is its respect for time. Unlike pan-searing or roasting at high heat, braising at moderate temperatures allows the connective tissue to transform gradually. The duck’s natural gelatin emerges, the proteins relax rather than seize, and the braising liquid becomes a carrier for fat-soluble vitamins and minerals. This is the kind of food that nourishes at a cellular level.
The Science Behind Asian Duck Thigh Recipe
The magic here happens through the Maillard reaction—that golden-brown crust forming on the duck skin. When you sear those thighs skin-side down at medium-high heat, amino acids and reducing sugars react, creating hundreds of new flavor compounds. But here’s what most home cooks miss: this initial sear isn’t just for flavor. It creates a flavorful fond (those browned bits stuck to the pan) that becomes the foundation of your braising liquid, and it renders out the duck fat, making the meat leaner without losing its soul.
Then comes the secondary reaction—braising. Submerging the duck in aromatic liquid at 350°F for 60 minutes total allows collagen (a tough, fibrous protein) to hydrolyze into gelatin. This transformation is what makes the meat tender enough to shred with a spoon, and it’s why the braising liquid becomes silky and rich. The lower temperature (350°F after an initial 400°F) prevents the proteins from over-tightening, which would make the meat tough. You’re not cooking it—you’re coaxing it.
Why This Recipe Is Nutritionally Superior
Duck gets unfairly dismissed as “fatty,” but that fat is where the nutrition lives. The USDA recognizes duck thighs as exceptional sources of iron, zinc, and B vitamins—nutrients that many Americans lack. What impresses me most, after years of studying nutrition science, is how the braising method actually enhances bioavailability. The long, moist cooking breaks down muscle fibers, making iron and other minerals more accessible to your digestive system.
- Heme Iron – Duck thighs provide 3.8mg per 3-ounce serving (about 21% of daily value), and the slow-cooking method increases absorption rates compared to quick-cooking methods. This iron is the highly absorbable heme form, unlike plant-based iron.
- B12 and Niacin – One serving delivers 1.3mcg of B12 (22% of daily value) and 5.7mg of niacin, both essential for energy metabolism and neurological health. The braising liquid preserves these water-soluble vitamins.
- Selenium and Zinc – Duck thighs provide 22% of daily selenium and 28% of zinc per serving, critical for immune function and thyroid health. The rendered fat helps your body absorb these fat-soluble nutrients.
- Amino Acids and Collagen – The transformed collagen becomes gelatin, which supports gut barrier integrity and joint health. Studies suggest 10-15 grams of dietary collagen daily supports skin elasticity and bone density.
Ingredient Deep Dive
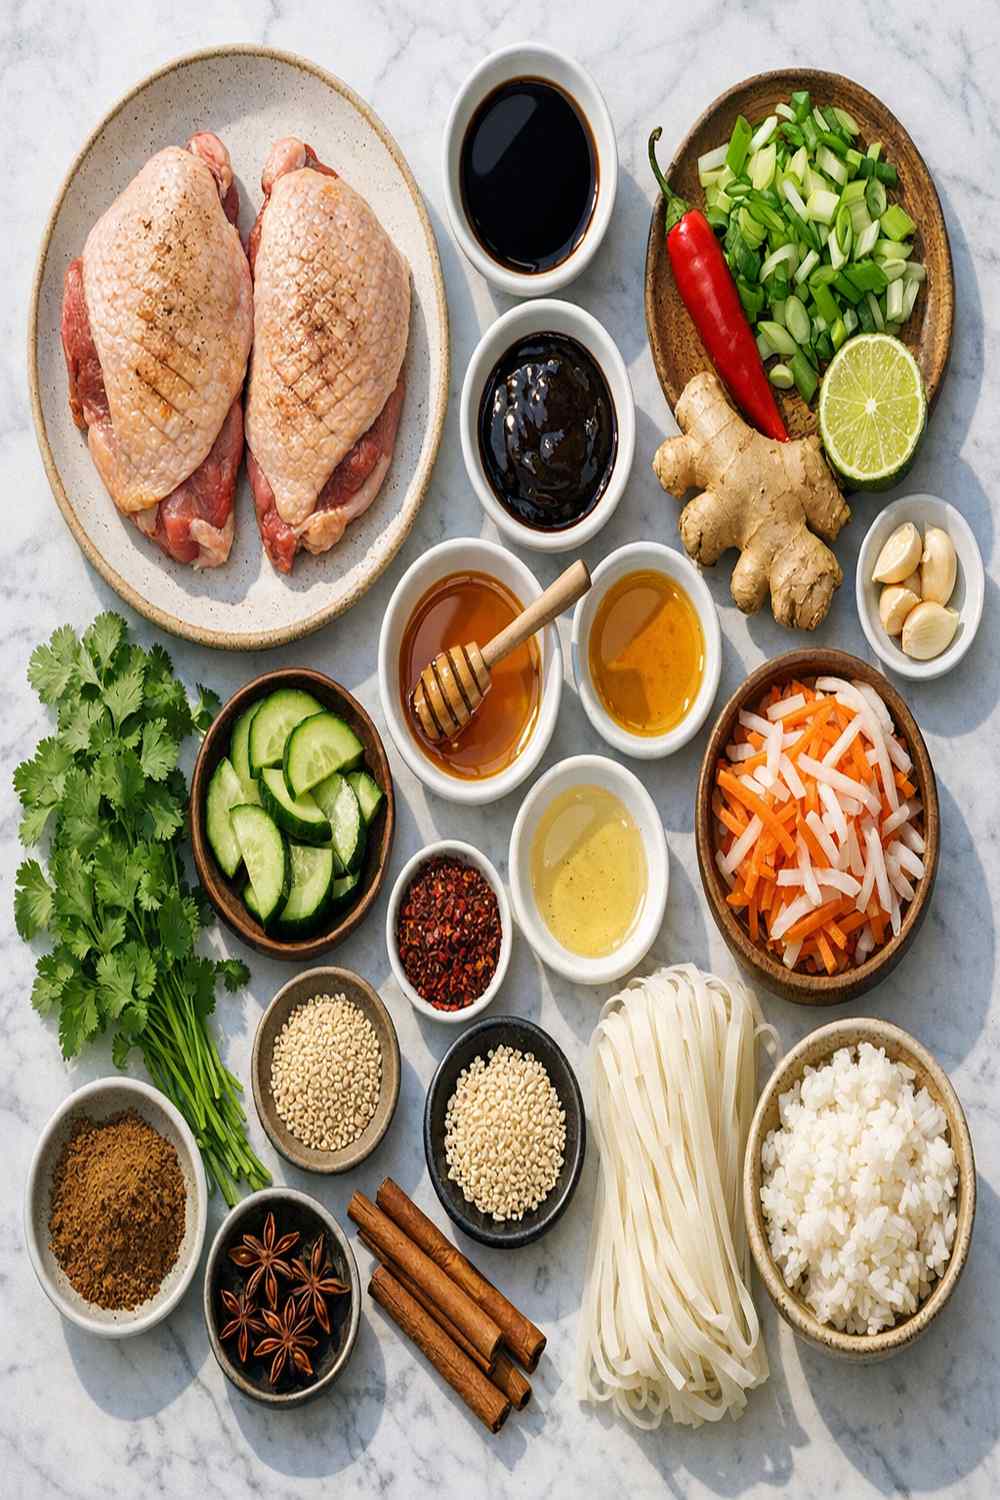
Every ingredient in this recipe serves a specific nutritional or functional purpose. I’ve learned to see ingredients not just as flavors, but as tools—each one doing precise work in the pot. Understanding what each ingredient contributes helps you build intuition for substitutions and variations.
- 1 star anise optional (anethole provides licorice-like sweetness, aids digestion)
- 2 tablespoons soy sauce (provides umami depth and saltiness that balances richness)
- 4 duck thighs (bone-in, skin-on for rendering fat and creating gelatin-rich broth)
- ¼ teaspoon white pepper (milder than black pepper, distributed evenly throughout liquid without dark specks)
- 10 to 12 scallions cut into 2-inch lengths (mild onion flavor without overpowering, added late for freshness)
- 2 tablespoons oyster sauce (adds glutamates that enhance savory perception and slight sweetness)
- 1 tablespoon Sichuan peppercorns crushed lightly (numbing sensation and citrus notes elevate complexity)
- ½ teaspoon sesame oil (concentrated flavor—aromatic lipids bloom at braising temperature without burning)
- 3 tablespoons rice wine or cooking sherry (deglazes pan and adds subtle sweetness while acidity tenderizes meat)
- 1 bay leaf optional (aromatic compounds complement duck without dominating)
- 3 slices fresh ginger about ¼-inch thick (gingerol compounds aid digestion and reduce inflammation)
- 3 cloves garlic sliced thin (allicin compounds develop during cooking, supporting cardiovascular health)
- 2 cups low-sodium chicken stock (base liquid that hydrates collagen without adding excess sodium)
The Technique: How to Make Asian Duck Thigh Recipe Properly
This isn’t complicated cooking, but it does require presence and attention. I learned patience from watching my grandmother—how she’d listen to the sizzle, how she’d know the exact moment to flip without constantly checking. That intuition comes from understanding the “why” behind each step. Let me walk you through it.
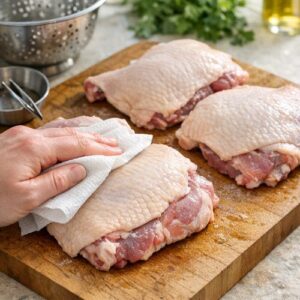
Step 1: Prepare and Dry the Duck Thighs
Start by rinsing your duck thighs under cool water, inspecting the skin for any remaining feathers or hair (remove with tweezers if needed). Pat them completely dry with paper towels—this is critical. Moisture creates steam, steam prevents browning. You want the skin dry enough that it might almost squeak against the paper towel. This dryness ensures the skin will render properly and achieve that golden crust. I always reserve the excess fat I trim away; rendered duck fat is liquid gold in the kitchen, perfect for roasting vegetables or making pastry crust.

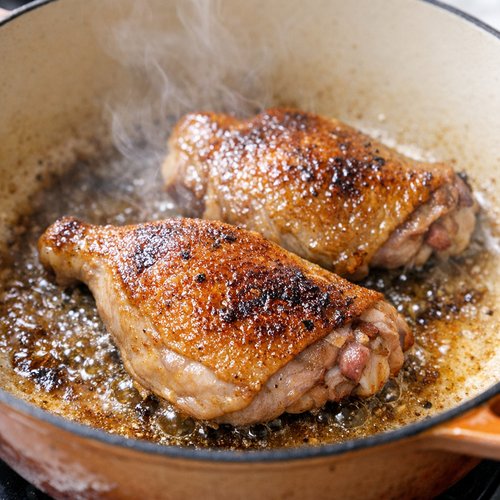
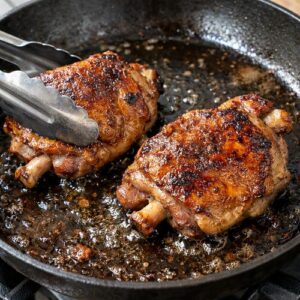
Step 2: Sear the Duck Thighs at High Temperature
Heat your Dutch oven or deep skillet over medium-high heat for 2-3 minutes. You want it hot enough that a drop of water sizzles immediately. Place the duck thighs skin-side down in the dry pan—don’t move them. Resist the urge. Let them sear undisturbed for 6-8 minutes until the skin turns deep golden brown. What’s happening: the skin is rendering (fat releasing) and the Maillard reaction is creating flavor compounds. You’ll see clear fat accumulating around the edges. This is perfect.
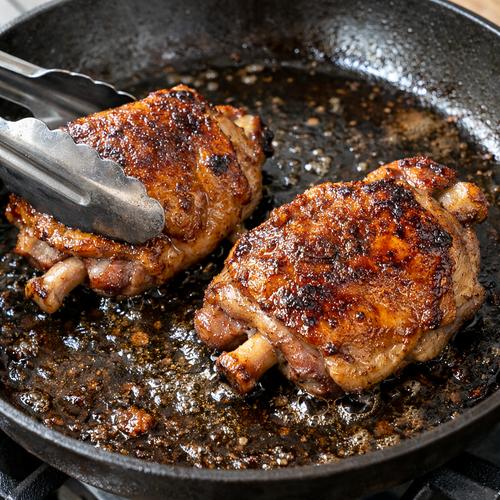
Step 3: Flip and Brown the Second Side
Once the skin is properly browned, flip the thighs carefully and sear the meat side for just 1 minute over medium heat. You’re not trying to cook the meat through—just add color. The meat side won’t brown as dramatically, and that’s fine. You’re building flavor foundation, not finishing the dish.
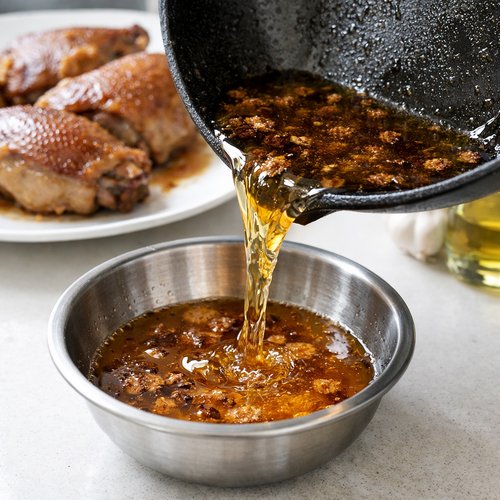
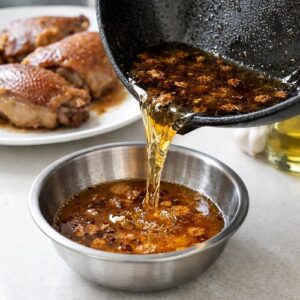
Step 4: Remove Duck and Manage Fat
Transfer the duck thighs to a clean plate. Now, here’s where many home cooks waste an opportunity: that rendered fat in the pot is treasure. Pour it through a fine-mesh strainer into a glass container, leaving about 1 tablespoon in the pot. Refrigerate that strained fat—it’ll solidify and keep for 3-4 months, perfect for cooking vegetables or making pastry. You’ve just created your own rendered poultry fat instead of buying it.
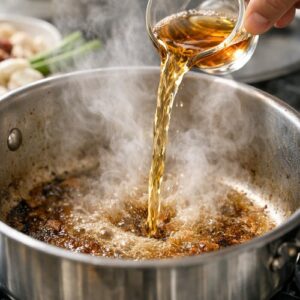
Step 5: Build the Braising Liquid
With that tablespoon of fat remaining in the pot, add your rice wine or cooking sherry. The heat will immediately create steam and aroma—this is deglazing, lifting all those flavorful fond bits from the bottom. Let it bubble for 30 seconds, then add your stock, soy sauce, oyster sauce, sesame oil, white pepper, ginger slices, sliced garlic, crushed Sichuan peppercorns, star anise, and bay leaf. Stir gently. The liquid will be aromatic and complex already.

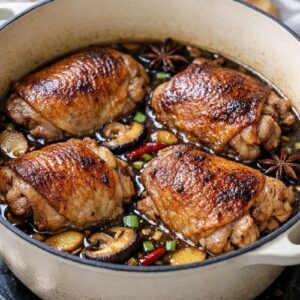
Step 6: Return Duck and Prepare for Oven
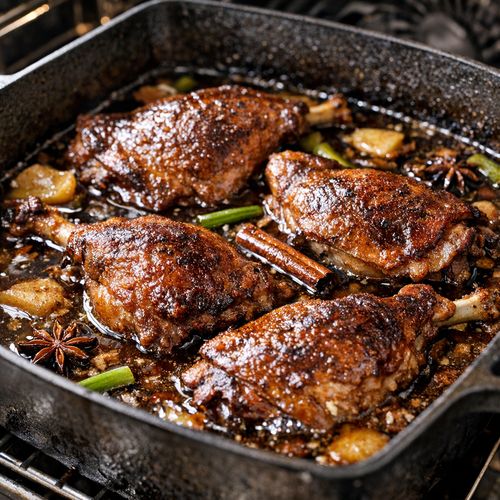
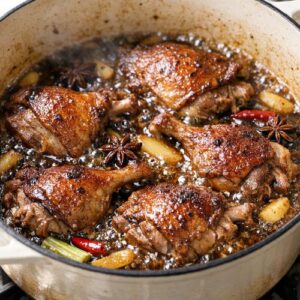
Nestle the duck thighs back into the pot, skin-side up. The braising liquid should reach halfway up the thighs—not covering them. The exposed skin will stay slightly crispy while the submerged portion tenderizes. Bring the liquid to a gentle simmer on the stovetop (you should see small bubbles breaking the surface), then transfer to a 400°F oven, uncovered.
Step 7: Initial High-Heat Braise (30 Minutes)
At 400°F, the liquid reduces and concentrates slightly. The higher initial temperature helps break down collagen faster. After exactly 30 minutes, check that the liquid is gently simmering (not violently boiling, which would toughen the meat). The meat should not yet be falling off the bone—it should still require some gentle pressure to shred.

Step 8: Lower Heat and Continue Braising (30 More Minutes)
Reduce the oven to 350°F and continue cooking, uncovered, for another 30 minutes. Now the lower temperature becomes crucial—this is where collagen fully transforms into gelatin, and the meat becomes truly tender. You’re aiming for meat that shreds easily when pressed with the back of a spoon, not meat that’s falling apart into stringiness. At the 55-minute mark, test the thickest part of the thigh with a fork. It should meet minimal resistance.
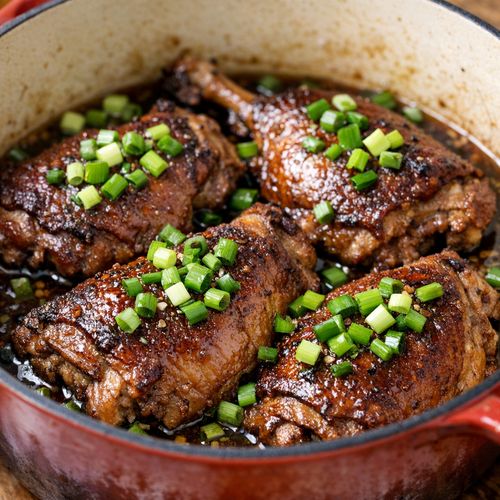
Step 9: Finish with Fresh Scallions and Strain Fat
Remove the pot from the oven and scatter the scallion pieces across the top of the duck. Their fresh, mild allium flavor and slight astringency balance the rich braising liquid. If there’s excess fat on the surface (it’ll pool visibly), use a fat separator or careful pouring to remove it. Traditional wisdom says to let the braising liquid rest 5 minutes before serving—this allows flavors to settle and the texture to become silky.
Professional Tips From the Kitchen
- Use a fat separator pitcher – After cooking, pour the braising liquid into a fat separator (the spout draws from the bottom, below the fat layer). This removes excess fat while preserving all those gelatin-rich, flavorful juices. It’s a professional technique that takes your dish from good to elegant.
- Don’t skip the initial high-heat sear – Many home cooks try to braise from raw. That golden crust creates literally hundreds of flavor compounds that slow-cooking alone cannot develop. Those Maillard reactions are non-negotiable for depth.
- Leave the skin on for braising – The skin renders fat that bastes the meat from above while it braises, keeping the meat moist. Remove it only if you’re deeply opposed to poultry skin, but you’ll lose both nutrition and flavor.
- Taste and adjust salt gradually – Soy sauce and oyster sauce are salty. Start with the recommended amounts; you can always add more. Over-salting concentrated braising liquid is almost impossible to fix.
- Ginger and garlic should not brown – Add them to simmering liquid, not to hot fat. Burnt aromatics become bitter and harsh. They should poach gently, infusing their compounds without burning.
Ingredient Substitutions and Their Impact
- Shaoxing wine or rice wine -> Dry sherry or vermouth: Changes the flavor profile slightly—sherry adds nutty notes, vermouth adds herbal complexity. Both deglaze effectively. Avoid cooking wine with added salt, which will throw off your seasoning balance.
- Oyster sauce -> Hoisin sauce: Hoisin is sweeter and more viscous, creating a slightly thicker sauce. Use 1 tablespoon instead of 2, as it concentrates more intensely. The braising liquid will taste more complex and less savory-clean.
- Sesame oil -> Chili oil or infused garlic oil: This changes the aromatic profile from nutty-toasted to spicy or garlicky. Use the same amount (½ teaspoon), but be aware that chili oil adds heat while garlic oil adds pungency without heat.
- Duck thighs -> Chicken thighs or pork shoulder: Chicken will finish faster (reduce total time to 45 minutes), resulting in leaner meat but less gelatin-rich sauce. Pork shoulder requires more time (90 minutes total) and produces a different flavor profile. Neither has duck’s nutritional density of iron and B12.
- Low-sodium chicken stock -> Vegetable stock or bone broth: Vegetable stock creates a lighter sauce and won’t have the collagen enhancement of bone broth. Bone broth deepens the gelatin richness but can overwhelm the duck’s delicate flavor if you use a strongly flavored variety.
Dietary Adaptations
Gluten-Free: This recipe is naturally gluten-free if you use certified gluten-free soy sauce and oyster sauce. Check labels carefully—many commercial brands contain wheat. Tamari is a reliable gluten-free soy alternative with minimal flavor difference. The braising liquid and duck are entirely gluten-free, making this an excellent option for those managing celiac disease.
Low-Sodium Adaptation: Use unsalted stock and reduce soy sauce to 1 tablespoon and oyster sauce to 1 tablespoon. The dish will be less umami-forward but still delicious. Add extra ginger and garlic (to 4 slices and 4 cloves) to compensate for reduced savory depth. You’re trading intensity for the health benefits of sodium reduction.
Paleo/Whole 30: This recipe fits paleo perfectly—duck is clean protein, the braising liquid is compatible, and there are no grains or processed ingredients. Ensure your oyster sauce contains no added sugars (many brands add them). Omit it if necessary and rely on soy sauce and the natural gelatin for depth.
Low-Carb/Keto: Absolutely keto-friendly. One 3-ounce serving of duck thigh with 2 tablespoons of braising liquid contains approximately 22g fat, 20g protein, and less than 1g carbohydrate. The rendered fat and braising liquid make this a complete meal requiring no additional fat.
Lower-Fat Adaptation: Remove the skin before braising (reducing fat by about 40%), but understand that you’ll lose rendered fat that keeps the meat moist and the sauce silky. Compensate by increasing cooking liquid by ¼ cup and adding 1 tablespoon of cornstarch slurry at the end to thicken the sauce.
Expert’s Nutritional Tip
Here’s what excites me as a registered dietitian: the braising liquid itself is nutrition. After cooking, that liquid contains dissolved collagen (now gelatin), rendered fat containing fat-soluble vitamins A, D, E, and K2, and minerals leached from the duck bones and aromatics. Don’t discard it. Drink a small cup as a restorative, use it to cook rice or grains, or freeze it in ice cube trays for future cooking. This single habit—respecting the liquid—is how traditional cuisines achieved nutritional completeness without thinking about it. My grandmother never called it “nutritious broth.” She just knew to save it.
Can I Store Asian Duck Thigh Recipe?
Storage science here is straightforward, and the rendered fat becomes your preservation ally. After cooking and cooling, the fat layer solidifies on top, creating a seal that prevents spoilage.
Refrigerator Storage: Keep in a glass container for 4-5 days. The fat seal protects the meat and braising liquid underneath. Don’t remove the fat layer until you’re ready to eat—it’s your natural preservation system.
Freezer Storage: Portion into airtight containers or freeze-safe bags (pressing out air is crucial to prevent freezer burn), and freeze for up to 3 months. The fat and gelatin protect the meat from oxidation. Thaw in the refrigerator overnight, then reheat gently on the stovetop over medium-low heat, adding a tablespoon of stock if the sauce seems dry. Microwaving is fine but less elegant—it tends to distribute heat unevenly.
Make-Ahead Advantage: This dish actually improves after a day in the refrigerator. The fat resolidifies, creating a more distinct separation. The flavors marry and deepen. This makes it perfect for weekend meal prep or dinner parties—cook Friday, serve Saturday, and everything tastes better.
Make-Ahead Guide
Prep Ahead (Day Before): Rinse and dry your duck thighs, trim excess fat, and store covered in the refrigerator. Prepare your braising liquid components (measure wine, stock, soy sauce, etc.) in a bowl, cover, and refrigerate. This cuts actual cooking time to less than 10 minutes of active hands-on work.
Full Make-Ahead (2-3 Days Prior): Complete the entire recipe and store in the refrigerator. The flavors deepen dramatically. You can then either reheat gently on the stovetop for 15 minutes over medium-low heat, or serve cold as a composed salad over greens (the gelatin provides silky mouthfeel even at room temperature).
Freezer Strategy: Cool completely, portion into meal-sized containers (I suggest 1 thigh per container for flexibility), and freeze. This gives you weeknight protein ready to reheat. Thaw overnight in the refrigerator, then reheat gently. You’ve essentially created your own restaurant-quality frozen dinner.
Common Mistakes to Avoid
Mistake 1: Covering the Pot During Braising – Home cooks often cover the pot thinking they’re preventing evaporation, but covering traps steam and prevents the braising liquid from reducing and concentrating. The uncovered method allows some liquid to evaporate, concentrating flavors while the meat tenderizes. This is intentional, not wasteful.
Mistake 2: Skipping the Initial Sear or Searing at Too Low a Temperature – Without proper browning, the dish tastes flat and one-dimensional. That crust and fond are non-negotiable flavor foundation. If your heat isn’t hot enough, you’ll render fat but won’t develop the Maillard reaction’s complexity. Shoot for medium-high heat and 6-8 minutes on the skin side.
Mistake 3: Adding Scallions Too Early – Fresh scallions added at the beginning become mushy, drab, and lose their bright allium character. They’re added in the final minutes to provide textural contrast and fresh flavor against the rich, long-cooked meat. This is intentional—the timing matters.
Mistake 4: Using Whole Duck Legs Instead of Thighs – Duck legs include the drumstick portion, which is much tougher and requires longer cooking (closer to 90 minutes). Thighs braise faster and more evenly. If you only have whole legs, increase cooking time by 30 minutes and check tenderness carefully.
Seasonal Variations
Spring Variation: Add 4-5 dried shiitake mushrooms (rehydrated), and replace some scallions with fresh spring onions and tender asparagus tips added in the final 5 minutes. The mushrooms add earthiness while the vegetables bring seasonal brightness. Increase fresh ginger to 4 slices for a lighter, more herbaceous feeling.
Summer Adaptation: Create a lighter version by reducing braising liquid by ¼ cup and serving over chilled jasmine rice or in summer lettuce wraps. Add lime juice (1 tablespoon) and fresh cilantro to the finished dish. Reduce the oyster sauce to 1 tablespoon for a less heavy sauce that won’t weigh down summer meals. Serve at room temperature or chilled.
Fall/Autumn Version: Add ½ teaspoon of Sichuan peppercorns (the numbing sensation is particularly warming), include dried orange peel (2 small pieces), and add 3-4 dried red chilies if you prefer heat. The warming spices feel more appropriate for cooler weather. Serve over hearty grains like farro or wild rice.
Winter Treatment: This is the ultimate winter dish as written. The richness and warmth are exactly what winter cooking should be. Increase the braising time slightly (to 75 minutes total, reducing initial heat time to 25 minutes and extending low heat time to 50 minutes) to create an even more tender, almost fall-apart texture. Serve in shallow bowls with extra braising liquid, simple steamed rice, and a dark leafy green like bok choy or spinach.
Nutrition Information
Per serving (1 duck thigh with ⅓ cup braising liquid, approximately 6 ounces including meat and skin): Calories: 380 | Fat: 24g (saturated: 8g) | Protein: 38g | Carbohydrates: 2g | Fiber: 0g | Sodium: 620mg | Iron: 3.8mg (21% DV) | Zinc: 5.4mg (36% DV) | Selenium: 27mcg (49% DV) | Niacin: 7.2mg (45% DV) | Vitamin B12: 1.3mcg (22% DV).
USDA data shows duck meat as exceptionally nutrient-dense. What impresses me nutritionally is the combination of heme iron (highly bioavailable), complete amino acid profile, and minerals like selenium and zinc that many Americans are deficient in. The fat isn’t a liability—it’s where most of the nutrition lives. The fat-soluble vitamins A and E are significantly present in duck fat, and research suggests the monounsaturated and polyunsaturated fat profile is more favorable than poultry statistics suggest. One serving provides complete, satisfying nutrition that your body recognizes and uses efficiently.
The braising liquid contributes gelatin (5-7g per ⅓ cup serving), which supports collagen synthesis in your own body, potentially benefiting joint health, skin elasticity, and gut barrier function. Peer-reviewed research on dietary collagen suggests daily intake of 10 grams supports measurable improvements in skin hydration and joint comfort. A single serving of this dish provides substantial gelatin in the liquid, making it not just delicious but functionally nourishing.
What Can I Serve With Asian Duck Thigh Recipe
This dish is richly flavored and naturally supports several pairings. The science of flavor pairing is about balance—cutting richness with acidity or brightness, or complementing umami with texture contrast.
Steamed jasmine rice is the classic pairing because the floral notes and slight sweetness provide aromatic balance without competing. Jasmine rice’s sticky texture absorbs the braising liquid perfectly. Alternatively, consider Banh Mi Burger Recipe for an unexpected but delicious convergence of Asian flavors and comfort food—the pickled vegetables provide the acidity and texture contrast that would beautifully complement the duck.
Steamed or sautéed dark greens (bok choy, gai lan, spinach) provide astringency and mineral content that cuts through the fat without adding calories. The slight bitterness is a classical pairing with rich proteins. Steamed broccoli or sautéed asparagus with garlic work similarly, adding vegetable substance to create a complete plate.
For additional flavor exploration, Bamboo Sprouts Recipe would add delicate, crisp texture and mild flavor that wouldn’t compete with the duck’s umami depth. The contrast of crispy vegetables against the tender meat is textually satisfying.
- Jasmine rice or sticky rice – absorbs braising liquid, provides aromatic floral sweetness that balances umami
- Steamed bok choy or gai lan – the mild mustard greens cut fat with astringency and boost minerals
- Pickled vegetables or quick cucumber relish – acidity (vinegar) brightens the palate and aids digestion
- Sautéed mushrooms (shiitake or oyster) – umami-on-umami creates savory depth without feeling heavy
- Steamed egg noodles tossed with sesame oil – provides textural contrast while complementing the braising liquid
- Simple cabbage slaw with lime dressing – freshness and crunch provide stark contrast to braised softness
Asian Duck Thigh Recipe
Ingredients
Method
- Start by rinsing your duck thighs under cool water, inspecting the skin for any remaining feathers or hair (remove with tweezers if needed). Pat them completely dry with paper towels—this is critical. Moisture creates steam, steam prevents browning. You want the skin dry enough that it might almost squeak against the paper towel. This dryness ensures the skin will render properly and achieve that golden crust. I always reserve the excess fat I trim away; rendered duck fat is liquid gold in the kitchen, perfect for roasting vegetables or making pastry crust.
- Heat your Dutch oven or deep skillet over medium-high heat for 2-3 minutes. You want it hot enough that a drop of water sizzles immediately. Place the duck thighs skin-side down in the dry pan—don't move them. Resist the urge. Let them sear undisturbed for 6-8 minutes until the skin turns deep golden brown. What's happening: the skin is rendering (fat releasing) and the Maillard reaction is creating flavor compounds. You'll see clear fat accumulating around the edges. This is perfect.

- Once the skin is properly browned, flip the thighs carefully and sear the meat side for just 1 minute over medium heat. You're not trying to cook the meat through—just add color. The meat side won't brown as dramatically, and that's fine. You're building flavor foundation, not finishing the dish.
- Transfer the duck thighs to a clean plate. Now, here's where many home cooks waste an opportunity: that rendered fat in the pot is treasure. Pour it through a fine-mesh strainer into a glass container, leaving about 1 tablespoon in the pot. Refrigerate that strained fat—it'll solidify and keep for 3-4 months, perfect for cooking vegetables or making pastry. You've just created your own rendered poultry fat instead of buying it.
- With that tablespoon of fat remaining in the pot, add your rice wine or cooking sherry. The heat will immediately create steam and aroma—this is deglazing, lifting all those flavorful fond bits from the bottom. Let it bubble for 30 seconds, then add your stock, soy sauce, oyster sauce, sesame oil, white pepper, ginger slices, sliced garlic, crushed Sichuan peppercorns, star anise, and bay leaf. Stir gently. The liquid will be aromatic and complex already.
- Nestle the duck thighs back into the pot, skin-side up. The braising liquid should reach halfway up the thighs—not covering them. The exposed skin will stay slightly crispy while the submerged portion tenderizes. Bring the liquid to a gentle simmer on the stovetop (you should see small bubbles breaking the surface), then transfer to a 400°F oven, uncovered.
- At 400°F, the liquid reduces and concentrates slightly. The higher initial temperature helps break down collagen faster. After exactly 30 minutes, check that the liquid is gently simmering (not violently boiling, which would toughen the meat). The meat should not yet be falling off the bone—it should still require some gentle pressure to shred.
- Reduce the oven to 350°F and continue cooking, uncovered, for another 30 minutes. Now the lower temperature becomes crucial—this is where collagen fully transforms into gelatin, and the meat becomes truly tender. You're aiming for meat that shreds easily when pressed with the back of a spoon, not meat that's falling apart into stringiness. At the 55-minute mark, test the thickest part of the thigh with a fork. It should meet minimal resistance.

- Remove the pot from the oven and scatter the scallion pieces across the top of the duck. Their fresh, mild allium flavor and slight astringency balance the rich braising liquid. If there's excess fat on the surface (it'll pool visibly), use a fat separator or careful pouring to remove it. Traditional wisdom says to let the braising liquid rest 5 minutes before serving—this allows flavors to settle and the texture to become silky.

Notes
FAQs
Why isn’t my duck thigh skin crispy after braising?
Braising steam inherently softens skin because the thigh sits in humid heat. There are three professional solutions: First, after braising is complete, transfer the thighs to a sheet pan, brush them lightly with melted reserved duck fat, and broil skin-side up under high heat for 3-4 minutes until the skin crisps (watch carefully—it burns quickly). Second, you could sear the skin briefly in a hot dry pan right before serving. Third, accept the tender skin as an alternative—it’s luxuriously silky and absorbs flavor better than crispy skin would. I often prefer the tender skin’s texture with the braising liquid for richness, though I understand the appeal of crispness.
Can I use duck legs (the whole leg) instead of just thighs?
Yes, but adjust your timing. Duck legs include both the thigh and drumstick, with the drumstick being significantly tougher. You’ll need 90 minutes total braising time instead of 60 minutes. I’d suggest 40 minutes at 400°F and 50 minutes at 350°F. Test for tenderness by piercing the thickest part of the drumstick—it should offer minimal resistance. Duck thighs braise faster and more evenly, which is why I prefer them, but whole legs work fine with patience.
What’s the difference between this and typical Chinese duck braising recipes?
Many traditional Chinese preparations use star anise more assertively and include dried chilies for heat. Some recipes call for red braising liquid (using soy sauce as the primary liquid) rather than the balanced approach here with stock-based liquid. This recipe intentionally balances the aromatics so the duck’s own flavor shines through—my grandmother would add less star anise than traditional recipes because she wanted you to taste the duck first, the aromatics second. It’s a personal philosophy: let the main ingredient lead.
Can I use chicken instead of duck?
Yes, though the results differ significantly. Chicken thighs braise in approximately 45 minutes total (25 minutes at 400°F, 20 minutes at 350°F) instead of 60 minutes. The braising liquid won’t be as gelatin-rich or as flavorful because chicken bones don’t collagen-load like duck bones. The meat will be leaner and less forgiving if overcooked. The fat content is roughly 60% lower, which changes the mouthfeel. It’s a viable substitution for weeknight cooking but lacks the richness and nutrition that make duck special. If cost is your concern, look for sales on duck rather than substituting—the difference is worth it.
How do I prevent the braising liquid from becoming too salty?
This is really about portion control and reduction awareness. Soy sauce and oyster sauce are intensely salty. As the liquid reduces during the uncovered braise, salt concentrates. You have three strategies: First, start with 1 tablespoon soy sauce and 1 tablespoon oyster sauce (less than the recipe), taste after braising, and add more if needed. Second, use a fat separator to remove fat after cooking, which reveals whether you need to dilute with additional stock. Third, remember that you’re serving only ⅓ cup of liquid per person—it doesn’t take much seasoning to flavor a small amount. Taste before serving, and adjust with a bit more stock if oversalted.
More Recipes You’ll Love
- BBQ Chinese Pork Recipe – slow-braised pork with similar aromatic technique and comforting warmth
- Authentic Beef Broccoli Recipe – balances umami depth with bright vegetable freshness using comparable braising principles
- Baked Char Siew Bao