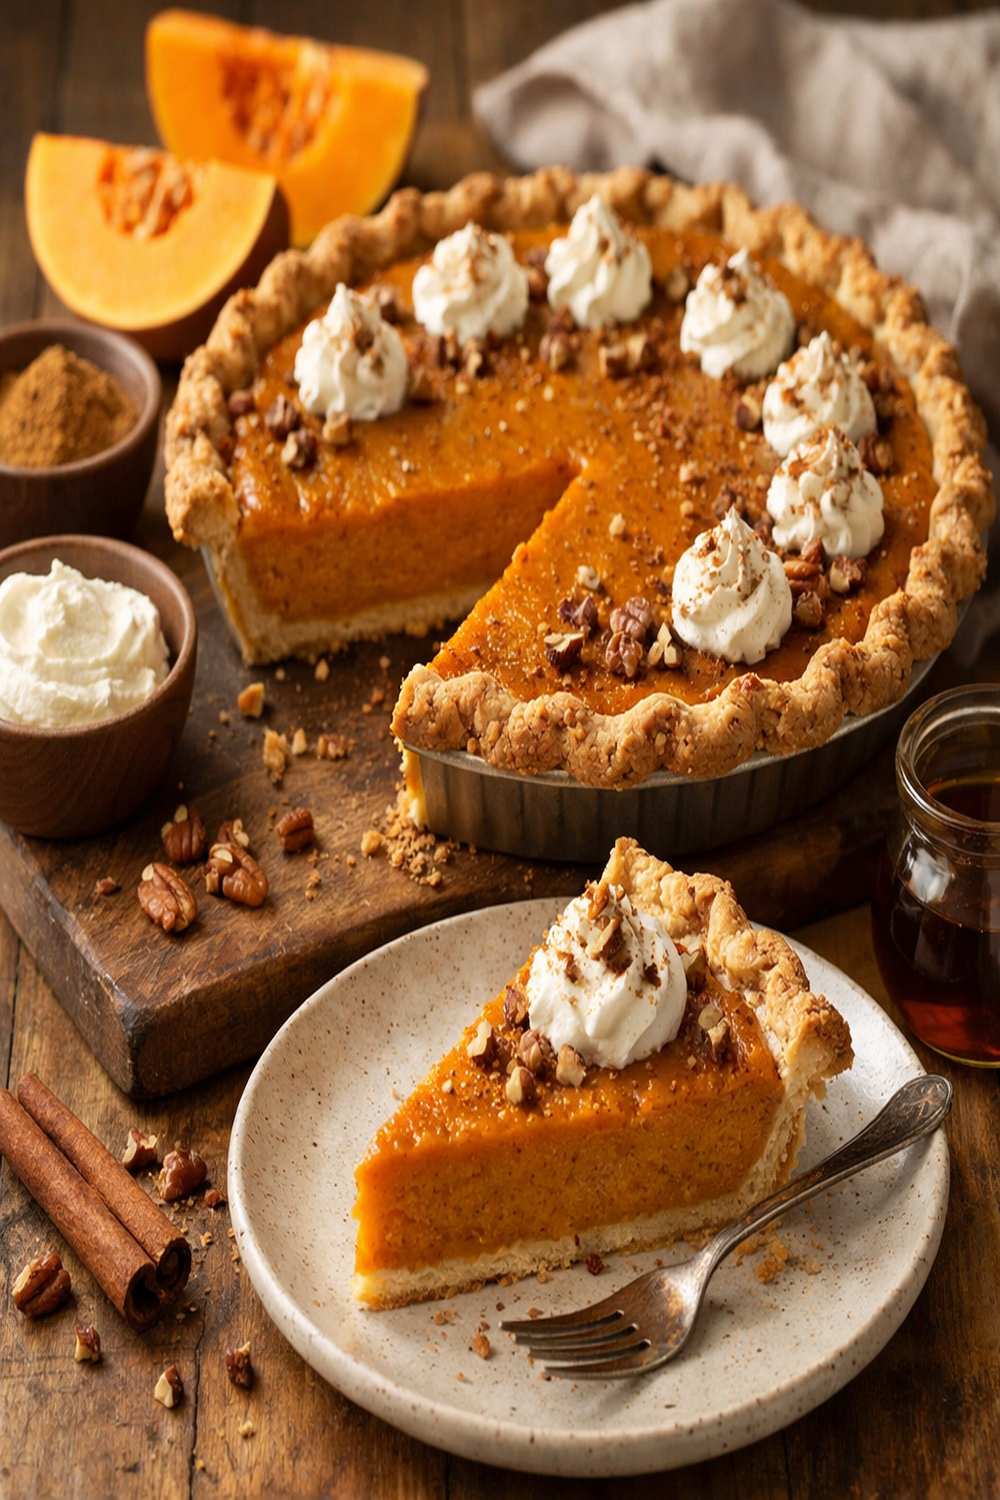
Ingredients
Method
Step 1: Prepare and Roast Your Squash Low and Slow
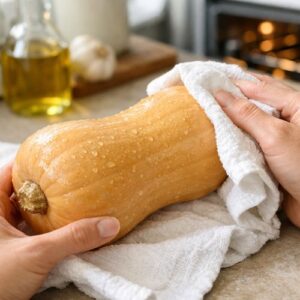
- Preheat your oven to 375 degrees Fahrenheit. While it's warming, wash your butternut squash under cool running water and pat it completely dry. A damp squash won't roast properly. Take a sharp chef's knife and carefully slice the squash lengthwise, cutting straight through the stem end. This takes some pressure—take your time and keep your hands clear of the blade's path. Scoop out all the seeds and stringy bits with a sturdy spoon or melon baller. (Save those seeds if you like—they roast beautifully with a little salt and oil.) Lightly grease a rimmed baking sheet with butter or neutral oil. Place both squash halves cut-side down on the sheet. This is important: the cut side down allows the natural sugars to caramelize against the hot pan while the skin protects the delicate flesh from drying out. Slide into the oven and roast for 45 to 60 minutes, depending on the size and thickness of your squash. You'll know it's ready when a fork easily pierces the flesh and the edges have taken on a light golden-brown color. This roasting time is non-negotiable—it's where the magic happens.
Step 2: Cool and Transform Into Silken Puree
- Remove the baking sheet from the oven and let those beautiful roasted halves rest for at least 30 minutes. This cooling period is important for two reasons: first, it makes the squash safe to handle, and second, the cooling allows the starches to set slightly, making the flesh easier to scoop and process. The squash should still be warm but not actively steaming. Once cooled enough to handle, use a sturdy spoon to scoop the soft flesh away from the skin into a food processor. You're looking to capture all the caramelized goodness clinging to the inside of that skin. Discard the skin. Add the 2 tablespoons of butter to the food processor with the warm squash. Blend on high speed for about 5 minutes, stopping occasionally to scrape down the sides. What you're creating here is pure velvet—a puree so smooth it practically pours.

Step 3: Build Your Custard Foundation
- Pour exactly 2 cups of your butternut squash puree into a large mixing bowl. (Any extra can be refrigerated for soups or roasted vegetable dishes.) To this puree, add your 2 room-temperature eggs, the cup of evaporated milk, the ½ cup of packed light brown sugar, the ¼ cup of granulated sugar, and 2 teaspoons of vanilla extract. Using a whisk or wooden spoon, stir everything together until well combined. The mixture should look creamy and unified, with no streaks of brown sugar remaining. This is the moment where you're building the custard that will be the structural and textural heart of your pie. Those eggs will set the filling. The milk creates silkiness. The sugars provide both sweetness and help with the custard's texture through their hygroscopic properties (they attract and hold moisture).

Step 4: Season With Purpose and Intention
- Now add your cornstarch, cinnamon, salt, and nutmeg to the same bowl. Stir gently but thoroughly until the spices are evenly distributed and no streaks of cornstarch remain. This step is crucial—a patch of concentrated cinnamon or an undissolved bit of cornstarch can create texture problems or flavor imbalances in your finished pie. I like to stir in one direction, scraping the bottom frequently, for about one minute. You want uniformity. Taste a tiny spoonful. It should smell like autumn in a bowl—warm, sweet, and gently spiced. Adjust spices now if needed, though this is rarely necessary if you're using fresh spices.

Step 5: Prepare Your Crust With Care
- Remove your pie crust from the freezer and let it sit at room temperature for about 10 minutes. You want it flexible enough to work with but still cold enough to maintain its structure. Using a rolling pin, gently roll out the crust to about ⅛-inch thickness, working on a lightly floured surface. Transfer it carefully to your 9-inch pie tin, letting it settle naturally into the corners and up the sides. Trim the excess dough to about 1 inch beyond the rim, then fold that overhang under itself to create a thick edge. At this point, you can crimp the edge decoratively with your fingers or a fork—this detail adds visual interest and helps the edge brown beautifully. If you'd like, brush the edge lightly with that optional tablespoon of honey diluted with a few drops of water. This encourages deep, even browning.

Step 6: Fill and Bake to Golden Perfection
- Pour your prepared filling into the unbaked crust. Pour slowly and deliberately, filling until the mixture reaches about ¼ inch from the rim of the crust. (You may not need every drop—it's better to be slightly under than to risk overflow, which creates a mess and burns on your oven floor.) Slide the filled pie into your 375-degree oven. Bake for 45 minutes to 1 hour. The pie is done when the crust is a beautiful golden brown and the filling is set around the edges but still has a very slight jiggle—about the consistency of soft custard—in the center when you gently shake the pan. That tiny wobble indicates a perfectly set custard that won't crack or become rubbery. If the crust edges are browning too quickly, cover them loosely with aluminum foil or a pie crust shield for the final 15 to 20 minutes.

Step 7: Cool With Patience (The Hardest Step)
- Remove the pie from the oven and place it on a wire cooling rack. This is the moment where you have to exercise real restraint. Let that pie cool at room temperature for at least one full hour before you even think about slicing it. I know it smells incredible. I know you want to eat it immediately. But this cooling period allows the custard to set completely. A pie sliced too warm will fall apart and weep its filling everywhere. A properly cooled pie will slice cleanly and hold its shape beautifully on the plate. After that first hour at room temperature, you can transfer the pie to the refrigerator if you'd like to serve it chilled. Chilled pie has a different, luxurious texture that some people prefer. I find both room temperature and chilled versions equally wonderful—choose based on your preference and the season.
