
Ingredients
Method
Step 1: Gather Your Aromatics and Prepare the Base
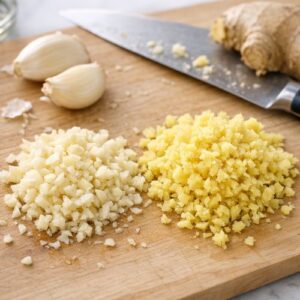
- Before you even touch the stove, mince your ginger and garlic as finely as possible. This matters more than you might think. When aromatics are finely minced rather than roughly chopped, they release their essential oils more completely into the broth and distribute evenly. You won't get little chunks of ginger surprising you—instead, you get a whisper of warmth throughout. Also prepare your cornstarch slurry by mixing that teaspoon of cornstarch with cold water in a small bowl. Stir it until smooth with no lumps. This prevents lumps from forming in your hot broth—lumpy soup is the enemy of elegant comfort food.
Step 2: Combine Broth, Aromatics, Creamed Corn, and Seasonings Over High Heat
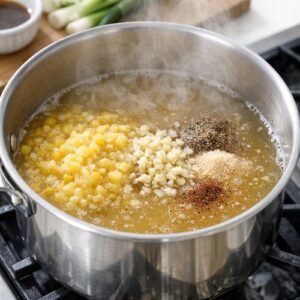
- Pour your 2 cups of broth into a medium saucepan and place it over high heat. Add your minced ginger and garlic immediately. This is different from the typical method where you sauté aromatics in fat first—here, you're essentially steeping them in the broth as it heats. Add the full can of creamed corn, the soy sauce, and your Chinese cooking wine (or mirin). Stir this combination well, making sure the creamed corn fully incorporates rather than clumping. Watch for the first sign of steam—you want to bring this to a boil, but not a rolling, aggressive boil. The moment you see active bubbles breaking the surface consistently, you've reached the temperature you need. This typically takes 4-5 minutes depending on your stove.
Step 3: Reduce Heat to Medium and Simmer Gently
- The moment your broth reaches a boil, reduce your heat to medium. This is critical. You're not looking for a vigorous rolling boil now—you want gentle, consistent bubbles breaking the surface maybe three to four times per second. This is where the magic happens. The gentle heat allows the corn and broth to marry their flavors fully, allows the soy sauce and cooking wine to meld into the background, and allows the aromatics to fully infuse without becoming harsh or burnt-tasting. Stir occasionally—maybe every minute or so—just to ensure nothing sticks to the bottom and the flavors stay distributed. Cook for exactly 5 minutes at this medium heat. I know that sounds short, but it's intentional. The broth has already come to a boil, so the cooking is essentially complete; this 5 minutes is just about flavor integration and ensuring your corn has fully released its natural thickeners.
Step 4: Thicken the Broth With Your Cornstarch Slurry
- After 5 minutes, slowly pour your prepared cornstarch-and-water mixture into the simmering broth while stirring constantly. This is the moment where technique prevents lumps and creates silkiness. Don't dump it all in at once. Instead, pour it in a thin stream—maybe a quarter of the mixture at a time—while stirring in circular motions. The constant stirring keeps the cornstarch suspended evenly throughout rather than settling into clumps. You'll notice the broth becoming glossier almost immediately. Continue stirring for another minute to ensure the cornstarch fully hydrates and reaches its thickening power. Your broth should now coat a spoon with a light, silky layer rather than running right off like water. If it's not quite thick enough for your preference, you can add another teaspoon of cornstarch mixed with a splash of water, but go slowly—it's easier to add more thickener than to thin it back down.
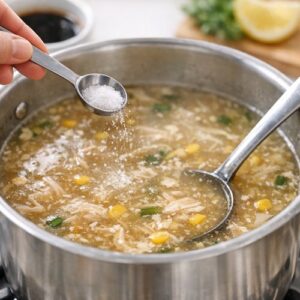
Step 5: Adjust Seasoning Before Adding Egg
- Taste your broth now, before the egg goes in. Add salt gradually—maybe a quarter teaspoon at a time—and taste between additions. The soy sauce already brought some saltiness, so you usually don't need much more. Add white pepper to taste, starting with just a small pinch. The white pepper should be almost invisible but provide a subtle heat that makes you want another spoonful. This is your only chance to adjust seasoning before the egg; once the egg goes in, the flavor profile is essentially locked.
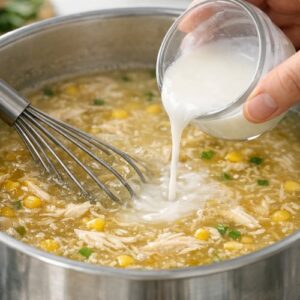
Step 6: Turn Off Heat and Create Silky Egg Ribbons
- This is the step that separates home cooking from cooking with intention. Turn off your heat completely. Yes, completely—remove the pot from the burner entirely if you're on an electric stove. Whisk your egg in a small bowl until completely uniform with no visible streaks of white or yolk. Now, holding a fork or thin whisk at a slight angle above the surface of the broth, slowly pour the whisked egg in a very thin stream while stirring the broth in one direction (usually counterclockwise). The egg will cook from the residual heat and create those characteristic silky strands rather than scrambled pieces. This takes maybe 30 seconds total. You'll see the egg ribbons form in real time. Do not stir aggressively—you're not trying to fully incorporate the egg. You're creating ribbons. This is what my grandmother meant when she said "watch it dance." The egg swirls through the golden broth and creates something beautiful.

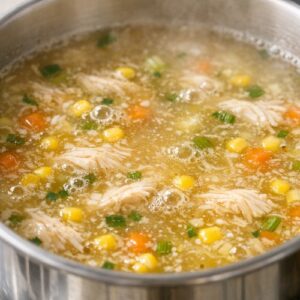
Step 7: Add Protein and Final Touches
- Once the egg ribbons have set (and they'll set almost immediately in the residual heat), add your shredded chicken. Stir gently to distribute it throughout. If your chicken is cold from the refrigerator, this gentle stirring will warm it through using the residual heat of the broth. The chicken doesn't need to cook further; it just needs to be incorporated and warmed. Taste one final time and adjust seasoning if needed. Some people love a whisper more of white pepper; some want the garnish to provide the final seasoning note.

Step 8: Serve Immediately With Fresh Garnish
- Ladle your soup into bowls immediately while it's still steaming. Top each bowl with a generous pinch of sliced scallions or shallots. These fresh aromatics provide brightness, a slight crunch, and a subtle sweetness that plays perfectly against the silky, savory broth. If you prepared those optional shiitake mushrooms, add them now too—they'll provide earthiness and umami complexity. The contrast between the hot soup and the cool, fresh garnish is part of the experience.