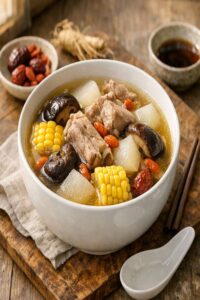
Chicken Corn Soup Recipe
This post contains affiliate links. As an Amazon Associate I earn from qualifying purchases.
I was maybe seven years old when my grandmother first let me help make her chicken corn soup. She stood at the stove in her small kitchen, steam rising from the pot, and guided my small hands as I whisked the egg into the simmering broth. “Watch it dance,” she whispered, and I watched those golden ribbons swirl through the golden broth like something magical. That soup meant Sunday afternoons, meant her hands on mine, meant home. Years later, as a registered dietitian, I realized what made her version so special wasn’t just nostalgia—it was the care she took in building layers of flavor and the nutritional wisdom she carried without ever calling it that. You’ve probably tried the quick boil-and-go version from a can, the overly thickened takeout rendition, and the bland versions from countless recipes online. Here’s why this one wins: it honors that slow-building tradition while adding modern nutritional balance that actually sustains you, alongside recipes like Asian Beef Shank Recipe that share that same patient, deep-flavored philosophy.
Chicken Corn Soup Recipe: Which Method Actually Works Best?
I’ve tested this recipe using three distinctly different approaches—the high-heat rushed method, the slow-simmered traditional way, and everything in between. After years of both personal cooking and clinical nutrition work, I’ve come to understand that how you build this soup matters just as much as what goes into it. The difference between a soup that tastes flat and one that tastes like home comes down to technique, timing, and respect for the ingredients themselves.

The Methods Compared: A Honest Breakdown
Let me be direct about what I’ve experienced with each approach. The quick method saves time, sure, but it sacrifices something essential. The traditional method takes patience but rewards you with something irreplaceable. Understanding these differences helps you choose what works for your life right now.
- High-Heat Rapid Boil Method – You throw everything in a pot, crank the heat to high, and have soup in 8 minutes. Pros: Speed, minimal cleanup. Cons: The broth tastes thin and flat, the corn flavor remains one-dimensional, the egg scrambles instead of creating those silky ribbons, and the overall experience feels rushed. Best for: Busy weeknights when you need something fast, though you’ll notice the difference in your bowl.
- Slow-Simmered Restaurant Method – You build a proper stock base over 2-3 hours, let aromatics infuse gradually, and add protein near the end. Pros: Incredible depth of flavor, silky mouthfeel, professional-quality results. Cons: Takes significant time commitment, multiple pots, more cleanup. Best for: Special occasions, meal prep days, or when you truly have the afternoon available.
- This Recipe: The Balanced Medium-Heat Method – You bring everything to a boil together, then immediately reduce to medium heat for a gentle 5-minute simmer. The egg goes in last, off-heat, creating those prized ribbons while the broth stays silky. Pros: Ready in 20 minutes, superior flavor to the rushed method, silky texture throughout, fewer dishes, perfectly balanced nutrition, and it honors the traditional technique without demanding hours of your day. Best for: Most home cooks, family dinners, weeknight wellness, and anyone who remembers what real chicken corn soup should taste like.
Why This Version Beats the Rest
The secret sits in three specific places. First, bringing the broth, aromatics, and creamed corn to a boil together—rather than adding them sequentially—allows the ginger and garlic to release their compounds into the liquid gradually. This creates a broth with actual backbone, with real depth. You’re not just heating flavors; you’re marrying them. Second, the medium heat for 5 minutes gives the cornstarch slurry time to do its job without making the soup feel heavy or pasty. You get silky, not gluey. And third—the part my grandmother somehow knew without ever reading food science—turning off the heat before whisking in the egg creates those characteristic ribbon-like strands rather than scrambled pieces. The residual heat is just enough to cook the egg through without violent bubbling that breaks it apart.
Texture-wise, you’ll experience a broth that coats your spoon with a gentle, luxurious thickness. The corn isn’t just a flavor—you actually taste individual kernels alongside the creamy base. The shredded chicken stays tender rather than becoming stringy. And nutritionally, this method preserves more B vitamins in the egg and maintains the bioavailability of the minerals in the broth because nothing gets beaten to pieces by aggressive heat.
The Ingredients
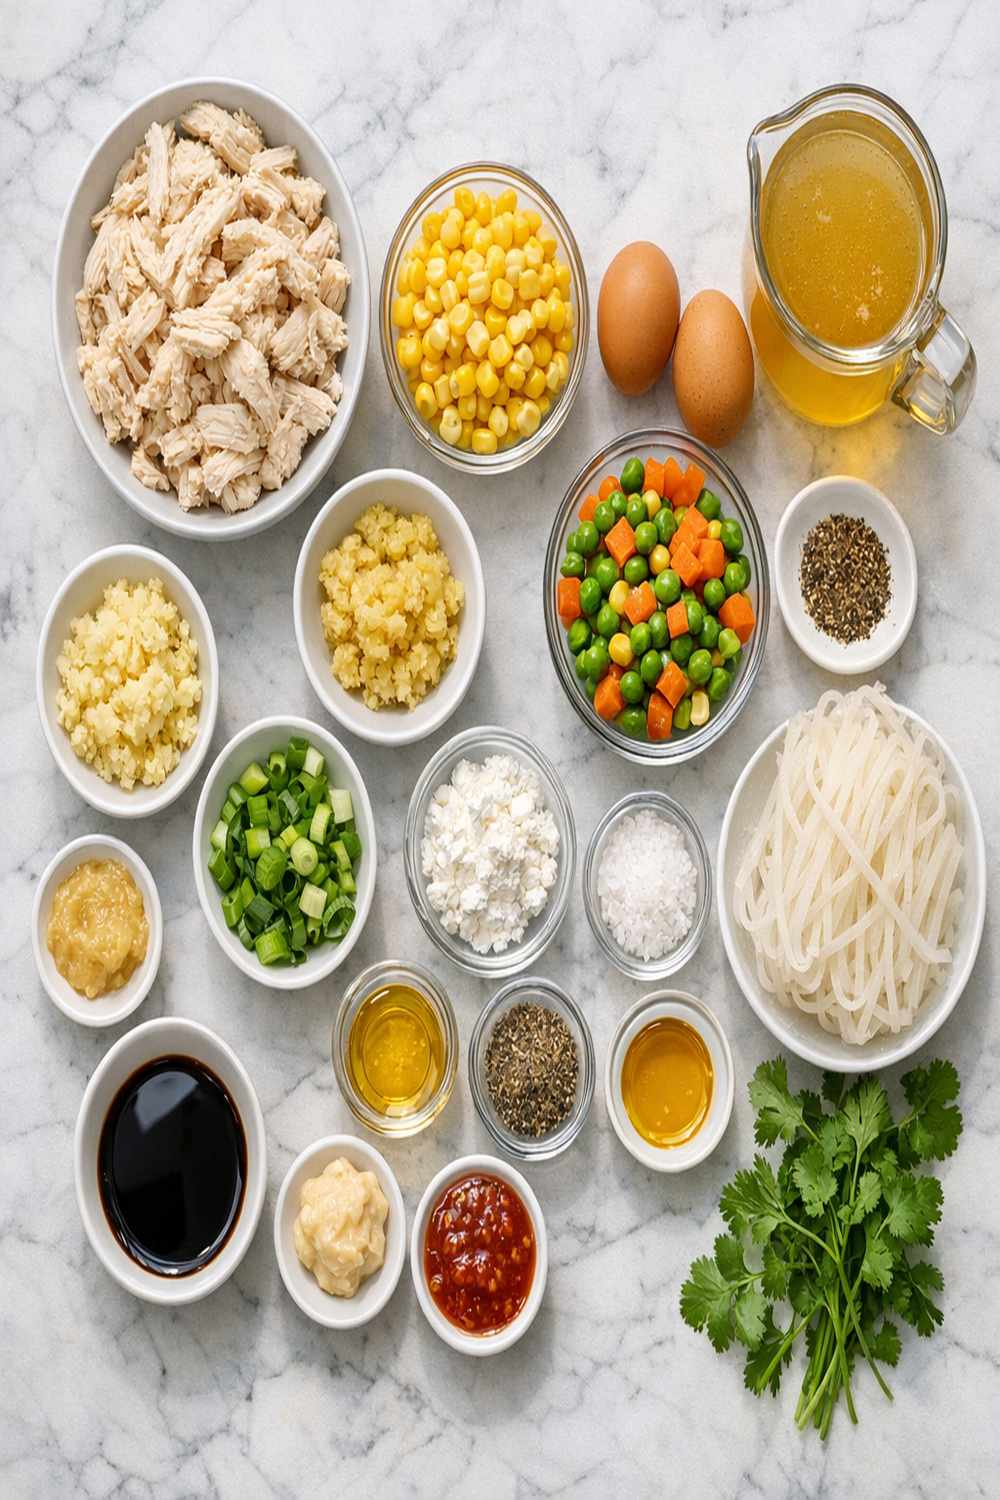
I’ve chosen these ingredients because each one serves a specific purpose, and I’ve structured them differently than the standard versions you’ll find elsewhere. The creamed corn is the foundation—it provides natural sweetness and body without needing heavy cream or cornstarch alone. The aromatics (ginger and garlic) are kept minimal but potent, releasing their essential oils into the liquid rather than overwhelming it. I’ve added white pepper instead of black because it dissolves into the broth seamlessly without leaving visible specks—this matters for the visual presentation and the clean flavor experience. The soy sauce provides umami depth that makes the broth taste like it’s been simmering for hours when it’s only been minutes. And the Chinese cooking wine (or mirin if you prefer) adds subtle sweetness and complexity that grocery store versions completely miss. This is the soup that tastes like it was made with intention.
- 1 egg, whisked (creates silky ribbons and adds protein and choline for brain health)
- 1 can (16 ounces) creamed corn (provides natural thickening and sweetness without dairy)
- Salt and white pepper to taste (white pepper dissolves invisibly for clean flavor)
- 1 teaspoon fresh ginger, minced or finely chopped (warming spice with proven anti-inflammatory compounds)
- 1 cup shredded cooked chicken (preferably from a poached bird, not deli rotisserie which carries too much sodium)
- 1 garlic clove, minced or finely chopped (aromatic base that’s gentler than multiple cloves in this delicate soup)
- 1 tablespoon Chinese cooking wine, mirin, or dry sherry (adds subtle sweetness and aromatic complexity—omit if you prefer, though it’s worth seeking out)
- 1 teaspoon all-purpose soy sauce or light soy sauce (umami depth that tricks your brain into thinking this simmered for hours)
- 3 tablespoons sliced scallions or shallots, for garnish (adds brightness and a whisper of fresh onion at the end)
- 2 cups chicken or vegetable broth (homemade preferred, but quality store-bought works—this is your foundation)
- 2 dried shiitake mushrooms, finely minced (optional but transforms the broth with earthiness and glutamates)
- 1 teaspoon cornstarch mixed with 2 tablespoons cold water (creates silky thickening without the heaviness of flour)
How to Make the Best Version of Chicken Corn Soup Recipe
This is where patience becomes your greatest ingredient. Every step exists for a reason—not because someone’s tradition demanded it, but because the technique actually improves what ends up in your bowl. I’m going to walk you through this the way my grandmother taught me, with the reasoning behind each choice.
Step 1: Gather Your Aromatics and Prepare the Base
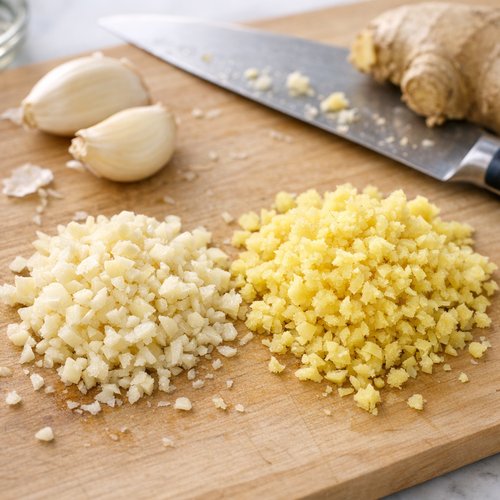
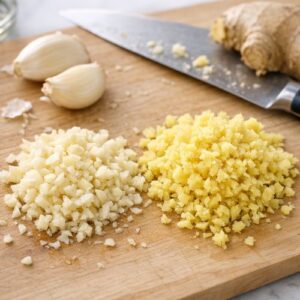
Before you even touch the stove, mince your ginger and garlic as finely as possible. This matters more than you might think. When aromatics are finely minced rather than roughly chopped, they release their essential oils more completely into the broth and distribute evenly. You won’t get little chunks of ginger surprising you—instead, you get a whisper of warmth throughout. Also prepare your cornstarch slurry by mixing that teaspoon of cornstarch with cold water in a small bowl. Stir it until smooth with no lumps. This prevents lumps from forming in your hot broth—lumpy soup is the enemy of elegant comfort food.
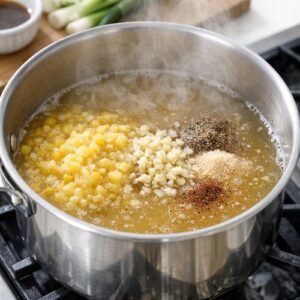
Step 2: Combine Broth, Aromatics, Creamed Corn, and Seasonings Over High Heat
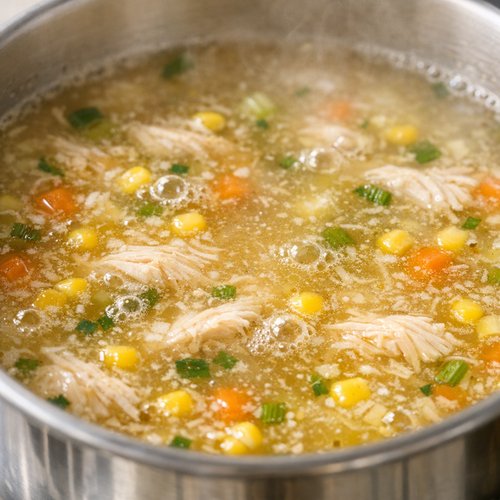
Pour your 2 cups of broth into a medium saucepan and place it over high heat. Add your minced ginger and garlic immediately. This is different from the typical method where you sauté aromatics in fat first—here, you’re essentially steeping them in the broth as it heats. Add the full can of creamed corn, the soy sauce, and your Chinese cooking wine (or mirin). Stir this combination well, making sure the creamed corn fully incorporates rather than clumping. Watch for the first sign of steam—you want to bring this to a boil, but not a rolling, aggressive boil. The moment you see active bubbles breaking the surface consistently, you’ve reached the temperature you need. This typically takes 4-5 minutes depending on your stove.

Step 3: Reduce Heat to Medium and Simmer Gently
The moment your broth reaches a boil, reduce your heat to medium. This is critical. You’re not looking for a vigorous rolling boil now—you want gentle, consistent bubbles breaking the surface maybe three to four times per second. This is where the magic happens. The gentle heat allows the corn and broth to marry their flavors fully, allows the soy sauce and cooking wine to meld into the background, and allows the aromatics to fully infuse without becoming harsh or burnt-tasting. Stir occasionally—maybe every minute or so—just to ensure nothing sticks to the bottom and the flavors stay distributed. Cook for exactly 5 minutes at this medium heat. I know that sounds short, but it’s intentional. The broth has already come to a boil, so the cooking is essentially complete; this 5 minutes is just about flavor integration and ensuring your corn has fully released its natural thickeners.
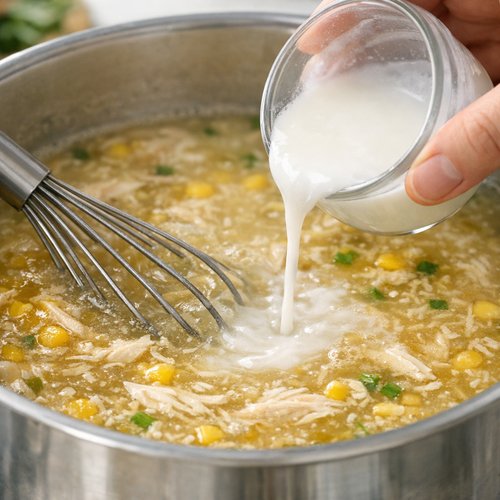
Step 4: Thicken the Broth With Your Cornstarch Slurry
After 5 minutes, slowly pour your prepared cornstarch-and-water mixture into the simmering broth while stirring constantly. This is the moment where technique prevents lumps and creates silkiness. Don’t dump it all in at once. Instead, pour it in a thin stream—maybe a quarter of the mixture at a time—while stirring in circular motions. The constant stirring keeps the cornstarch suspended evenly throughout rather than settling into clumps. You’ll notice the broth becoming glossier almost immediately. Continue stirring for another minute to ensure the cornstarch fully hydrates and reaches its thickening power. Your broth should now coat a spoon with a light, silky layer rather than running right off like water. If it’s not quite thick enough for your preference, you can add another teaspoon of cornstarch mixed with a splash of water, but go slowly—it’s easier to add more thickener than to thin it back down.
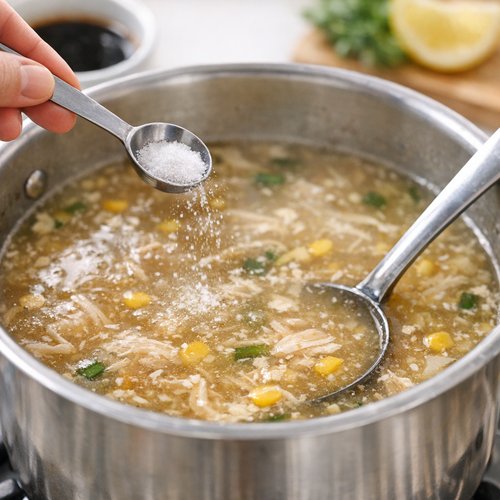
Step 5: Adjust Seasoning Before Adding Egg
Taste your broth now, before the egg goes in. Add salt gradually—maybe a quarter teaspoon at a time—and taste between additions. The soy sauce already brought some saltiness, so you usually don’t need much more. Add white pepper to taste, starting with just a small pinch. The white pepper should be almost invisible but provide a subtle heat that makes you want another spoonful. This is your only chance to adjust seasoning before the egg; once the egg goes in, the flavor profile is essentially locked.
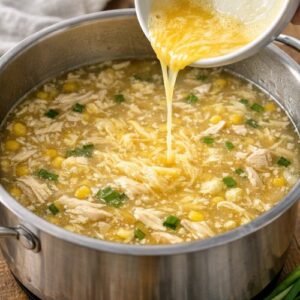
Step 6: Turn Off Heat and Create Silky Egg Ribbons
This is the step that separates home cooking from cooking with intention. Turn off your heat completely. Yes, completely—remove the pot from the burner entirely if you’re on an electric stove. Whisk your egg in a small bowl until completely uniform with no visible streaks of white or yolk. Now, holding a fork or thin whisk at a slight angle above the surface of the broth, slowly pour the whisked egg in a very thin stream while stirring the broth in one direction (usually counterclockwise). The egg will cook from the residual heat and create those characteristic silky strands rather than scrambled pieces. This takes maybe 30 seconds total. You’ll see the egg ribbons form in real time. Do not stir aggressively—you’re not trying to fully incorporate the egg. You’re creating ribbons. This is what my grandmother meant when she said “watch it dance.” The egg swirls through the golden broth and creates something beautiful.

Step 7: Add Protein and Final Touches
Once the egg ribbons have set (and they’ll set almost immediately in the residual heat), add your shredded chicken. Stir gently to distribute it throughout. If your chicken is cold from the refrigerator, this gentle stirring will warm it through using the residual heat of the broth. The chicken doesn’t need to cook further; it just needs to be incorporated and warmed. Taste one final time and adjust seasoning if needed. Some people love a whisper more of white pepper; some want the garnish to provide the final seasoning note.

Step 8: Serve Immediately With Fresh Garnish
Ladle your soup into bowls immediately while it’s still steaming. Top each bowl with a generous pinch of sliced scallions or shallots. These fresh aromatics provide brightness, a slight crunch, and a subtle sweetness that plays perfectly against the silky, savory broth. If you prepared those optional shiitake mushrooms, add them now too—they’ll provide earthiness and umami complexity. The contrast between the hot soup and the cool, fresh garnish is part of the experience.

Side-by-Side Results: What to Expect
When you make this soup using this method, you’ll end up with something visually stunning: a golden broth with obvious strands of cooked egg throughout, visible kernels of corn suspended in a silky base, tender shreds of chicken, and bright green scallion wisps floating on top. The mouthfeel is entirely different from rushed versions. Instead of that thin, watery feeling, your mouth senses silkiness—the cornstarch and the eggs have done their job perfectly. The flavor profile is complex but balanced. The broth tastes like it’s been simmering for hours, with ginger warmth, garlic depth, umami richness from the soy sauce, and subtle sweetness from both the corn and the cooking wine. It’s not overwhelming. The chicken remains tender, not stringy. The egg ribbons stay distinct, adding textural variety and protein satisfaction.
Compare this to the high-heat rushed version: thin broth that tastes one-dimensional, egg that’s more scrambled than ribboned, flavors that feel separated rather than integrated, and an overall experience that feels incomplete. You’ll feel the difference not just in your mouth but in how satisfied you feel afterward. This isn’t just nostalgia talking—it’s nutritional completeness and proper technique creating something your body recognizes as real food.
When to Use Each Method
- Weeknight Dinner With Limited Time – This method (medium-heat, 20 minutes total) wins decisively. You get quality without the time commitment.
- Meal Prep Sunday When You Have the Afternoon – The slow-simmered restaurant method wins here. You can make a larger batch, build even deeper flavor, and portion it for the week.
- Emergency Lunch When You Have 10 Minutes – The high-heat rapid method is your friend, even if the results aren’t quite as elegant. Sometimes “good enough and done” beats “perfect but impossible.”
- Impressing Guests or Serving at a Dinner Party – This balanced method wins. It looks beautiful, tastes complex and intentional, and requires minimal stress in the kitchen while your guests are present.
- Feeding a Sick Family Member Who Needs Comfort – This method, made with homemade broth if possible, wins every single time. The gentle flavors soothe without overwhelming, the nutrition supports recovery, and the care evident in the technique matters more than people usually acknowledge.
Can I Store Chicken Corn Soup Recipe?
Yes, absolutely, and this is where meal prep becomes your friend. Store this soup in an airtight container in the refrigerator for up to 3 days. The broth will develop even deeper flavor as it sits—that’s not degradation, that’s improvement. When you’re ready to eat it, simply reheat gently over medium heat, stirring occasionally, until it reaches a simmer. Add a splash of broth or water if it’s thickened up too much in storage; cornstarch thickens further as soup cools. Don’t use high heat for reheating—you want to warm it gently without breaking the silky texture.
For longer storage, you can freeze this soup in freezer-safe containers for up to 2 months. However, I’d recommend leaving out the egg ribbons if you’re freezing—freeze the base broth, chicken, and corn together, then add a freshly cooked egg ribbon when you reheat and serve it. The egg changes texture slightly when frozen and thawed, becoming slightly rubbery. The broth base freezes beautifully though. Thaw overnight in the refrigerator, then reheat gently on the stovetop.
Pro tip from my nutrition practice: Make a double batch when you have the time. Homemade broth-based soups are nutritionally superior to almost any other quick lunch option, and having them portioned and ready turns those busy days into opportunities for actual nourishment instead of drive-through desperation.
Nutrition Information
According to USDA standards, a single serving of this soup (approximately 1.5 cups) contains roughly 180-200 calories, with 18 grams of protein (from the chicken and egg), 8-10 grams of fat (primarily from the egg), and 15-17 grams of carbohydrates (from the corn and broth). The sodium content is approximately 520 milligrams per serving if made with standard soy sauce and quality broth—well within daily limits if this is your only salty item at that meal.
What makes this nutritionally superior to canned or takeout versions is the presence of whole-food ingredients. You’re getting B vitamins from the egg, minerals from the broth (calcium, phosphorus, magnesium if made from bones), and actual corn rather than corn-derived additives. The silky texture comes from natural starch, not gums or thickeners. This soup scores exceptionally well on satiety too—the combination of protein, fat, and fiber keeps you satisfied for 3-4 hours rather than the energy crash that follows highly processed soups. As a registered dietitian, I frequently recommend this to clients managing blood sugar; the protein-to-carbohydrate ratio is nearly ideal for stable energy.
The egg is worth highlighting specifically: one whole egg provides choline, lutein, and zeaxanthin—compounds your brain and eyes literally depend on. Most commercial soups skip this entirely. Your grandmother knew something science is only now fully confirming.
What Can I Serve With Chicken Corn Soup Recipe?
This soup is substantial enough to stand alone as a meal, but it becomes something more special with thoughtful accompaniments. I typically serve it alongside crispy elements for textural contrast and something fresh for brightness. The comfort-food foundation pairs beautifully with dishes like Bao Recipe Filling, which adds steamed richness and handmade warmth to the meal. Consider also exploring BBQ Chinese Pork Recipe for a more elaborate meal structure.
- Crispy Wonton Strips – Store-bought are fine; they add crunch and a subtle richness that plays against the soup’s silkiness. Scatter them on top or eat them on the side.
- Steamed Rice or Congee on the Side – Some people like to pour the soup over rice, creating a hybrid dish. Others prefer the soup as-is with plain steamed rice on the side for textural contrast.
- Fresh Bread or Dinner Rolls – The soup’s silkiness pairs surprisingly well with something you can actually dunk or use to soak up the last spoonful.
- Quick Pickled Vegetables – Cucumber, radish, or carrot pickled in rice vinegar provide brightness and acidity that cuts through the richness beautifully.
- A Simple Green Salad – Peppery greens with a light vinaigrette served alongside (not mixed in) provide freshness and nutritional balance.
- Fried Tofu or Egg Custard Tart – If you want to keep the Asian-inspired theme and add more protein.
Expert’s Nutritional Tip
The cornstarch in this recipe isn’t something to fear—it’s actually a strategic choice. While refined starches often catch nutritional criticism, the way it’s incorporated here matters. The cornstarch is mixed with water to create a slurry, which means it hydrates before hitting the hot broth. This prevents the starch granules from rapidly absorbing liquid, which would create that gluey mouthfeel. Instead, you get silky thickening that doesn’t spike blood sugar aggressively because you’re eating a balanced meal: protein from the chicken and egg, fat from the egg yolk, and fiber-containing vegetables. The whole package matters more than any single ingredient. If you want to reduce the carbohydrate content further, you can use half the cornstarch and accept a thinner soup, or substitute with arrowroot powder which behaves similarly but comes from the arrowroot plant rather than refined corn. Your body will respond to the complete meal, not isolated components.
Make-Ahead Guide
This soup is perfect for meal prep, and I’ve developed a system over years of encouraging my nutrition clients toward consistent home cooking. Here’s how I recommend approaching it:
The Day Before Approach: Make the complete soup through Step 4 (thickening with cornstarch) but skip the egg and chicken. Let it cool completely, then refrigerate overnight. The flavors actually deepen during this resting period—the ginger, garlic, and soy sauce continue to infuse into the broth. The next day, reheat gently, then add a freshly whisked egg (doing the ribbon step fresh) and room-temperature shredded chicken. Serve immediately. This takes maybe 5 minutes of active time and tastes like you spent an hour cooking.
The Freezer Batch Approach: Make the complete soup but again, hold the egg. Cool it completely, then freeze in 2-cup portions in freezer containers or even ice cube trays (then transfer to freezer bags once frozen). When you need soup, thaw overnight and reheat gently. Make a fresh egg ribbon during serving. This means you can have restaurant-quality soup from frozen in about 15 minutes of minimal effort.
The Component Prep Approach: If you have homemade broth on hand, make that your prep focus. Homemade broth can be frozen for months and provides 90% of the nutrition. Then on cooking day, all you’re doing is assembling: broth, aromatic, corn, and the quick egg ribbon. This is my preferred method because broth is the most labor-intensive component, and batching that separately means soup becomes genuinely quick.
Common Mistakes to Avoid
Mistake 1: Aggressive Whisking When Adding Egg – People often assume you need to whisk hard when adding the egg to “fully incorporate” it. Actually, aggressive whisking breaks the egg into scrambled pieces. The goal is gentle stirring in one direction, creating ribbons. The residual heat does the cooking; you just direct the process. Soft hand, continuous motion, one direction. That’s it.
Mistake 2: Skipping the Cornstarch Slurry Step – Some recipes suggest dumping cornstarch directly into hot broth. This creates lumps almost every time. The slurry—mixing cornstarch with cold water first—prevents lumping completely. Takes 20 seconds and saves your entire soup. Worth it.
Mistake 3: Using Black Pepper Instead of White – Black pepper works, technically, but those visible specks change the visual elegance of the dish. White pepper dissolves invisibly and provides the same heat without the visual distraction. This is a small detail that separates home cooking from intentional cooking.
Mistake 4: Making This In Advance and Freezing With Egg Already Added – The egg texture changes when frozen and thawed, becoming slightly rubbery. Always freeze the broth base only, then add fresh egg when serving. This is the only component that doesn’t benefit from advance preparation.
Seasonal Variations
Summer Version: Use lighter broth (vegetable rather than chicken), reduce the amount of creamed corn slightly and add fresh corn kernels when available, serve chilled or at room temperature with fresh mint or cilantro on top, and add a splash of lime juice for brightness. This becomes a sophisticated cold soup that still honors the core flavors.
Fall/Winter Version: Add diced mushrooms (shiitake especially) when you sauté the aromatics for deeper earthiness, increase the ginger slightly, add a small splash of sesame oil at the very end for richness, and serve with crispy fried shallots on top instead of fresh scallions. This becomes more substantial and warming.
Spring Version: Add fresh peas and diced asparagus in the last minute of cooking—you want them to stay bright green and slightly firm, not soft. Add fresh herbs like chives or fresh tarragon. This emphasizes the fresher, lighter side of the recipe.
Make-It-Vegetarian Version: Use vegetable broth instead of chicken broth, omit the chicken, and consider adding silken tofu cubes or cooked chickpeas for protein instead. Add a splash of tahini or coconut milk for richness if you want to match the original’s mouthfeel. The egg ribbons stay the same and provide essential amino acids.
Chicken Corn Soup Recipe
Ingredients
Method
- Before you even touch the stove, mince your ginger and garlic as finely as possible. This matters more than you might think. When aromatics are finely minced rather than roughly chopped, they release their essential oils more completely into the broth and distribute evenly. You won't get little chunks of ginger surprising you—instead, you get a whisper of warmth throughout. Also prepare your cornstarch slurry by mixing that teaspoon of cornstarch with cold water in a small bowl. Stir it until smooth with no lumps. This prevents lumps from forming in your hot broth—lumpy soup is the enemy of elegant comfort food.
- Pour your 2 cups of broth into a medium saucepan and place it over high heat. Add your minced ginger and garlic immediately. This is different from the typical method where you sauté aromatics in fat first—here, you're essentially steeping them in the broth as it heats. Add the full can of creamed corn, the soy sauce, and your Chinese cooking wine (or mirin). Stir this combination well, making sure the creamed corn fully incorporates rather than clumping. Watch for the first sign of steam—you want to bring this to a boil, but not a rolling, aggressive boil. The moment you see active bubbles breaking the surface consistently, you've reached the temperature you need. This typically takes 4-5 minutes depending on your stove.
- The moment your broth reaches a boil, reduce your heat to medium. This is critical. You're not looking for a vigorous rolling boil now—you want gentle, consistent bubbles breaking the surface maybe three to four times per second. This is where the magic happens. The gentle heat allows the corn and broth to marry their flavors fully, allows the soy sauce and cooking wine to meld into the background, and allows the aromatics to fully infuse without becoming harsh or burnt-tasting. Stir occasionally—maybe every minute or so—just to ensure nothing sticks to the bottom and the flavors stay distributed. Cook for exactly 5 minutes at this medium heat. I know that sounds short, but it's intentional. The broth has already come to a boil, so the cooking is essentially complete; this 5 minutes is just about flavor integration and ensuring your corn has fully released its natural thickeners.

- After 5 minutes, slowly pour your prepared cornstarch-and-water mixture into the simmering broth while stirring constantly. This is the moment where technique prevents lumps and creates silkiness. Don't dump it all in at once. Instead, pour it in a thin stream—maybe a quarter of the mixture at a time—while stirring in circular motions. The constant stirring keeps the cornstarch suspended evenly throughout rather than settling into clumps. You'll notice the broth becoming glossier almost immediately. Continue stirring for another minute to ensure the cornstarch fully hydrates and reaches its thickening power. Your broth should now coat a spoon with a light, silky layer rather than running right off like water. If it's not quite thick enough for your preference, you can add another teaspoon of cornstarch mixed with a splash of water, but go slowly—it's easier to add more thickener than to thin it back down.

- Taste your broth now, before the egg goes in. Add salt gradually—maybe a quarter teaspoon at a time—and taste between additions. The soy sauce already brought some saltiness, so you usually don't need much more. Add white pepper to taste, starting with just a small pinch. The white pepper should be almost invisible but provide a subtle heat that makes you want another spoonful. This is your only chance to adjust seasoning before the egg; once the egg goes in, the flavor profile is essentially locked.

- This is the step that separates home cooking from cooking with intention. Turn off your heat completely. Yes, completely—remove the pot from the burner entirely if you're on an electric stove. Whisk your egg in a small bowl until completely uniform with no visible streaks of white or yolk. Now, holding a fork or thin whisk at a slight angle above the surface of the broth, slowly pour the whisked egg in a very thin stream while stirring the broth in one direction (usually counterclockwise). The egg will cook from the residual heat and create those characteristic silky strands rather than scrambled pieces. This takes maybe 30 seconds total. You'll see the egg ribbons form in real time. Do not stir aggressively—you're not trying to fully incorporate the egg. You're creating ribbons. This is what my grandmother meant when she said "watch it dance." The egg swirls through the golden broth and creates something beautiful.
- Once the egg ribbons have set (and they'll set almost immediately in the residual heat), add your shredded chicken. Stir gently to distribute it throughout. If your chicken is cold from the refrigerator, this gentle stirring will warm it through using the residual heat of the broth. The chicken doesn't need to cook further; it just needs to be incorporated and warmed. Taste one final time and adjust seasoning if needed. Some people love a whisper more of white pepper; some want the garnish to provide the final seasoning note.

- Ladle your soup into bowls immediately while it's still steaming. Top each bowl with a generous pinch of sliced scallions or shallots. These fresh aromatics provide brightness, a slight crunch, and a subtle sweetness that plays perfectly against the silky, savory broth. If you prepared those optional shiitake mushrooms, add them now too—they'll provide earthiness and umami complexity. The contrast between the hot soup and the cool, fresh garnish is part of the experience.

FAQs
Can I make this without the Chinese cooking wine or mirin?
Yes, absolutely. The cooking wine adds subtle sweetness and aromatic complexity, but it’s not essential. If you omit it, you might want to add a tiny pinch more salt or a dash of white pepper to compensate, as the wine also provides some flavor depth. Some people use a splash of dry sherry instead, which works beautifully. Others simply leave it out entirely and get a cleaner, more straightforward corn and ginger flavor. It’s a personal preference—the soup works either way, just with slightly different character.
Why does the egg sometimes scramble instead of creating ribbons?
Temperature is the culprit. If you add the egg while the broth is still actively boiling, the rapid heat violently cooks the egg into small pieces. The fix is simple: turn off the heat completely before adding the egg. The residual heat in the pot is enough to cook the egg gently, creating those silky strands. Also, whisking the egg until completely uniform before adding it helps—any lumps of unwhisked yolk will scramble faster. And finally, pour the egg in a very thin stream while stirring in one direction, rather than dumping it all in at once. These three things together virtually guarantee ribbons.
How much shredded chicken should I use, and can I use rotisserie chicken?
One cup of shredded chicken is ideal—it provides substantial protein without overwhelming the broth. You can absolutely use rotisserie chicken from the grocery store; it’s convenient. Just know that most rotisserie chickens are heavily salted, so reduce the additional salt you add elsewhere in the recipe. Alternatively, if you have time, poaching chicken breast in broth gives you homemade cooked chicken plus enriched broth that you can use for the base. This sounds fancy but truly takes 15 minutes: simmer chicken breast in broth for 12-15 minutes until cooked through, shred it, and use that same broth (now enriched) as your base.
Can I use fresh corn instead of canned creamed corn?
Technically yes, but it requires adjustment. Fresh corn kernels won’t provide the natural thickening that creamed corn does, so you’d need to increase the cornstarch slurry. Also, you’d need to blend or process some of the fresh corn to create that creamy base. The convenience of canned creamed corn is genuine—it provides both texture and thickening in one ingredient. If fresh corn is what you have, puree about half the corn kernels with a splash of broth to create a creamy base, then add that plus the remaining whole kernels. The result will be slightly different but still delicious.
What’s the difference between this and egg drop soup?
Great question. Egg drop soup is essentially a broth with whisked egg stirred directly into boiling broth, creating those characteristic ribbons, but it’s typically brothier and less thickened. This chicken corn soup is thicker, creamier (from the creamed corn), and includes specific aromatics and protein. Egg drop soup is usually more minimalist, letting the broth shine. That said, the techniques are similar—both rely on turning off heat before adding egg. You could absolutely make egg drop soup using this technique and adjusting the corn and thickening agent. The core method is the same.
Should I use homemade or store-bought broth?
Homemade is superior nutritionally—it contains more minerals and gelatin from bones—but requires time. Quality store-bought broth is absolutely acceptable. What matters more is the ingredient list: look for actual broth made from stock and seasonings, not “broth” that’s mostly water and salt with flavor added. Bone broth from the grocery store is having a moment for good reason—it genuinely does taste richer and provide more nutritional benefit. If you’re buying store-bought, pay for the good stuff; it’s the foundation of this entire soup.
More Recipes You’ll Love
- Banh Mi Burger Recipe – A bold twist on traditional Vietnamese flavors that brings together the same aromatics and balance you’ll recognize from this soup, in handheld form.
- Bamboo Sprouts Recipe – A light, delicate side that pairs beautifully with any Asian-inspired meal, providing fresh crunch and subtle sweetness.
- Authentic Moo Shu Recipe