 Willie Regan
There’s something deeply comforting about a bowl of tender, fall-apart beef shank braised in warming spices—the kind of dish that fills your kitchen with memories before you even take the first bite. This Asian beef shank recipe is the answer when you’re craving soul-warming magic that takes time but rewards your patience tenfold. Pair it with steamed rice, tender noodles, or even alongside Authentic Shrimp Fried Rice for a complete meal that speaks to generations of home cooking.
When My Grandmother Taught Me the Meaning of Low and Slow
I remember standing on a wooden stool in my grandmother’s Worcester kitchen, barely tall enough to see over the edge of her heavy Dutch oven. She was preparing beef shank the way her mother taught her—a method passed down through her family in Asia and carried across the ocean in nothing but memory and muscle memory. The kitchen wasn’t fancy; the stovetop was modest, the ingredients humble. But what happened in that pot over hours was nothing short of transformation.
She never rushed it. She’d say, “Willie, good food cannot be hurried. The meat must have time to surrender its toughness, to become silk.” That lesson shaped how I approach nutrition and cooking today. As a registered dietitian, I understand the science—the collagen in beef shank breaks down through gentle, prolonged heat into gelatin, creating both incredible texture and bioavailable nutrients. But back then, I just knew it tasted like love.
What is Asian Beef Shank Recipe?
Beef shank braised in aromatic spices is a foundational dish across East Asian cuisines—from Chinese red-braised beef to Vietnamese pho-inspired preparations. This version honors the traditional method: a humble cut of beef transformed through hours of gentle simmering with warm spices like cinnamon, star anise, Sichuan peppercorns, and cardamom, combined with soy sauce, ginger, and garlic.
What makes this dish special is its philosophy. Beef shank, often overlooked in Western kitchens, is packed with collagen and gelatin—the very compounds that keep our joints, skin, and connective tissue healthy. When cooked low and slow, this tough, inexpensive cut becomes impossibly tender while developing layers of umami-rich flavor. The spices aren’t just flavor—they’re medicine. In traditional Asian cooking systems, these warming spices aid digestion and circulation.
The braising liquid becomes its own masterpiece: a silky, savory sauce infused with every spice and the deep flavor of beef. Nothing goes to waste. Nothing is rushed. This is how my grandmother cooked, and this is how I teach others to honor their ingredients.
Why You’ll Love This Asian Beef Shank Recipe
- Minimal Active Time, Maximum Flavor – After 15 minutes of prep and parboiling, you simply set it to simmer. This is perfect for busy weeknights when you want something that tastes like you spent hours cooking.
- Incredibly Nourishing – The collagen breaks down into gelatin and amino acids your body recognizes and uses. The warming spices support digestion. The slow cooking preserves heat-sensitive nutrients while making minerals bioavailable.
- Budget-Friendly Elegance – Beef shank is one of the most affordable cuts of beef, yet it tastes restaurant-quality after proper braising. You’re getting luxury nutrition without the luxury price tag.
- Make-Ahead Magic – This dish actually improves overnight in the refrigerator as flavors meld and deepen. It’s ideal for meal planning and reheats beautifully.
- Deeply Satisfying – There’s something primal about eating meat so tender it falls from the bone, vegetables infused with savory depth, and broth so rich it coats your spoon. This isn’t just food; it’s restoration.
- Adaptable to Your Pantry – While these spices are traditional, you can adjust heat levels, swap proteins, or simplify the spice blend based on what you have and what your body loves.
The Ingredients
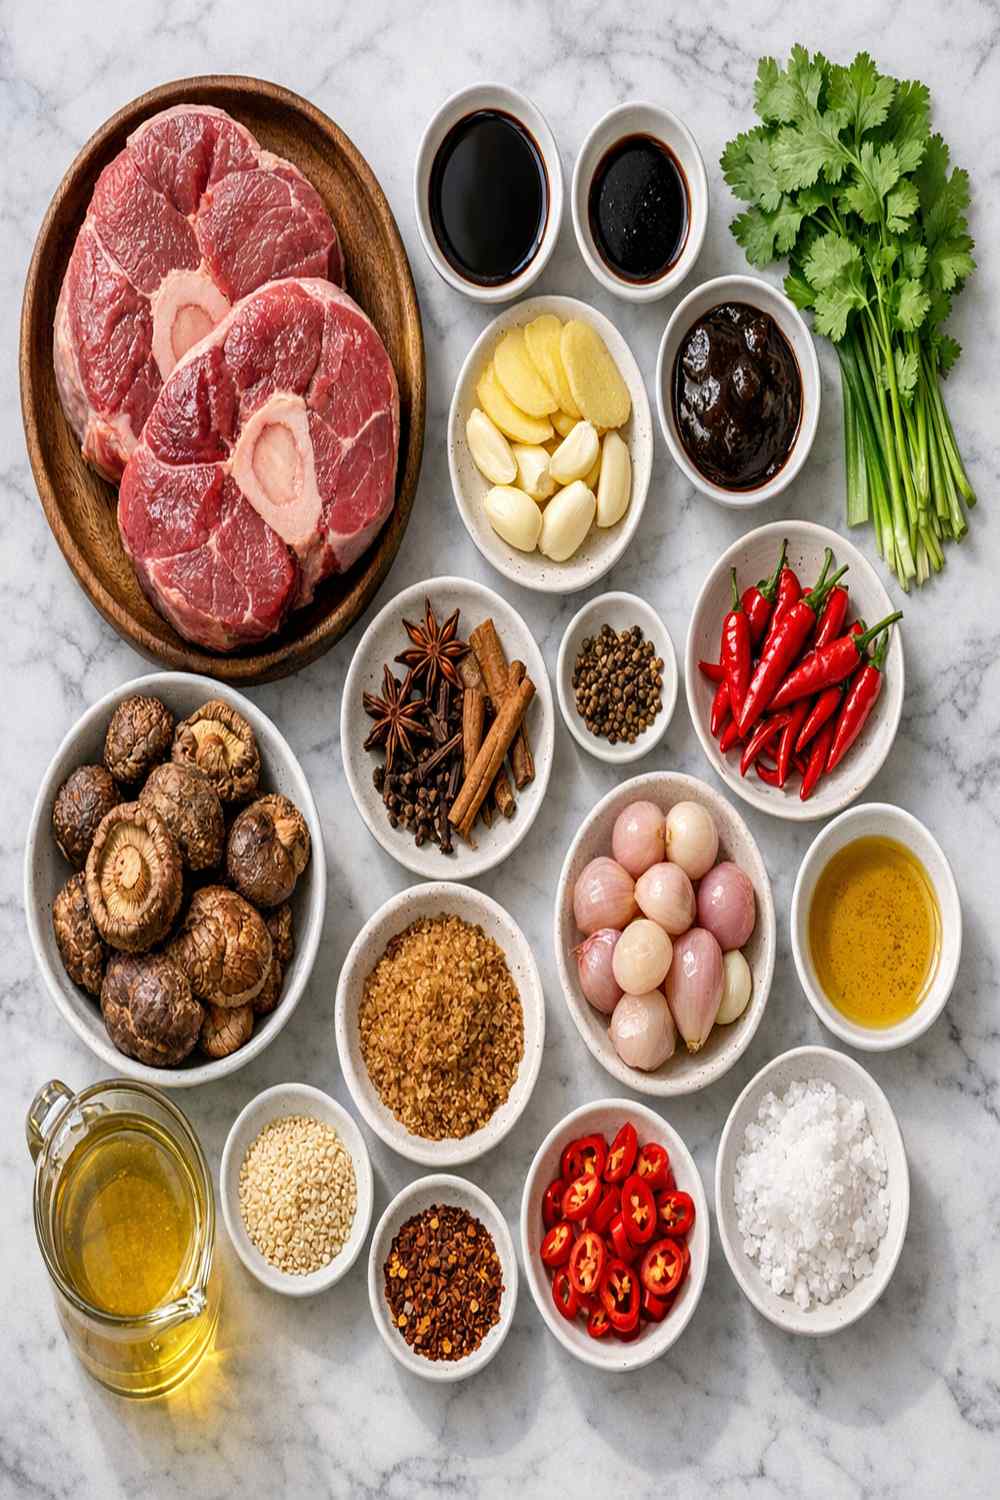
I’ve organized these ingredients by category to help you understand what each plays in this symphony of flavor. The spices create the soul of the dish, the aromatics build the foundation, and the beef shank is your canvas. You’ll notice some spices are optional—this reflects how my grandmother cooked. She used what was available, what her body needed that season, what would balance her family’s constitution. You have permission to do the same.
For the Aromatic Base
- 2½ pounds beef shank (cut into 2-3 equal cross-sections, about 5-6 inches long)
- 3 slices fresh ginger (about 1 inch thick, smashed lightly with the side of your knife)
- 5 cloves garlic (smashed, skin still on to infuse without overwhelming)
- 4 scallions (cut into large 2-inch pieces, white and green parts)
For the Braising Spices
- 3 dried liquorice slices (adds subtle sweetness and anti-inflammatory benefits, optional)
- 8 whole cloves (warming, aids digestion)
- ½ tablespoon Sichuan peppercorns (adds numbing warmth, optional but recommended)
- 1 whole nutmeg (optional, adds warmth)
- 1 teaspoon white or black peppercorns (freshness and bite)
- 1 piece dried tangerine peel (adds brightness, about 1-2 inches)
- 2 cinnamon sticks (about 3 inches long, broken in half)
- 1 tablespoon fennel seeds (optional, aids digestion)
- 1 black cardamom pod (split open to release oils)
- 2 star anise pods (whole, adds licorice notes)
- 2 bay leaves (European addition to the Asian pantry)
For the Braising Liquid
- 15 grams rock sugar (about 1 tablespoon, or substitute regular granulated sugar)
- About 4 cups water or stock (beef, chicken, or pork—enough to cover the beef by 1-2 inches)
- ¼ cup light soy sauce (sodium content noted; use good quality for better flavor)
- 2 tablespoons dark soy sauce (adds color, caramel notes, slightly thicker)
- Salt to taste (I use about 1 teaspoon, adjusted at the end)
- ¼ cup Shaoxing wine (rice wine, adds depth and alcohol cooks off)
Note: This recipe makes enough for 4-6 servings depending on appetite, with leftover braising liquid that becomes more precious each day.
How to Make Asian Beef Shank Recipe?
This method honors the traditional approach my grandmother used, with modern understanding of food safety and technique. The parboiling step removes impurities and creates a cleaner-tasting final dish. The slow simmer allows collagen to transform into gelatin without fiber breaking down into stringiness. This is where patience becomes your greatest ingredient.
Step 1: Prepare Your Spice Bundle
Before anything else, I create what I call the “spice vessel”—securing all your aromatics in cheesecloth or tea pouches so they infuse without fragmenting into the finished dish. Take two large tea pouches or cut a 6-inch square of cheesecloth. Add your cinnamon sticks, black cardamom pod, Sichuan peppercorns, star anise pods, whole cloves, dried tangerine peel, bay leaves, white peppercorns, liquorice slices, whole nutmeg, and fennel seeds if using.
Bundle it tightly—I tie mine with kitchen twine so it won’t come loose during the long simmer. This little packet is going to become your kitchen’s secret ingredient. When you open it at the end, the aroma that escapes is pure magic. Preparation time: 5 minutes.

Step 2: Prepare and Parboil the Beef Shank
Cut your beef shank into 2-3 equal cross-sections, each about 5-6 inches long. You want them substantial enough to hold together but manageable enough to fit comfortably in your pot. Don’t skip this step—the size affects cooking time and texture.
Fill a medium to large pot with water and bring it to a boil. Add your beef shank pieces and ginger slices. Let it come to a rolling boil, watching for a grayish film to form on the water’s surface—this takes about 5-8 minutes. This film is impurities rising: blood proteins, bone marrow particles, all the things that would cloud your final broth.
When you see that film clearly covering the surface, remove the pot from heat. Pour everything into a colander set in your sink. Rinse the beef shank pieces thoroughly under cool running water, rubbing gently to remove any remaining film. Rinse your pot clean as well—this is crucial for a pure-tasting final dish. Total time: 15 minutes.

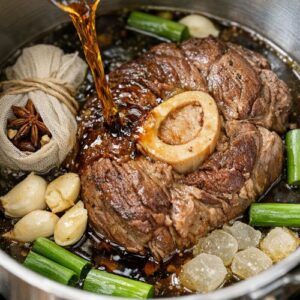
Step 3: Build Your Braising Pot
Return your cleaned beef shank to the pot. Add your spice bundle, then add the Shaoxing wine, smashed garlic cloves, scallion pieces, rock sugar, light soy sauce, dark soy sauce, and about 4 cups of water or stock. The liquid should cover the beef by about an inch—if you need more, add water now.
This step is where I pause and breathe. Looking at all these ingredients about to become one unified dish reminds me why my grandmother loved cooking. Each ingredient carries history, nutrition, tradition. You’re not just combining ingredients; you’re joining thousands of kitchens across generations. Prep time: 5 minutes.

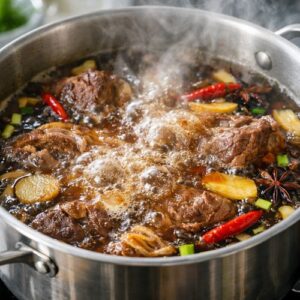
Step 4: Bring to a Boil, Then Settle Into a Simmer
Bring everything to a rolling boil over medium-high heat. You’ll see the liquid roiling, steam rising, the first tastes of flavor escaping into your kitchen. Once it reaches a full boil, reduce the heat immediately to low, aiming for just 2-3 small bubbles breaking the surface every few seconds.
This is the most important step: the difference between braising and boiling. Boiling breaks down meat fibers through violent agitation; braising coaxes them into tenderness through gentle, moist heat. The surface should barely move. If you hear vigorous bubbling, your heat is too high. Lower it further. The smell should be intoxicating—warm spices beginning their slow dance with beef and liquid. Heat adjustment: 2 minutes.

Step 5: The Long Simmer—Patience Rewarded
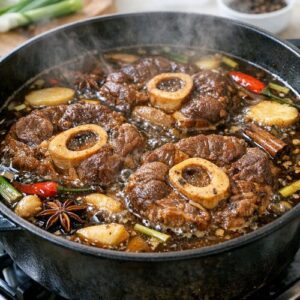
Allow the beef to simmer gently for 60 to 90 minutes, depending on the thickness of your shank pieces and your specific stovetop. My grandmother would check at the 45-minute mark by piercing the meat with a fork—if it resisted, it needed more time; if it gave way easily, it was approaching readiness.
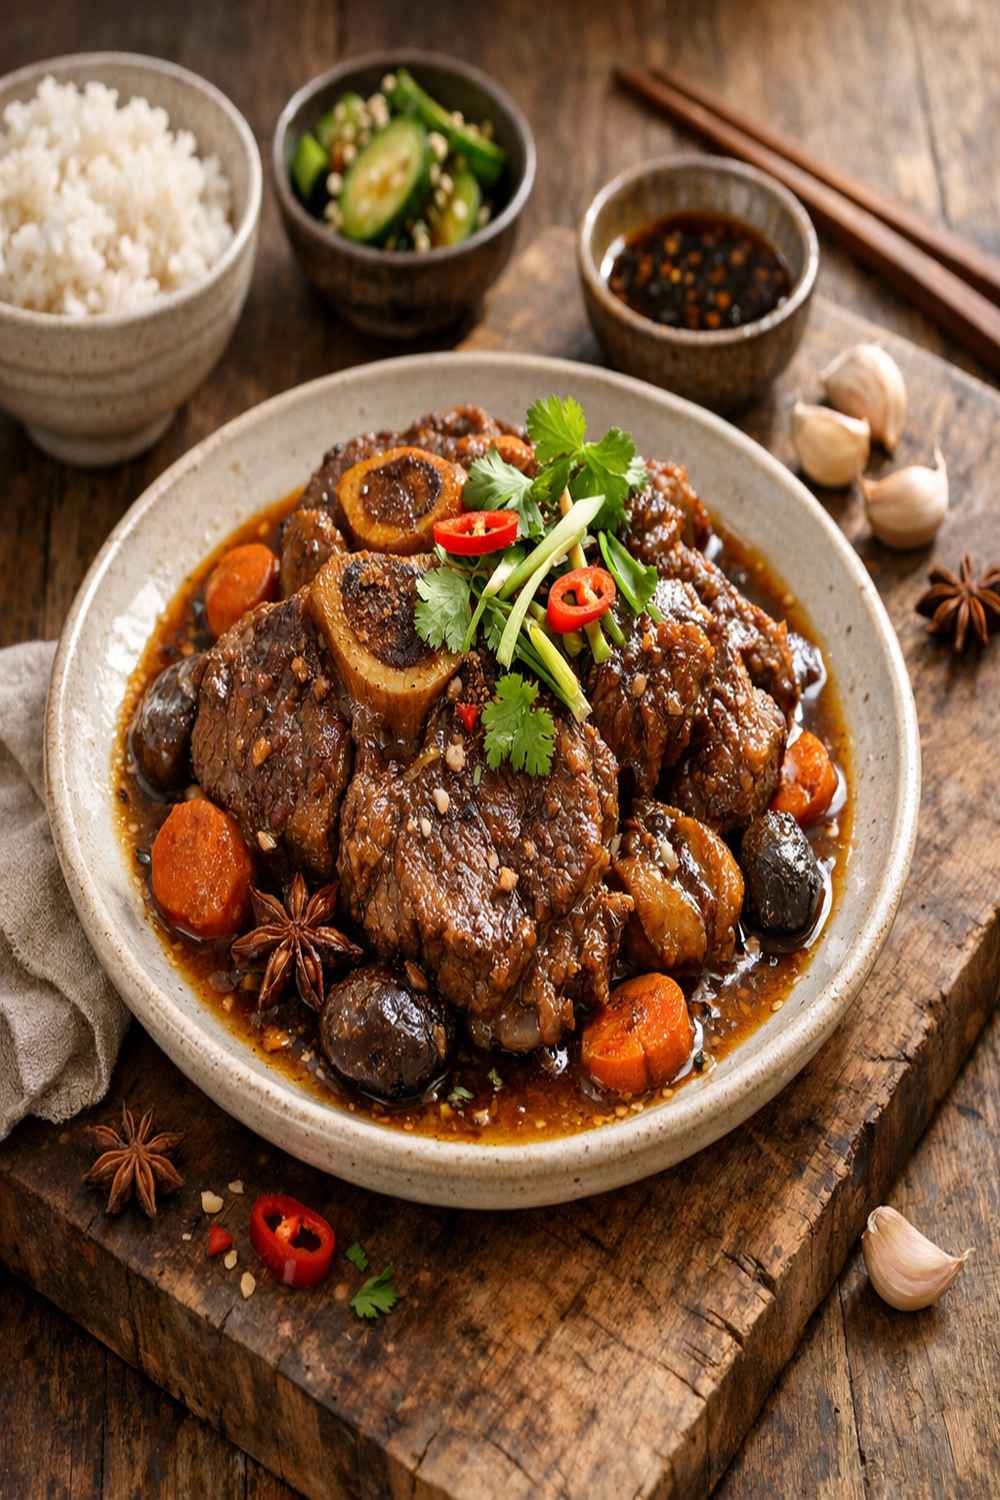
Around 60 minutes, pierce the thickest part of the largest piece with a fork. The meat should be fork-tender, offering almost no resistance, nearly falling from the bone. The braising liquid should have reduced slightly, concentrating in flavor and becoming glossier from the dissolved gelatin. The kitchen should smell like a memory—warm, safe, full of promise.
Don’t overcook beyond this point. Overcooked beef shank becomes mushy and loses its beautiful texture. You’re aiming for that sweet spot: tender enough to eat with a spoon, structured enough to hold its shape. Total cooking time: 60-90 minutes depending on thickness.

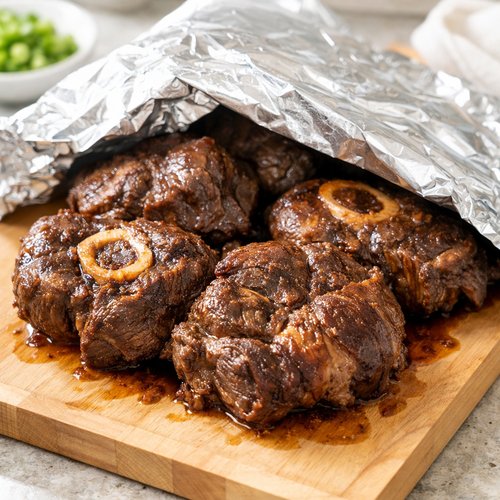
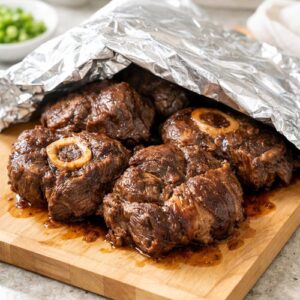
Step 6: Rest and Cool Before Slicing
Remove the beef shank pieces from the pot with tongs or a slotted spoon and place them on a clean cutting board or serving platter. Cover loosely with foil to keep them warm while they cool slightly. This resting period—about 10-15 minutes—allows the meat fibers to set, making slicing cleaner and more beautiful.
While the beef rests, you can strain your braising liquid if you prefer a cleaner presentation, removing the spice bundle and aromatics. Or leave them in for deeper flavor and rustic presentation—my grandmother always left them in, saying they’d earned their place in the pot.
Pro move: After the beef cools completely, you can return it to the braising liquid and refrigerate overnight. The flavors will deepen, the gelatin will set slightly, and everything becomes more delicious. When reheating gently on the stovetop or in the oven at 325°F, the flavors will have melded into something even more profound. Cooling time: 15 minutes; optional overnight rest: 8-12 hours.
Tips and Tricks
- Use a Heavy Pot with a Tight Lid – A Dutch oven or heavy-bottomed pot with a well-fitting lid maintains consistent temperature and prevents too much liquid from evaporating. The lid should fit snugly but not seal completely.
- Don’t Skip the Parboiling Step – This creates a cleaner, more refined-tasting final dish. It’s not extra work; it’s essential technique.
- Adjust Your Heat Carefully – Low and slow means you should barely see movement in the liquid. If you’re hearing bubbles, your heat is too high. Better too low than too high.
- Use Good Quality Soy Sauce – Cheap soy sauce is thin and overly salty. Invest in a good light and dark soy sauce; you’ll taste the difference immediately in the finished dish.
- Taste and Adjust at the End – Don’t salt heavily at the beginning. Taste your braising liquid after the beef is cooked and adjust seasoning then. The flavors will have concentrated.
- The Braising Liquid is Liquid Gold – Save every drop. Use it as a base for soups, to reheat the beef, or to braise vegetables. It’s full of collagen and nutrients.
- Make It in Advance – This dish actually improves with a night in the refrigerator. The flavors meld, the gelatin sets, and reheating is forgiving and easy.
Can I Store Asian Beef Shank Recipe?
This is where the make-ahead magic really shines. Properly stored, this dish keeps remarkably well and actually tastes better as time passes.
Refrigerator Storage: Allow the beef and braising liquid to cool to room temperature, then transfer to an airtight container. It will keep for up to 4-5 days in the refrigerator. The fat will solidify on top as it cools—this is protective and flavorful. Simply reheat gently on the stovetop over medium-low heat, or in a 325°F oven until warmed through, about 20-30 minutes.
Freezer Storage: This dish freezes beautifully. Cool completely, then transfer to freezer-safe containers or heavy-duty freezer bags (remove as much air as possible). Frozen beef shank will keep for 2-3 months without quality loss. Thaw overnight in the refrigerator before reheating gently on the stovetop.
Make-Ahead Tip: I recommend cooking this on Sunday or a day when you have time, then portioning it into individual containers. Throughout the week, you can reheat a single portion for lunch or dinner—minimal effort, maximum satisfaction.
Braising Liquid Storage: Even after you’ve eaten the beef, don’t discard the liquid. Strained and cooled, it will keep for up to a week refrigerated or 3 months frozen. Use it as a base for beef noodle soup, to braise vegetables, or to add umami depth to rice dishes.
Expert’s Nutritional Insight
As a registered dietitian, I want to highlight something that often gets overlooked: the extraordinary nutritional value of beef shank, especially when prepared this way. The collagen in beef shank—that compound that makes it tough when raw—transforms during slow cooking into gelatin and amino acids like glycine, proline, and hydroxyproline.
According to USDA data, beef shank provides approximately 25 grams of protein per 3-ounce serving, making it protein-dense without being excessive. More importantly, the amino acid profile from collagen supports joint health, skin elasticity, and gut integrity—compounds your body recognizes and uses directly.
The warming spices here aren’t just flavor. Ginger aids inflammation and digestion. Cinnamon has been shown to support healthy blood sugar response. Cardamom and fennel traditionally aid digestion and reduce bloating. The soy sauce provides salt-based seasoning plus naturally occurring glutamates that trigger umami satisfaction, meaning you feel more satisfied on smaller portions.
This is whole-food nutrition done right—ingredients that nourish at multiple levels: satiety, micronutrients, amino acid profile, and digestive support. This is why my grandmother’s cooking made us healthy.
Seasonal Variations and Make-Ahead Guide
Spring Variation
As weather warms, reduce the braising time slightly to 50-60 minutes and add fresh spring aromatics: substitute some of the dried spices with fresh coriander leaf and young ginger. Serve over fresh noodles with blanched spring vegetables like pea shoots or baby bok choy.
Summer Adaptation
While this dish is warming, summer cravings call for lighter accompaniments. Serve cold, sliced beef shank over cucumber salad with the braising liquid reduced to a glaze. Chill completely before serving—it becomes a sophisticated cold noodle topping or salad base.
Fall Deepening
This is when the recipe shines most. The warm spices align with autumn’s cooling energy. Consider adding star anise and cinnamon in slightly larger quantities. Braise at the longer end (75-90 minutes) for maximum flavor concentration. Serve with rice or roasted root vegetables.
Winter Grounding
Deep winter calls for maximum warming spices. Add an extra cinnamon stick and the optional nutmeg and dried liquorice. Serve in shallow bowls with extra braising liquid, paired with warming teas. This is ultimate comfort food for cold months.
Complete Make-Ahead Guide
Day 1 (Sunday, for example): Complete all steps through cooling. Portion into containers. Refrigerate overnight.
Days 2-5: Each day, reheat a single portion gently. Flavors improve each day as they meld. Around day 3, flavors peak. You can comfortably eat this through day 5.
Freezing Strategy: If making for future weeks, cool completely, then freeze in individual portions. Label with date and contents. When ready to eat, thaw overnight and reheat gently.
Common Mistakes to Avoid
- Skipping the Parboil: This creates cloudy, off-tasting broth. Even though it adds 15 minutes, it’s non-negotiable for clear, refined flavor.
- Cooking Too Hot: High heat breaks down meat fibers violently, creating mushiness instead of tenderness. Resist the urge to speed things up. Low and slow is the only way.
- Crowding the Pot: If your pieces are too large or too many for your pot, they won’t cook evenly. Give them space to be surrounded by liquid. Cook in batches if needed.
- Adding All Salt at the Beginning: Soy sauce and stock already contribute salt. Over-salting early makes final adjustment impossible. Taste and season at the end only.
- Discarding the Braising Liquid: This liquid is treasure—full of gelatin, minerals, and flavor. Save it for future cooking. A single pot of this liquid can flavor multiple future dishes.
What Can I Serve With Asian Beef Shank Recipe?
The beauty of this dish is its adaptability. The braised beef shank is substantial enough to be the centerpiece, but it welcomes accompaniments that either highlight or balance its richness. Think about what your body craves: warming or cooling, light or grounding, simple or complex.
- Steamed White Rice or Brown Rice – The simplest, most traditional pairing. The plain rice provides neutral canvas for the savory sauce to shine. Brown rice adds nutty depth and sustained energy.
- Fresh Noodles (Wheat or Egg) – Toss warm noodles with the beef and braising liquid for a one-bowl meal. The noodles absorb all that precious sauce.
- Rice Noodles – For lighter appetite or warmer weather. The delicate rice noodles let the beef’s flavor dominate without adding heaviness.
- Steamed or Sautéed Greens – Bok choy, gai lan, or even common spinach provide cooling balance to the warming spices. A drizzle of sesame oil and garlic makes them complete.
- Quick-Pickled Vegetables – Radish, cucumber, or carrot sliced thin and pickled in rice vinegar provide bright acidity that cuts through richness perfectly.
- Authentic Shrimp Fried Rice – Transform leftover rice into Authentic Shrimp Fried Rice on day 2 or 3, making a completely new meal from the same braising liquid base.
- Steamed Buns – Pulled beef shank tucked into soft steamed buns becomes an entirely different meal. Vegetarian Baozi dough works beautifully with this beef filling.
- Simple Broth Soup – Reduce the braising liquid slightly, add fresh herbs like cilantro, and serve as a fragrant broth alongside the beef. Some people drink the broth like tea at the meal’s end.
Substitutes
- Beef Chuck or Brisket – These cuts are more readily available than beef shank but require slightly less cooking time (45-60 minutes). They’re slightly less gelatinous but still deeply satisfying.
- Beef Short Ribs – A more tender starting point that cooks in 45-50 minutes. Slightly higher in fat, which some find more indulgent and others prefer to trim.
- Pork Shoulder or Pork Shank – Following my grandmother’s philosophy of cooking what you have, pork adapts beautifully to this preparation. Reduce cooking time to 50-70 minutes as pork is more tender than beef.
- Chicken Thighs or Wings – For lighter protein, chicken works when braised at the same temperature for just 35-45 minutes. The braising liquid becomes lighter but still deeply flavorful.
- Shaoxing Wine Alternative – If unavailable, use dry sherry or even good quality sake. Skip cheap cooking wine—it ruins the dish. Mirin works in a pinch but adds sweetness.
- Rock Sugar Alternative – Regular granulated sugar works identically in the same amount. Rock sugar simply dissolves more slowly and adds subtle mineral notes some prefer.
- Dark Soy Sauce Alternative – Use an additional tablespoon of light soy sauce plus ½ teaspoon molasses or dark honey if dark soy is unavailable. The color and depth won’t be identical but the flavor will be close.
- Spice Flexibility – This is your most important freedom. Use what you have and what your body loves. Can’t find black cardamom? Add an extra star anise. No Sichuan peppercorns? Substitute white pepper. The dish adapts beautifully to your pantry reality.
Asian Beef Shank Recipe
Ingredients
Method
- Before anything else, I create what I call the "spice vessel"—securing all your aromatics in cheesecloth or tea pouches so they infuse without fragmenting into the finished dish. Take two large tea pouches or cut a 6-inch square of cheesecloth. Add your cinnamon sticks, black cardamom pod, Sichuan peppercorns, star anise pods, whole cloves, dried tangerine peel, bay leaves, white peppercorns, liquorice slices, whole nutmeg, and fennel seeds if using. Bundle it tightly—I tie mine with kitchen twine so it won't come loose during the long simmer. This little packet is going to become your kitchen's secret ingredient. When you open it at the end, the aroma that escapes is pure magic. Preparation time: 5 minutes.

- Cut your beef shank into 2-3 equal cross-sections, each about 5-6 inches long. You want them substantial enough to hold together but manageable enough to fit comfortably in your pot. Don't skip this step—the size affects cooking time and texture. Fill a medium to large pot with water and bring it to a boil. Add your beef shank pieces and ginger slices. Let it come to a rolling boil, watching for a grayish film to form on the water's surface—this takes about 5-8 minutes. This film is impurities rising: blood proteins, bone marrow particles, all the things that would cloud your final broth. When you see that film clearly covering the surface, remove the pot from heat. Pour everything into a colander set in your sink. Rinse the beef shank pieces thoroughly under cool running water, rubbing gently to remove any remaining film. Rinse your pot clean as well—this is crucial for a pure-tasting final dish. Total time: 15 minutes.

- Return your cleaned beef shank to the pot. Add your spice bundle, then add the Shaoxing wine, smashed garlic cloves, scallion pieces, rock sugar, light soy sauce, dark soy sauce, and about 4 cups of water or stock. The liquid should cover the beef by about an inch—if you need more, add water now. This step is where I pause and breathe. Looking at all these ingredients about to become one unified dish reminds me why my grandmother loved cooking. Each ingredient carries history, nutrition, tradition. You're not just combining ingredients; you're joining thousands of kitchens across generations. Prep time: 5 minutes.
- Bring everything to a rolling boil over medium-high heat. You'll see the liquid roiling, steam rising, the first tastes of flavor escaping into your kitchen. Once it reaches a full boil, reduce the heat immediately to low, aiming for just 2-3 small bubbles breaking the surface every few seconds. This is the most important step: the difference between braising and boiling. Boiling breaks down meat fibers through violent agitation; braising coaxes them into tenderness through gentle, moist heat. The surface should barely move. If you hear vigorous bubbling, your heat is too high. Lower it further. The smell should be intoxicating—warm spices beginning their slow dance with beef and liquid. Heat adjustment: 2 minutes.
- Allow the beef to simmer gently for 60 to 90 minutes, depending on the thickness of your shank pieces and your specific stovetop. My grandmother would check at the 45-minute mark by piercing the meat with a fork—if it resisted, it needed more time; if it gave way easily, it was approaching readiness. Around 60 minutes, pierce the thickest part of the largest piece with a fork. The meat should be fork-tender, offering almost no resistance, nearly falling from the bone. The braising liquid should have reduced slightly, concentrating in flavor and becoming glossier from the dissolved gelatin. The kitchen should smell like a memory—warm, safe, full of promise. Don't overcook beyond this point. Overcooked beef shank becomes mushy and loses its beautiful texture. You're aiming for that sweet spot: tender enough to eat with a spoon, structured enough to hold its shape. Total cooking time: 60-90 minutes depending on thickness.
- Remove the beef shank pieces from the pot with tongs or a slotted spoon and place them on a clean cutting board or serving platter. Cover loosely with foil to keep them warm while they cool slightly. This resting period—about 10-15 minutes—allows the meat fibers to set, making slicing cleaner and more beautiful. While the beef rests, you can strain your braising liquid if you prefer a cleaner presentation, removing the spice bundle and aromatics. Or leave them in for deeper flavor and rustic presentation—my grandmother always left them in, saying they'd earned their place in the pot. Pro move: After the beef cools completely, you can return it to the braising liquid and refrigerate overnight. The flavors will deepen, the gelatin will set slightly, and everything becomes more delicious. When reheating gently on the stovetop or in the oven at 325°F, the flavors will have melded into something even more profound. Cooling time: 15 minutes; optional overnight rest: 8-12 hours.
Notes
FAQs
Can I Make This Recipe in a Slow Cooker or Instant Pot?
Absolutely, and I understand why you’d want to. Slow cooker: After parboiling and assembling your pot as described in Step 3, transfer everything to a slow cooker set to low. Cook for 6-8 hours until fork-tender. The longer cooking time actually develops deeper flavor—this is when slow cooker magic happens. Instant Pot or pressure cooker: After parboiling, add ingredients to your pressure cooker. Cook on high pressure for 35-40 minutes, then natural release for 10 minutes before quick release. Pressure cooking is faster but produces slightly less developed broth complexity. I prefer the stovetop method for maximum control and flavor development, but all three methods produce excellent results.
What if My Beef Shank is Still Tough After 90 Minutes?
This depends on your starting material and heat. First, verify your heat is actually low—you should see barely any bubbles. If it’s genuinely low and the meat is still tough, continue cooking. Every stovetop is different. Some beef shanks, particularly from older cattle or those with particularly dense bone structure, need up to 120 minutes. Check texture every 10 minutes after 60 minutes to find your exact timing. Some home cooks find that their meat softens noticeably between 80-100 minutes, then plateaus—this is when you stop cooking.
Is This Recipe Gluten-Free?
Yes, with careful ingredient selection. All the core components are naturally gluten-free: beef, spices, soy sauce (unless specified otherwise), and ginger. However, many soy sauces contain wheat. Purchase tamari or certified gluten-free soy sauce to keep this dish gluten-free. Shaoxing wine is typically gluten-free but verify the label. Once you’ve confirmed your soy sauce is gluten-free, this entire recipe is safe for gluten-free diets.
Can I Make This Without the Optional Spices?
Yes, and you should if it aligns with your preferences. The non-optional spices—cinnamon, star anise, bay leaves, and ginger—form the flavor foundation. The optional ones (cardamom, nutmeg, fennel, liquorice, Sichuan peppercorns) add complexity and warming properties. If you omit them, you’ll still have a delicious, warming beef braise. If you only have a few spices, use what you have. A beef shank braised with just cinnamon, ginger, and soy sauce is still beautiful. Cooking with what you have is more important than following recipes exactly.
How Do I Know When the Beef is Done Without a Meat Thermometer?
The fork test is your best friend. Pierce the thickest part of the largest piece with a fork. Truly done beef shank should offer almost no resistance—the fork should slide through easily as though the meat is already breaking apart on its own. If it still requires pressure, it needs more time. This texture is what we’re after: complete tenderness while still holding its shape. The meat should not feel mushy or stringy, just incredibly soft and yielding.
Nutrition Information
Per serving (approximately 4-6 servings per recipe, nutrition calculated for 5-ounce serving of beef with ½ cup braising liquid):
Calories: 385 | Protein: 48g | Fat: 16g | Carbohydrates: 8g | Sodium: 1,240mg | Fiber: 0g
This analysis is based on USDA Food Data Central and accounts for the braising liquid consumed with the beef. The protein content is substantial—nearly half your daily needs in a single serving—while the carbohydrate content comes entirely from the small amount of sugar and the natural carbohydrates in soy sauce and aromatics.
The fat content is primarily from the beef itself, with some from the dissolved collagen in the braising liquid. This fat is essential for nutrient absorption and satiety. The sodium level reflects the soy sauce content; if you’re sodium-restricted, you can reduce soy sauce by 25% though this impacts flavor.
What makes this nutritionally exceptional is what the standard analysis doesn’t capture: the amino acid profile from collagen, the micronutrient contribution from the warming spices (manganese from spices, chromium from ginger), and the bioavailability of minerals once collagen breaks down into gelatin. Your body recognizes and uses these nutrients directly.
More Recipes You’ll Love
- BBQ Chinese Pork Recipe – Another slow-cooked treasure using similar spice foundations and braising philosophy
- Bao Recipe Filling – Transform leftover beef shank into the most luxurious bao filling
- Authentic Shrimp Fried Rice Recipe – Perfect pairing to serve alongside or make with leftover rice
- Bamboo Sprouts Recipe – A fresh, light vegetable side that balances the warming richness of beef shank
Final Words on Slow Cooking and Remembrance
Standing in your kitchen watching this beef shank become silk in the gentle heat, you’re not just making dinner. You’re joining generations of home cooks who understood that the best food cannot be rushed, that time is an ingredient itself, that love is expressed through patience and attention.
My grandmother never owned a fancy kitchen. She never had exotic equipment or trendy gadgets. What she had was understanding: that tough becomes tender when treated gently, that spices carry medicine in their warmth, that feeding people well is a


