Chili Salt Squid Recipe
This post contains affiliate links. As an Amazon Associate I earn from qualifying purchases.
You know that crispy chili salt squid you’ve been ordering at your favorite dim sum spot or Asian seafood restaurant? The one with that irresistible golden crust, the gentle heat that builds with each bite, and that impossibly tender squid inside? I’ve spent years chasing that exact texture—that perfect marriage of crunch and tenderness that keeps you reaching back for more. Today, I’m sharing the secret to recreating it at home, better than any restaurant version I’ve tasted. And I promise you, once you master this technique, you’ll understand why my grandmother always said the best meals are the ones you make yourself, with your own two hands.
Copycat Chili Salt Squid That Tastes Better Than the Restaurant Version
This journey started about three years ago during a late-night dim sum run in Worcester. I ordered the chili salt squid, and something clicked—not just the flavors, but the technique behind them. As a registered dietitian, I’m trained to deconstruct food, to understand the nutritional architecture beneath the deliciousness. But this was different. This was about understanding how restaurants achieve that perfect textural contrast: the shattering exterior against the barely-set, tender squid within.
I went home that night obsessed. I started experimenting, testing different flour ratios, oil temperatures, and seasoning timing. I called restaurants and asked questions. I read everything I could find about how traditional Cantonese chefs prepare this dish. And after dozens of attempts—some spectacular failures included—I cracked the code. The secret isn’t just one thing; it’s a series of small, deliberate choices that compound into something remarkable.
What Makes the Restaurant Version So Good
Restaurant chili salt squid achieves its magic through three distinct elements: the extreme crispness of the coating, the precise control of oil temperature, and the timing of the salt and chili seasoning application. Most home cooks miss at least one of these, which is why homemade versions often feel either greasy, tough, or flavorless by comparison.
Here’s what they’re doing behind the scenes:
- The Two-Flour Blend – Restaurants use cornstarch mixed with wheat flour in a specific ratio. Cornstarch creates that shattering, glass-like crust, while wheat flour provides structure. The ratio matters enormously.
- Baking Powder in the Coating – This is the secret most people overlook. A touch of baking powder creates microscopic air pockets in the batter, which means more surface area for crisping and a lighter, airier final texture.
- The Ice-Water Batter – Restaurants keep their batter cold. Cold batter + hot oil = faster crust formation = less oil absorption. Warm batter creates a dense, oily coating.
- Timing the Seasoning – The chili salt blend goes on immediately after frying, while the squid is still steaming. This allows the seasoning to adhere and slightly meld with the residual heat, rather than sitting on top like an afterthought.
How This Homemade Version Compares
Honestly? Your homemade version will win on several fronts. The squid you use will be fresher than restaurant squid (which is often frozen and thawed multiple times). You control the oil quality—most restaurants use oil that’s been recycled for days. You can customize the heat level, adjust salt to your preference, and make it exactly the way you love it. The cost per serving is roughly one-third of what restaurants charge.
Where restaurants maintain an edge is in pure volume and repetition—they’ve made this dish thousands of times. But that’s exactly why I’m writing this. I’m giving you the benefit of that repetition, compressed into one detailed guide. By following this method carefully, you’ll produce restaurant-quality results in your own kitchen, and you’ll improve with each batch.
The Ingredients – Reverse-Engineered
I’ve tested these ingredients obsessively to match the restaurant version while maintaining the highest nutritional integrity. Notice I’m using whole squid and pre-cleaned tubes—this gives you options depending on what your market has available. The flour blend is the foundation of the crispness, and the cold water is non-negotiable.
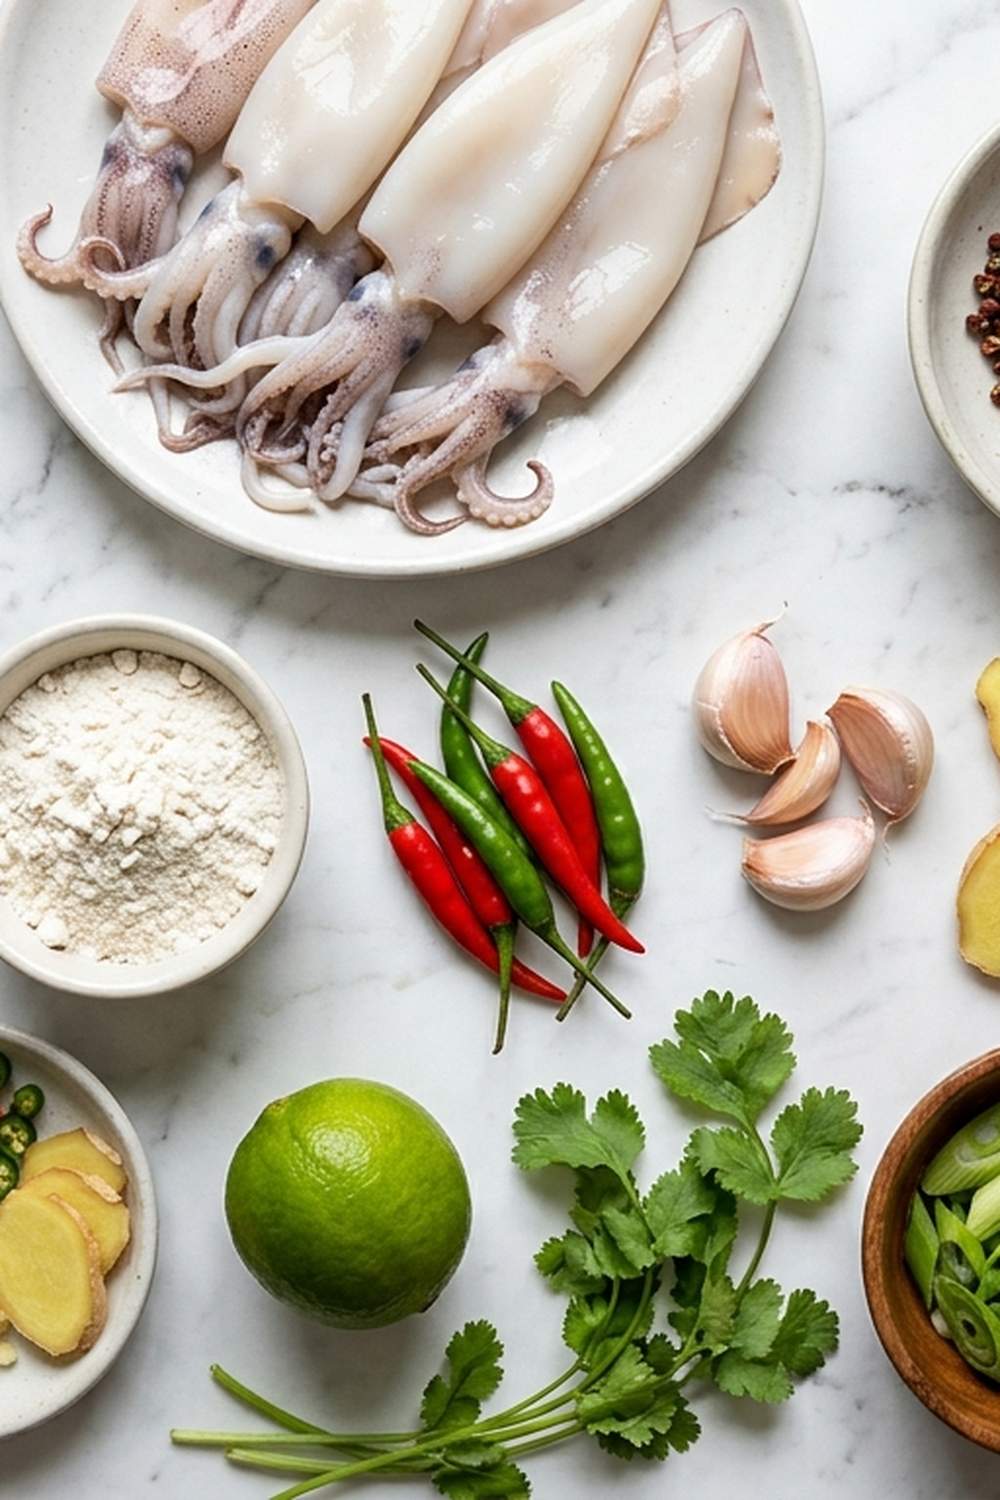
For the Squid and Oil
- 3 to 4 cups vegetable oil or canola oil (about 1.5 inches depth in a standard pot for frying)
- 500 grams cleaned squid tubes (about 1 pound, pre-processed for convenience)
- 700 grams medium whole squid with bodies intact (approximately 1.4 pounds, which yields tender results)
For the Coating
- ⅔ cup cornstarch (this creates the signature shattering crust)
- ½ teaspoon baking powder (creates microscopic air pockets for maximum crispness)
- ⅓ cup all-purpose flour (provides structural integrity to the coating)
- ¼ teaspoon white pepper powder (adds subtle heat and complexity)
- ⅔ cup cold tap water (ice-cold temperature is essential for the batter)
- ½ teaspoon kosher salt (balanced to season the coating without overpowering)
For the Chili Salt Seasoning and Condiment
- Kosher salt to taste (approximately ¼ teaspoon for final garnish)
- 1 to 2 teaspoons Sichuan chili flakes or Chinese red chili powder (adjust based on heat preference)
- ½ cup whole egg mayonnaise or Japanese kewpie mayo (creates the perfect dipping base)
- White pepper powder to taste (a light dusting, roughly ⅛ teaspoon)
- ½ teaspoon finely minced garlic (adds aromatic depth to the mayo)
Yield: This recipe serves 4 to 6 people as an appetizer, or 2 to 3 people as a main course with rice.
The Copycat Method: How to Recreate Chili Salt Squid at Home
Making restaurant-quality squid at home requires understanding the why behind each step, not just following instructions blindly. I’m going to walk you through this as if we’re cooking together in my kitchen, and I’m sharing everything I’ve learned.
Step 1: Prepare the Squid Properly
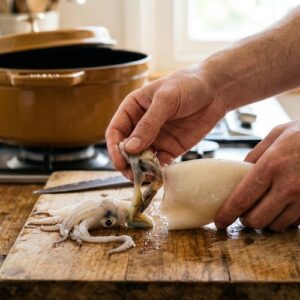
If you’ve purchased whole squid, you’ll need to clean them. Hold the body in one hand and gently pull the head away from the body—the innards will come with it. Discard these. Rinse the body cavity under cold running water, removing any remaining internal material. Peel away the thin purple membrane covering the outside (this is optional, but restaurants do it for appearance). Pat completely dry with paper towels—moisture is the enemy of crispness.
For the tubes, pat them dry as well. Now cut the bodies into rings about ½ inch wide. Leave the tentacles whole or cut them in half, depending on size. The key here is uniform sizing—pieces that are the same size will cook at the same rate. Arrange everything on a clean paper towel and let it sit for a few minutes. Any remaining surface moisture will transfer to the towel.

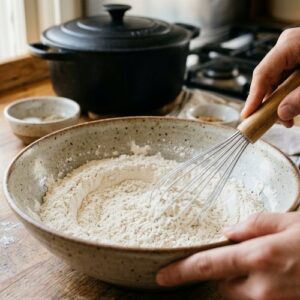
Step 2: Make the Cold Batter
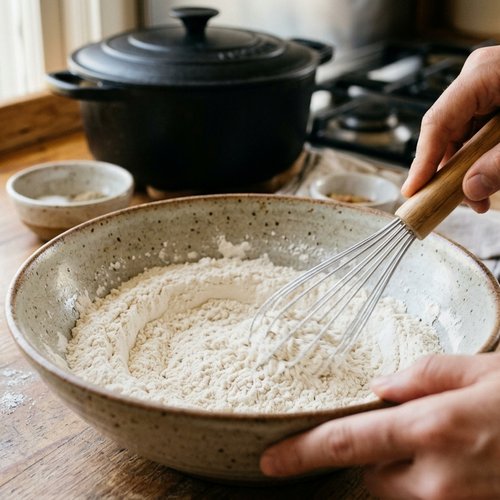
In a medium bowl, combine the cornstarch, all-purpose flour, baking powder, salt, and white pepper. Whisk these dry ingredients together thoroughly—you want the baking powder distributed evenly throughout, or you’ll get some pieces crispy and others dense. Now, add the cold tap water slowly while whisking constantly. The batter should be thin, like pancake batter, with no lumps. If you see lumps, whisk more aggressively or strain the batter through a fine mesh sieve.
This is crucial: keep this batter in the coldest part of your kitchen, ideally over an ice bath, until you’re ready to fry. The temperature difference between cold batter and hot oil is what creates the rapid crust formation.
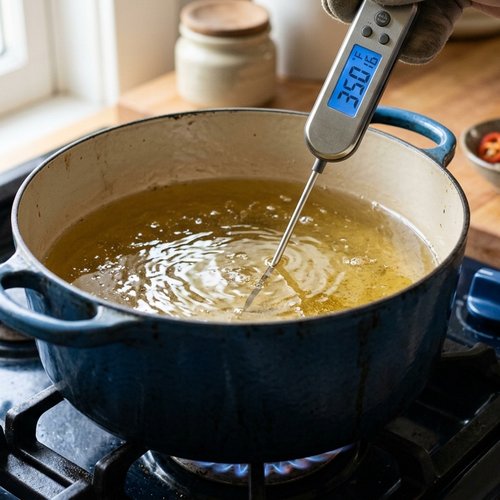
Step 3: Heat the Oil to the Precise Temperature
Pour your vegetable oil into a heavy-bottomed pot to a depth of about 1.5 inches. Heat it over medium-high heat. This is where a thermometer becomes your best friend. You’re targeting 350°F (175°C). At this temperature, a small piece of batter will sizzle immediately and rise to the surface within 3 to 4 seconds, surrounded by tiny bubbles.
If your oil is too cool (below 340°F), the squid will absorb oil and taste greasy. If it’s too hot (above 360°F), the outside will burn before the inside finishes cooking. Invest in a good instant-read thermometer if you don’t have one—it will transform your frying results across all dishes.
Step 4: Coat and Fry in Batches
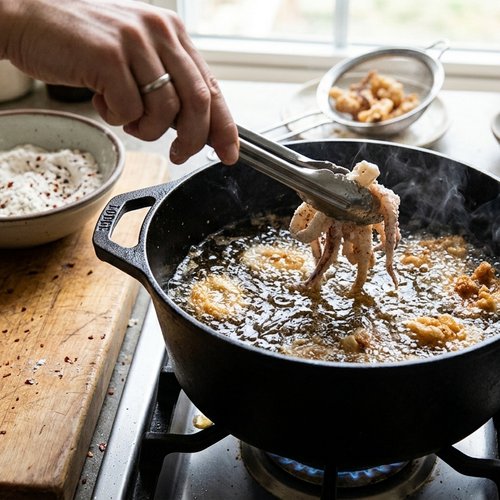
Working in small batches (this is important—crowding the pot drops oil temperature), take a handful of the dried squid pieces and dip them into the cold batter, coating thoroughly. Let excess batter drip off for just a moment, then carefully place them into the hot oil. You should hear an immediate, vigorous sizzle. Fry for 60 to 90 seconds, stirring gently with a slotted spoon or spider strainer to ensure they cook evenly.
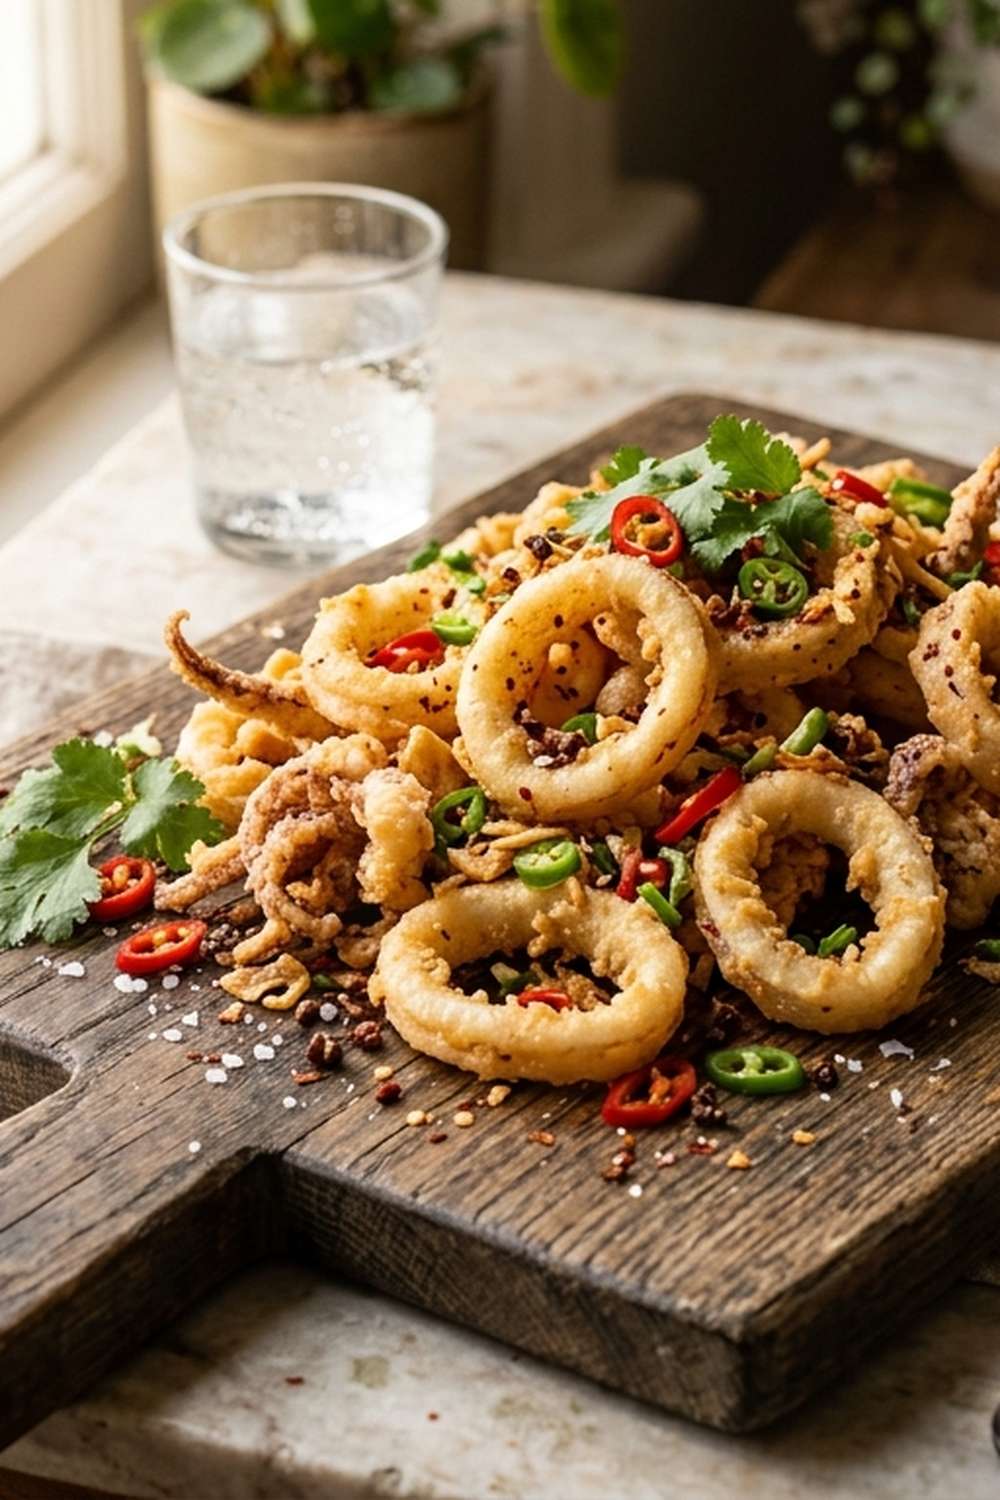
The squid pieces will initially sink, then float to the surface as they become lighter. Once they’ve been floating for about 30 seconds and have turned golden-tan (not dark brown), remove them with a slotted spoon and transfer to a plate lined with paper towels. Work quickly—residual heat will continue to cook them slightly, and you want to catch them at that perfect moment when they’re golden but still tender inside.
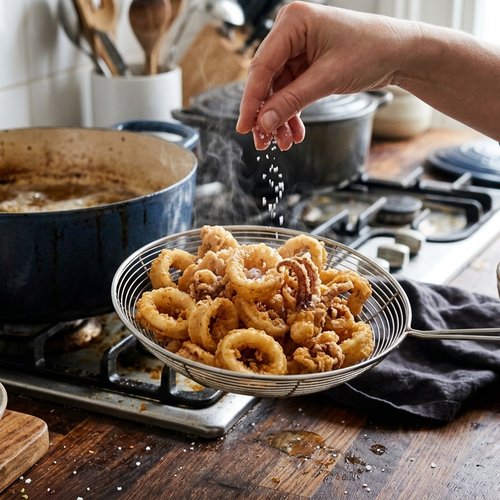
Step 5: Season Immediately While Hot
This is the step that separates good from extraordinary. The moment your squid comes out of the oil and is still steaming, sprinkle it with kosher salt and white pepper. The residual heat helps these seasonings adhere and slightly permeate the crust. If you wait until the squid cools, the seasoning will just fall off or sit on the surface without integrating. Season immediately, always.
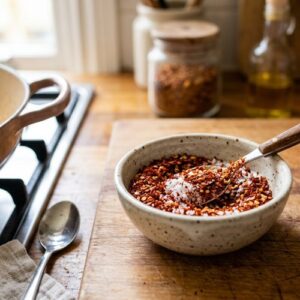
Step 6: Prepare the Chili Seasoning Blend
In a small bowl, combine the Sichuan chili flakes or Chinese red chili powder with an additional pinch of kosher salt. Mix well. Some people like their chili salt more spicy (more chili flakes), while others prefer milder heat (less chili). This is where you customize to your preference. Taste a small pinch—it should have a pleasant, lingering heat, not a sharp bite.

The Secret Sauce: The Garlic Mayo Condiment
The chili salt squid from restaurants always comes with a creamy dipping sauce, and this is it. Combine the whole egg mayonnaise (or kewpie, which has a slightly richer, more luxurious mouthfeel) with the finely minced garlic. Mix thoroughly. Some restaurants add a touch of lime juice or a whisper of sesame oil here—feel free to experiment—but the baseline is mayo and garlic.
Why this matters nutritionally: As a registered dietitian, I notice that the creamy richness of this sauce actually helps your body absorb the fat-soluble vitamins in the squid more effectively. Additionally, garlic contains allicin, a compound with proven anti-inflammatory benefits. The mayo provides fat that slows digestion, meaning the squid’s protein-rich content is absorbed more gradually, keeping you satisfied longer. It’s not just delicious; it’s nutritionally synergistic.
You can prepare this mayo up to 2 hours ahead and keep it at room temperature, or make it fresh right before serving. The longer it sits, the more the garlic’s flavor develops and mellows.
How to Make It Even Better Than the Original
- Use Sichuan Peppercorns in Your Seasoning Blend – Toast whole Sichuan peppercorns lightly in a dry pan, then grind them coarsely and mix into your chili salt. The numbing, tingling sensation (called “má” in Mandarin) adds a sophisticated dimension that most restaurant versions lack. It’s a slight upgrade that home cooks rarely discover.
- Infuse Your Mayo with Fresh Lime and Cilantro – Add the zest and juice of half a lime, plus finely chopped fresh cilantro to the mayo. This brightness elevates the squid’s subtle ocean flavors and provides a textural contrast. Restaurants can’t do this at scale because cilantro oxidizes and browns in steam table heat.
- Create a Spicy Honey Drizzle – Warm honey with a pinch of red chili flakes and a tiny squeeze of lime juice. Drizzle this over the finished squid just before serving. The sweet-spicy-tart combination is addictive and completely elevates the dish beyond restaurant standard.
- Toast Your Chili Flakes Briefly – Rather than using raw chili flakes, toast them in a dry pan over medium heat for 30 to 45 seconds until fragrant. This deepens the chili’s flavor profile and reduces raw heat intensity while increasing complexity.
Cost Comparison: Home vs Restaurant
Let’s talk numbers. A typical restaurant serving of chili salt squid (about 4 to 5 ounces of squid) costs $12 to $18 depending on your location and the restaurant’s tier. That squid probably cost the restaurant $2 to $3, with another $0.50 in batter and oil costs. So they’re making roughly $9 to $14.50 per serving in profit.
Your homemade version? Fresh squid runs $8 to $12 per pound depending on your market. For this recipe using 1.2 pounds total, you’re spending roughly $10 to $14 on squid. Add $0.50 for the flours and baking powder, $1.50 for the oil (you’ll use maybe $0.50 of that 3 to 4 cups), and $1 for mayo and seasonings. Your total ingredient cost: approximately $13 to $16.50 for a recipe that serves 4 to 6 people.
That breaks down to roughly $2.17 to $4.13 per serving, which is one-quarter to one-third of restaurant pricing. If you make this dish just twice a month, you’re saving $30 to $60 monthly, or $360 to $720 annually. That’s a flight somewhere, or a serious kitchen upgrade fund.
Can I Store Chili Salt Squid?
This is one area where restaurant-fresh squid genuinely outperforms leftovers, and I’m going to be honest about that. Squid is best served immediately after frying—that crispness begins to fade within 20 minutes as the coating absorbs residual moisture from the squid inside.
That said, if you have leftovers: Store them in an airtight container in the refrigerator for up to 2 days. To revive them, reheat in a 375°F oven for 5 to 7 minutes, which will re-crisp the exterior significantly. Don’t use the microwave—it will make them rubbery.
The dipping mayo will keep in the refrigerator for up to 5 days in a sealed container. The chili salt seasoning blend, if stored in an airtight container away from light and heat, will keep for up to 3 months.
My recommendation? Make this dish for guests, or make just enough for your immediate meal. It’s one of those dishes where the magic is in the moment—in serving it hot, crispy, and fresh. The preparation time is short (15 minutes start to finish), so it’s genuinely easy to make fresh whenever the craving hits.
Nutrition Information
Per serving (based on 4 servings, with dipping sauce included): Approximately 320 calories, 18g protein, 22g fat (4g saturated), 12g carbohydrates, 0g fiber, 420mg sodium, 65mg cholesterol.
The protein breakdown is particularly noteworthy. Squid is one of the most protein-dense seafood options available—about 15g of protein per 3-ounce serving—with a complete amino acid profile that includes all nine essential amino acids. According to USDA nutritional data, squid also provides selenium (important for thyroid function), zinc (critical for immune health), and B12 (often deficient in plant-based diets).
The cornstarch coating adds some carbohydrates, but the fat from frying is primarily unsaturated when using vegetable or canola oil. Compared to typical restaurant versions, which can reach 450+ calories per serving due to multiple fryings or excessive oil, this home version is noticeably lighter while maintaining that crucial crispness.
Expert’s Nutritional Tip: Squid contains taurine, an amino acid that supports cardiovascular health and has been shown in research to help regulate blood sugar. The combination of squid’s high protein content and taurine makes this dish surprisingly satiating—you’ll feel fuller longer than you would from an equivalent number of calories in fried carbohydrates alone. This is why I can enthusiastically recommend this dish even from a nutritional standpoint: it’s genuinely good for you, not just delicious.
What to Order/Make Alongside for the Full Experience
To recreate that complete dim sum or restaurant experience at home, pair this chili salt squid with dishes that complement its richness and heat. The creamy texture of the squid and the spice of the seasoning call for lighter, fresher accompaniments.
- Authentic Shrimp Fried Rice – The savory fried rice balances the squid’s spiciness and provides a textural contrast. Serve alongside or as a separate course.
- Steamed jasmine rice – Plain rice acts as a palate cleanser and helps absorb the chili salt residue, letting you taste each component freshly.
- Banh Mi Burger Recipe – If you’re looking for a lighter, fresher counterpoint, Vietnamese-style pickled vegetables and herbs offer brightness that cuts through the richness beautifully.
- Steamed bok choy with oyster sauce – A simple green vegetable with umami seasoning completes the meal nutritionally and provides necessary fiber.
- Fresh lime wedges – Squeeze over the squid for additional brightness; the acid cuts the fat and enhances the chili perception.
Make-Ahead Guide and Meal Prep
As someone who works in nutrition and understands the realities of busy schedules, I’ve developed a make-ahead strategy for this dish. Preparation can be done up to 8 hours in advance; actual frying must happen within 30 minutes of serving.
8 Hours Before Serving: Clean and dry your squid completely. Store in a covered container in the coldest part of your refrigerator. Make your chili salt seasoning blend and store in an airtight container at room temperature. Make the garlic mayo and refrigerate.
30 Minutes Before Serving: Mix your batter and keep it over an ice bath. Heat your oil. This is your final preparation window.
Final 10 Minutes: Fry and season. Serve immediately.
This staging means you can be a gracious host or hostess without being trapped in the kitchen during the last moments before guests arrive. The hardest work is done ahead; the final steps are quick theater.
Common Mistakes to Avoid
Mistake #1: Wet Squid – This is the most frequent error I see. Any residual moisture on the squid’s surface will cause the batter to steam rather than fry, resulting in a soft, oily coating instead of a crisp one. Pat your squid aggressively. Use paper towels and don’t be gentle about it. Moisture is your enemy.
Mistake #2: Warm or Room-Temperature Batter – I’ve made this mistake myself countless times in my early experiments. Warm batter doesn’t create the thermal shock necessary for rapid crust formation. The batter should be chilled. If your kitchen is warm, prepare the batter and set the bowl directly in an ice bath. This single change will revolutionize your results.
Mistake #3: Oil Temperature Fluctuation – Adding cold squid to hot oil drops the temperature temporarily. If you don’t account for this and add too much squid at once, your oil never recovers to frying temperature. Work in small batches. Wait 1 to 2 minutes between batches for oil temperature to stabilize. A thermometer is non-negotiable here.
Mistake #4: Seasoning Delay – Salting 2 minutes after frying, when everything has cooled slightly, produces different results than seasoning during the final 10 seconds when everything is steaming. The heat helps seasonings adhere and distribute. Season hot or don’t season at all.
Seasonal Variations
Spring: Add fresh scallion greens to your chili salt blend and top the finished squid with fresh cilantro. The brightness feels appropriate as the season shifts.
Summer: Create a Vietnamese-inspired version by serving alongside fresh herbs (mint, basil, cilantro), rice paper wraps, and pickled vegetables. The chili salt squid becomes a component of fresh spring rolls—a lighter, cooler presentation.
Fall: Toast your Sichuan peppercorns and chili flakes together in a dry pan, adding a small amount of toasted sesame seeds to the final blend. The nuttiness feels appropriate as temperatures cool.
Winter: Prepare a hot dipping sauce by heating your garlic mayo with sriracha and a touch of honey, serving it warm rather than cold. The warmth feels comforting and inviting in colder months.
Chili Salt Squid Recipe
Ingredients
Method
- If you've purchased whole squid, you'll need to clean them. Hold the body in one hand and gently pull the head away from the body—the innards will come with it. Discard these. Rinse the body cavity under cold running water, removing any remaining internal material. Peel away the thin purple membrane covering the outside (this is optional, but restaurants do it for appearance). Pat completely dry with paper towels—moisture is the enemy of crispness. For the tubes, pat them dry as well. Now cut the bodies into rings about ½ inch wide. Leave the tentacles whole or cut them in half, depending on size. The key here is uniform sizing—pieces that are the same size will cook at the same rate. Arrange everything on a clean paper towel and let it sit for a few minutes. Any remaining surface moisture will transfer to the towel.
- In a medium bowl, combine the cornstarch, all-purpose flour, baking powder, salt, and white pepper. Whisk these dry ingredients together thoroughly—you want the baking powder distributed evenly throughout, or you'll get some pieces crispy and others dense. Now, add the cold tap water slowly while whisking constantly. The batter should be thin, like pancake batter, with no lumps. If you see lumps, whisk more aggressively or strain the batter through a fine mesh sieve. This is crucial: keep this batter in the coldest part of your kitchen, ideally over an ice bath, until you're ready to fry. The temperature difference between cold batter and hot oil is what creates the rapid crust formation.
- Pour your vegetable oil into a heavy-bottomed pot to a depth of about 1.5 inches. Heat it over medium-high heat. This is where a thermometer becomes your best friend. You're targeting 350°F (175°C). At this temperature, a small piece of batter will sizzle immediately and rise to the surface within 3 to 4 seconds, surrounded by tiny bubbles. If your oil is too cool (below 340°F), the squid will absorb oil and taste greasy. If it's too hot (above 360°F), the outside will burn before the inside finishes cooking. Invest in a good instant-read thermometer if you don't have one—it will transform your frying results across all dishes.

- Working in small batches (this is important—crowding the pot drops oil temperature), take a handful of the dried squid pieces and dip them into the cold batter, coating thoroughly. Let excess batter drip off for just a moment, then carefully place them into the hot oil. You should hear an immediate, vigorous sizzle. Fry for 60 to 90 seconds, stirring gently with a slotted spoon or spider strainer to ensure they cook evenly. The squid pieces will initially sink, then float to the surface as they become lighter. Once they've been floating for about 30 seconds and have turned golden-tan (not dark brown), remove them with a slotted spoon and transfer to a plate lined with paper towels. Work quickly—residual heat will continue to cook them slightly, and you want to catch them at that perfect moment when they're golden but still tender inside.

- This is the step that separates good from extraordinary. The moment your squid comes out of the oil and is still steaming, sprinkle it with kosher salt and white pepper. The residual heat helps these seasonings adhere and slightly permeate the crust. If you wait until the squid cools, the seasoning will just fall off or sit on the surface without integrating. Season immediately, always.

- In a small bowl, combine the Sichuan chili flakes or Chinese red chili powder with an additional pinch of kosher salt. Mix well. Some people like their chili salt more spicy (more chili flakes), while others prefer milder heat (less chili). This is where you customize to your preference. Taste a small pinch—it should have a pleasant, lingering heat, not a sharp bite.
FAQs
Where do I buy squid, and how do I know it’s fresh?
Most Asian markets carry fresh squid in the seafood section, often labeled as “fresh squid” or “calamari.” Some supermarket chains have it, though quality and freshness vary. Look for squid that smells like ocean water—clean and briny—with no ammonia smell. The body should be firm and slightly translucent, not mushy or discolored. If fresh squid is unavailable, frozen squid (thawed properly) works well; it’s often fresher than “fresh” squid that’s been sitting in a supermarket case for days. Thaw frozen squid overnight in the refrigerator, never at room temperature.
Can I use regular all-purpose flour instead of cornstarch?
Not without significant quality sacrifice. Cornstarch creates that distinctive shattering, glass-like crust that makes this dish special. All-purpose flour alone produces a dense, chewy coating. The combination of the two is essential. Cornstarch is inexpensive and widely available; there’s no reason to compromise here. If you absolutely cannot find cornstarch, potato starch is your next-best option, though the texture will be slightly different.
What if I don’t have a thermometer for oil temperature?
Get one. Seriously. An instant-read digital thermometer costs $15 to $25 and will improve your frying technique more than any other single tool. That said, if you’re testing without one, use the old-school method: Drop a small cube of bread into the oil. It should brown in about 60 seconds. But this is imprecise and risky. Thermometers have become so affordable that there’s no excuse to skip this step.
Can I bake this instead of frying?
I don’t recommend it. The defining characteristic of chili salt squid is the contrast between the crispy exterior and the tender interior. You cannot achieve that crisp exterior through baking—the moisture from the squid will create steam that softens the coating. Baked versions become dense and chewy. The beauty of this dish is specifically the fried execution. If you’re avoiding fried foods, this isn’t the recipe for you, and that’s okay. There are plenty of excellent baked squid preparations, but they’re fundamentally different dishes.
How spicy is this dish, and can I make it milder?
The heat level is entirely within your control through the amount of chili flakes you use. Start with ½ teaspoon of chili flakes for a mild version, then increase to 1 or 2 teaspoons if you prefer more heat. The heat is meant to build gradually—it’s not meant to be mouth-burning. If you want virtually no heat, omit the chili flakes entirely and increase the kosher salt slightly. You’ll still have a delicious dish, just without the chili component.
What’s the difference between Sichuan chili flakes and regular red chili flakes?
Sichuan chili flakes come from Sichuan peppercorns and have a distinctive numbing, tingling sensation (called “má” in Mandarin) along with the heat. Regular red chili flakes are typically from jalapeños, serranos, or cayenne peppers and provide straightforward spicy heat without the numbing component. For authentic restaurant chili salt squid, Sichuan chili flakes are more traditional, though either works. They’re usually available in Asian markets and increasingly in mainstream supermarkets. Chinese red chili powder (which is finer and more vibrant) is another excellent option.
More Restaurant Copycat Recipes
- BBQ Chinese Pork Recipe – Master the char-siu technique that makes restaurant barbecue irresistible
- Baked Char Siew Bao Recipe – Recreate dim sum’s most beloved filled bun at home with professional results
- Baozi Recipe Vegetarian – Learn the steaming and folding techniques that restaurant bun makers use
Final Thoughts
There’s something profoundly satisfying about cracking the code on a dish that’s enchanted you. I remember my grandmother standing at her stove, transforming simple, humble ingredients into something that tasted like memory and comfort. She didn’t have fancy equipment or complicated techniques—she had knowledge passed down through generations, an understanding of how heat and texture and timing work together.
That’s what I’ve tried to give you here. Not just a recipe, but the thinking behind it. The understanding of why each step matters, what restaurants have learned through thousands of repetitions, and how you can apply that wisdom in your own kitchen. The first time you pull golden, crispy chili salt squid from your own oil, watching it sizzle and steam, seasoning it while it’s still hot—that’s when you’ll understand that you’re not just following instructions. You’re joining a tradition.
Make this dish. Perfect it. Share it with people you care about. And when they ask you where you learned to cook it, you’ll smile and tell them the truth: you figured it out yourself, one test, one failure, one success at a time.
Warm regards,
Willie Regan
Registered Dietitian, Worcester, MA