Authentic Ramen Recipe
This post contains affiliate links. As an Amazon Associate I earn from qualifying purchases.
If you’ve always wanted to make authentic ramen but felt intimidated by the complexity, I want you to know something right now: this is your starting point. I’m going to walk you through every single step in a way that makes sense, because I remember standing in my kitchen years ago, staring at recipes that seemed to require a culinary degree. My grandmother never overthought her noodle bowls—she built them with patience, love, and time. That’s exactly what you’re going to do here. When you pair this with other beloved dishes like authentic shrimp fried rice, you’ll realize you’re building a real repertoire of comfort cooking.
How to Make Authentic Ramen for the First Time (You’ve Got This)
I’ll never forget my first attempt at ramen. I was maybe twenty-three, home visiting my grandmother, and I found her simmering a pot on the back burner at five in the morning. The smell was something else—deep, aromatic, alive. She had chicken thighs going, ginger slices floating in stock, and this quiet confidence that the time would do the work. I asked her why she didn’t just grab instant packets, and she gave me this look. “Willie,” she said, “slow food teaches you about yourself. And about what matters.”
That stuck with me. Years later, working as a registered dietitian, I realized she was speaking a nutritional language too—real ingredients, real time, real nourishment. This recipe honors that philosophy. We’re building a broth that’s rich in collagen from the bones and skin, protein-dense from the chicken, and enhanced by umami from mushrooms and soy. You’re not just making ramen; you’re creating medicine that happens to be delicious.
What to Expect Before You Start
Let me set your expectations clearly so there are no surprises. This recipe is divided into phases that happen over a few hours—but most of that time is hands-off simmering. You’re not standing over the stove the entire time. The active work adds up to maybe thirty minutes total, spread across the afternoon. The difficulty level is low to moderate; the hardest part is simply waiting for the broth to develop its full flavor, which is why low-and-slow cooking matters so much.
- Total time commitment – You’re looking at approximately 3.5 to 4 hours from start to bowl, but only about 30-40 minutes of actual cooking work. The rest is gentle simmering while you live your life nearby.
- The “intimidation factor” is mostly mental – Ramen sounds fancy, but you’re really just building a flavorful broth, cooking noodles, and assembling toppings. If you can make a good soup, you can make ramen. Promise.
- Equipment is simple and probably already in your kitchen – You need a large pot, a strainer, a slotted spoon, and bowls. That’s genuinely it. No special tools required.
Equipment You’ll Need (And What You Can Skip)
This is where I want to ease your mind completely. I’ve seen people stress about buying special ramen bowls, a dedicated noodle-cooling station, and measuring equipment that would make a scientist jealous. You don’t need any of that. Here’s what actually matters:
- One large, heavy-bottomed pot (6-8 quart capacity) – This is your workhorse. It needs to hold the broth, chicken, and aromatics without crowding. Any heavy pot works; expensive doesn’t mean better. I use a simple stainless steel Dutch oven that cost $40.
- A fine-mesh strainer or colander – Essential for separating noodles from their cooking water and for draining your aromatics from the broth. A basic metal strainer from any grocery store works perfectly.
- A slotted spoon – Your friend for fishing out solid ingredients from the broth. Any kitchen has one of these.
- Shallow bowls for serving – Not special ramen bowls, just whatever bowls you own. I use old cereal bowls my grandmother gave me. The food matters more than the vessel.
- Optional: a ladle – Makes pouring broth cleaner, but honestly, a cup works too.
The Ingredients – A Beginner’s Shopping Guide
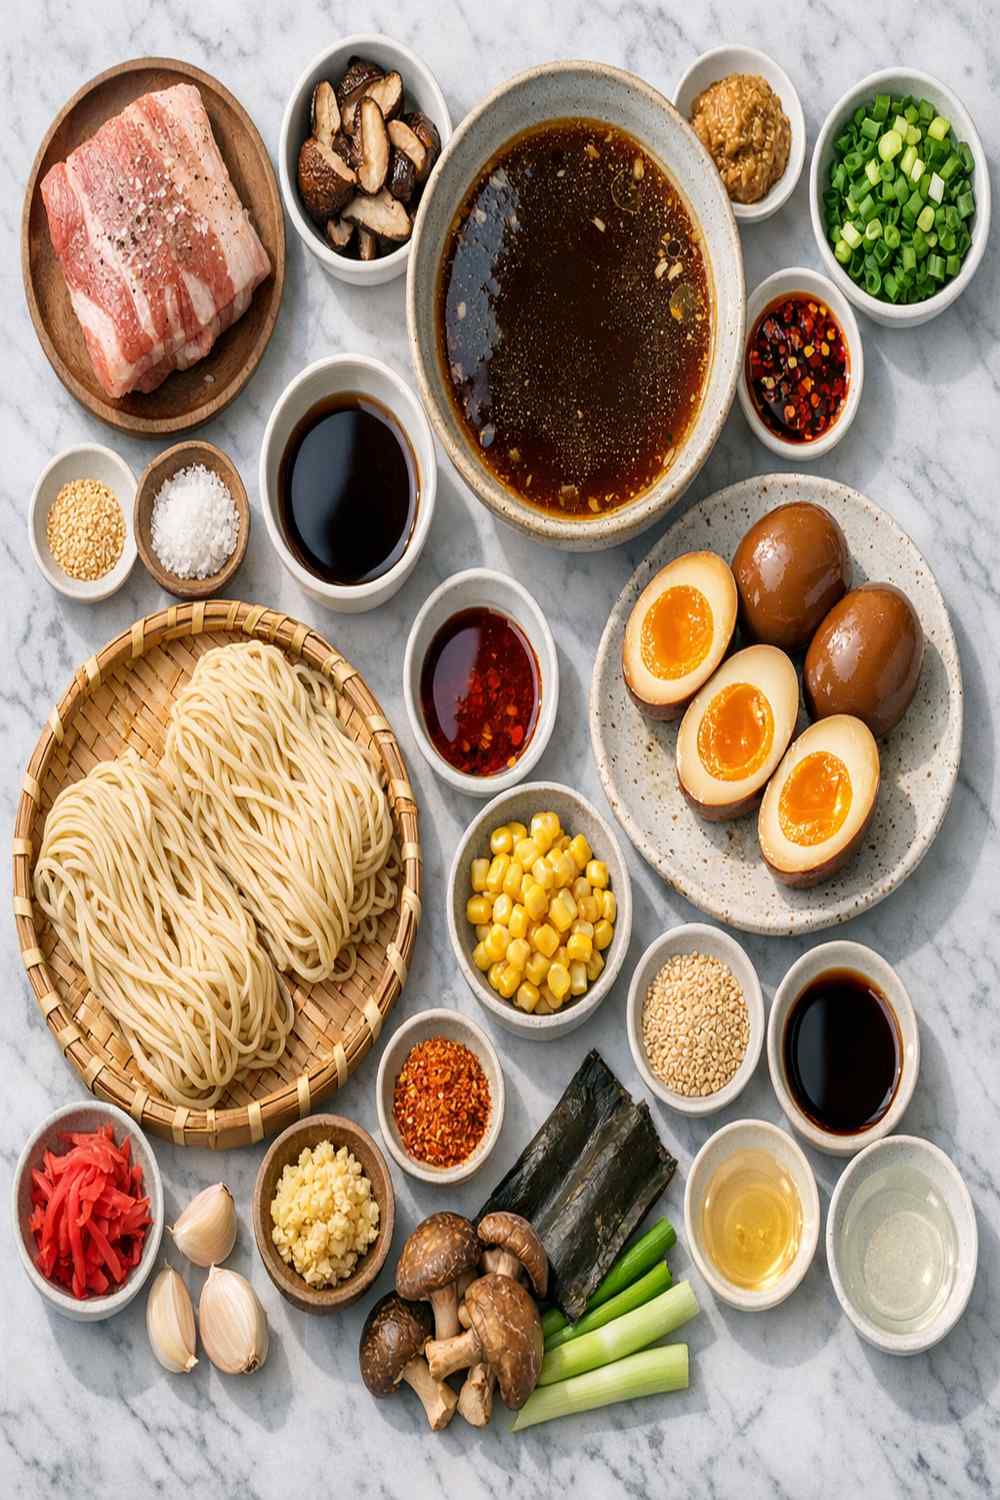
The beautiful thing about this recipe is that most ingredients live in your regular grocery store. I’ll tell you exactly where to find each one and what to look for so you don’t stand in the aisle feeling lost. Some ingredients might be new to you, but they’re all accessible, and I promise the investment is worth every penny.
For the Broth Base
- 4 fresh red chili peppers, left whole or split in half (Thai birds eye or jalapeños work; adjust quantity based on heat preference)
- 2-inch piece of fresh ginger root, sliced into thin coins (buy a knob from the produce section, not pre-sliced; fresh ginger smells peppery and bright)
- 4 cups good-quality chicken stock, preferably low-sodium or no-sodium (homemade is best, but quality store-bought brands like Kettle & Fire or Swanson all-natural work beautifully; avoid the high-sodium cubes)
- 4 to 5 spring onions or scallions, trimmed and cut into 3-inch pieces (the white and light green parts carry more flavor than the dark green tops)
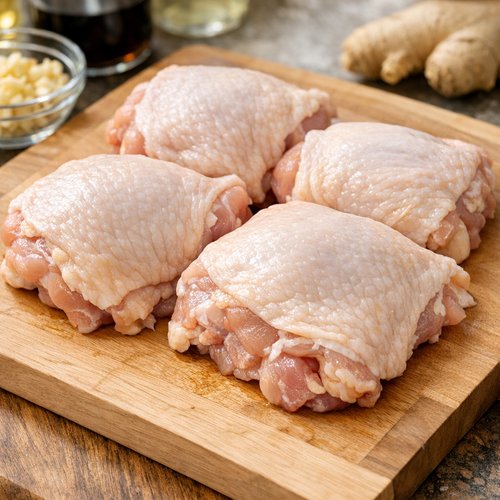
- 4 boneless chicken thighs with skin on or off (look for thighs that are vibrant pink, not gray; thighs have more fat and flavor than breasts, which is why they’re essential here)
- 5 whole cloves of garlic, peeled (any fresh garlic works; look for bulbs that feel firm and heavy, avoiding any with soft spots or sprouting)
For the Broth Seasoning
- 15 milliliters additional mirin for the broth (about 1 tablespoon more)
- 15 milliliters light soy sauce (about 1 tablespoon; this is thinner and more delicate than dark soy)
- ¼ teaspoon cayenne pepper (optional but recommended; a gentle whisper of heat)
- 2 teaspoons brown sugar (helps round out the seasoning profile and deepens the color slightly)
- 30 milliliters dark soy sauce, preferably mushroom dark variety (about 2 tablespoons; this has more umami than regular soy)
- 30 milliliters sweet cooking wine or mirin, divided (about 2 tablespoons for the marinated chicken, plus another 2 tablespoons for the broth; mirin adds subtle sweetness and balances saltiness)
For the Mushroom Layer
- 8 ounces fresh shiitake mushrooms, stems trimmed and sliced or halved (look for mushrooms that feel firm and have a dry surface; avoid any that are slimy or have a strong ammonia smell)
- 6 dried shiitake mushrooms, optional but highly recommended (these concentrate the umami and make your broth taste restaurant-quality; find them in the Asian section or dried mushroom aisle)
For Assembly and Service
- Sliced radishes or bean sprouts for crunch (whichever you prefer; adds textural interest)
- 4 spring onions or scallions, finely sliced (use the white and light green parts mostly)
- Sesame oil for drizzling (a small bottle lasts months; use sparingly as it’s potent)
- Chili garlic oil for drizzling (optional but delicious; find in the Asian foods section or make your own by slowly infusing garlic and chili flakes into neutral oil)
- 4 large eggs (for soft-boiled marinating, ideally room temperature before cooking)
- 2 to 3 cloves garlic, finely sliced (reserved fresh for topping, gives bright bite)
- 4 portions of dried ramen noodles (about 8 ounces total; any brand works, though I prefer alkaline noodles for slightly chewier texture)
- Soy sauce to taste (for final seasoning adjustment at the bowl)
- 1 large bunch of yu choy or fresh spinach, or any Asian greens (look for vibrant color and crisp stems; if yu choy isn’t available, bok choy works perfectly)
Shopping tip: Most of these ingredients live in regular supermarkets now. If your store doesn’t carry them, Asian markets in your area will have everything, usually for less money and with better quality. Don’t feel intimidated—staff at these markets expect questions and love helping.
Step-by-Step: Your First Authentic Ramen Recipe
Here we go. I’m going to break this into phases so it doesn’t feel overwhelming. Each step builds on the last, and I promise nothing here is difficult. You’re following the same low-and-slow philosophy my grandmother used. Take your time, trust the process, and remember that ramen is forgiving. Let’s make something beautiful.
Step 1: Prepare Your Chicken and Build the Base Marinade
Pat your four chicken thighs completely dry with paper towels. This matters because water prevents proper browning. Place them on a clean cutting board. In a small bowl, mix together 30 milliliters of mirin and 30 milliliters of dark soy sauce. Add your 2 teaspoons of brown sugar and stir until the sugar dissolves. This marinade is going to coat your chicken, and the sugars will caramelize slightly when the chicken cooks, adding depth to the broth.
Pour this marinade over the chicken, making sure every piece gets coated. Let this sit for 10 minutes at room temperature. You’re not looking for a long marination—just enough time for the flavors to start adhering to the meat. This is where patience begins.
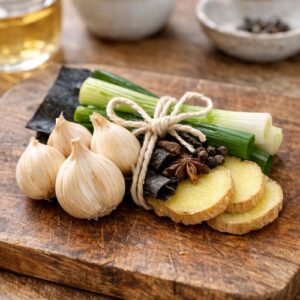
Step 2: Create Your Aromatic Bundle
While the chicken marinates, prepare your aromatics. Take your 5 whole garlic cloves and leave them unpeeled and whole—they’ll infuse the broth more gently this way. Slice your 2-inch piece of ginger into thin coins; you don’t need to peel it. Leave your 4 fresh red chilis whole or split them in half lengthwise if you want more heat. Trim your 4 to 5 spring onions by removing the root end and cutting the white and light green parts into 3-inch pieces. Keep the dark green tops separate—you might use them for garnish.
Gathering everything in one spot before you start cooking is called mise en place, a French term meaning “everything in its place.” This prevents frantic searching once your broth is simmering. Trust me, you’ll thank yourself.
Step 3: Sear the Chicken to Build Flavor
Place your large pot over medium-high heat. Let it warm for 2 minutes—you want it genuinely hot, not just warm. Add a light coating of neutral oil (about 1 tablespoon of vegetable or canola oil). Once the oil shimmers, carefully place your marinated chicken thighs skin-side down into the pot. Don’t move them yet. This is crucial. Let them sit undisturbed for 4 to 5 minutes.
What’s happening is a chemical process called the Maillard reaction—proteins and sugars are bonding and caramelizing, creating hundreds of new flavor compounds. This is why we sear meat. Your kitchen should smell incredible by now. After 4 to 5 minutes, flip each thigh and sear the other side for another 3 to 4 minutes until golden. The skin should be golden brown, the meat cooked about halfway through. You’re not trying to fully cook the chicken yet—you’re just building flavor.

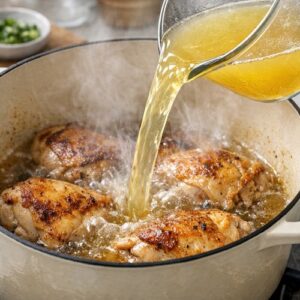
Step 4: Build Your Broth Layer
Pour your 4 cups of good-quality chicken stock directly into the pot over the seared chicken. The liquid will sizzle and steam—that’s perfect. Add all your prepared aromatics: the whole garlic cloves, ginger coins, chili peppers, and spring onion pieces. If you’re using the optional 6 dried shiitake mushrooms, add them now. They’ll rehydrate and release their umami into the broth.
Add 15 milliliters of light soy sauce and another 15 milliliters of mirin to the broth. Add your ¼ teaspoon of cayenne pepper if you want gentle heat. Stir gently, bringing everything to a simmer. Do not boil vigorously—a gentle simmer is what we want. Boiling will make the broth cloudy and can toughen the chicken. Reduce your heat to medium-low, aiming for just a few lazy bubbles breaking the surface every few seconds.
This is the beginning of the low-and-slow process. Your broth will now simmer, untouched and undisturbed, for 2 to 2.5 hours. During this time, collagen from the chicken skin breaks down into gelatin, creating a silky mouthfeel. The aromatics infuse deeply. The chicken becomes impossibly tender. This is where the magic happens, and it requires nothing from you but time.

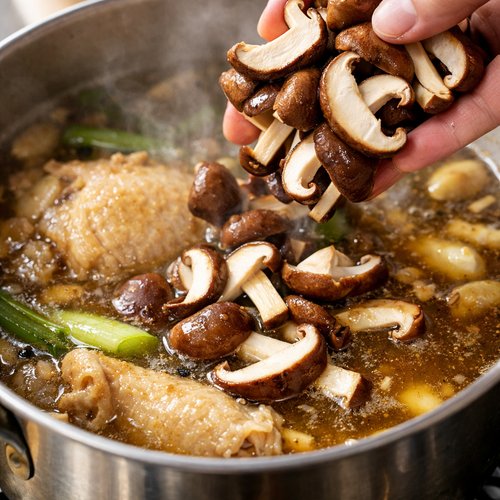
Step 5: Add the Fresh Mushrooms at the Halfway Point
After about 1.5 hours of simmering, the broth will smell phenomenal and the chicken will be becoming tender. Add your 8 ounces of fresh shiitake mushrooms, which you’ve already sliced or halved. These fresh mushrooms will cook down during the final 45 minutes to an hour, contributing earthiness and additional umami compounds. Stir gently to distribute them throughout the broth.
Taste the broth now. It should be flavorful but perhaps not perfect yet—it’s still developing. You can adjust seasoning now if needed, adding a splash more soy sauce or a pinch more salt. Remember, you can always add more, but you can’t take it out.
Step 6: Prepare the Soft-Boiled Eggs While the Broth Finishes
About 45 minutes before you want to eat, bring a separate small pot of water to a rolling boil. Gently lower your 4 large eggs into the boiling water using a spoon. Set a timer for exactly 6.5 minutes. This timing gives you the perfect soft-boiled egg—a tender, jammy yolk with a fully set white.
While the eggs cook, prepare an ice bath by filling a bowl with ice and cold water. When the timer goes off, use a slotted spoon to transfer the eggs directly from the hot water into the ice bath. Let them cool for at least 2 minutes. This stops the cooking immediately and makes them easier to peel.
Once cooled, gently tap the eggs all over and roll them to crack the shell, then peel under cool running water, starting from the wider end where the air pocket makes peeling easier. If you’re making these ahead, you can keep peeled eggs in a container covered with a mixture of 2 parts soy sauce to 1 part mirin, refrigerated, where they’ll marinate and develop flavor over 24 hours.
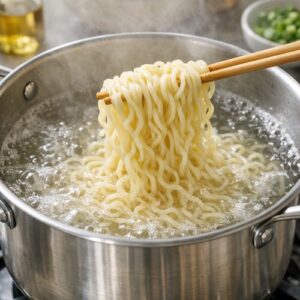
Step 7: Cook the Noodles Just Before Serving
About 10 minutes before you plan to eat, bring a large separate pot of water to a rolling boil. Do not add salt—the noodles themselves already contain salt. Add your 4 portions of dried ramen noodles and stir occasionally to prevent sticking. Most dried ramen cooks in 3 to 4 minutes—check the package, as different brands vary slightly. You want them tender but with a slight firmness when you bite through, what the Japanese call al dente.
When they’re done, drain them in a colander, rinse gently with cool water to stop the cooking, and divide them evenly among your four bowls. The rinsing prevents them from sticking together and removes excess starch.
Step 8: Finish Your Broth and Prepare Toppings
Your broth should now be rich, deeply flavored, and have simmered for 2 to 2.5 hours total. Taste it one more time and adjust seasoning if needed—a touch more soy sauce, a pinch of salt, maybe a whisper more cayenne. Using a slotted spoon, carefully remove the chicken pieces and transfer them to a cutting board. Remove the larger pieces of ginger, the whole garlic cloves, chilis, and spring onion pieces—these have done their job and you can discard them.
Shred or slice your chicken into bite-sized pieces. Discard the skin if you prefer, though it’s flavorful and contributes collagen. In a small bowl, prepare your fresh toppings: the sliced fresh garlic, sliced spring onions, your sliced radishes or bean sprouts, and a small drizzle of sesame oil.
Blanch your yu choy or spinach by placing it in a strainer and pouring boiling water from the broth over it for just 30 seconds—this wilts the greens and keeps them tender. Alternatively, you can skip this and serve them raw if you prefer the crunch.

Step 9: Assemble Your Bowl
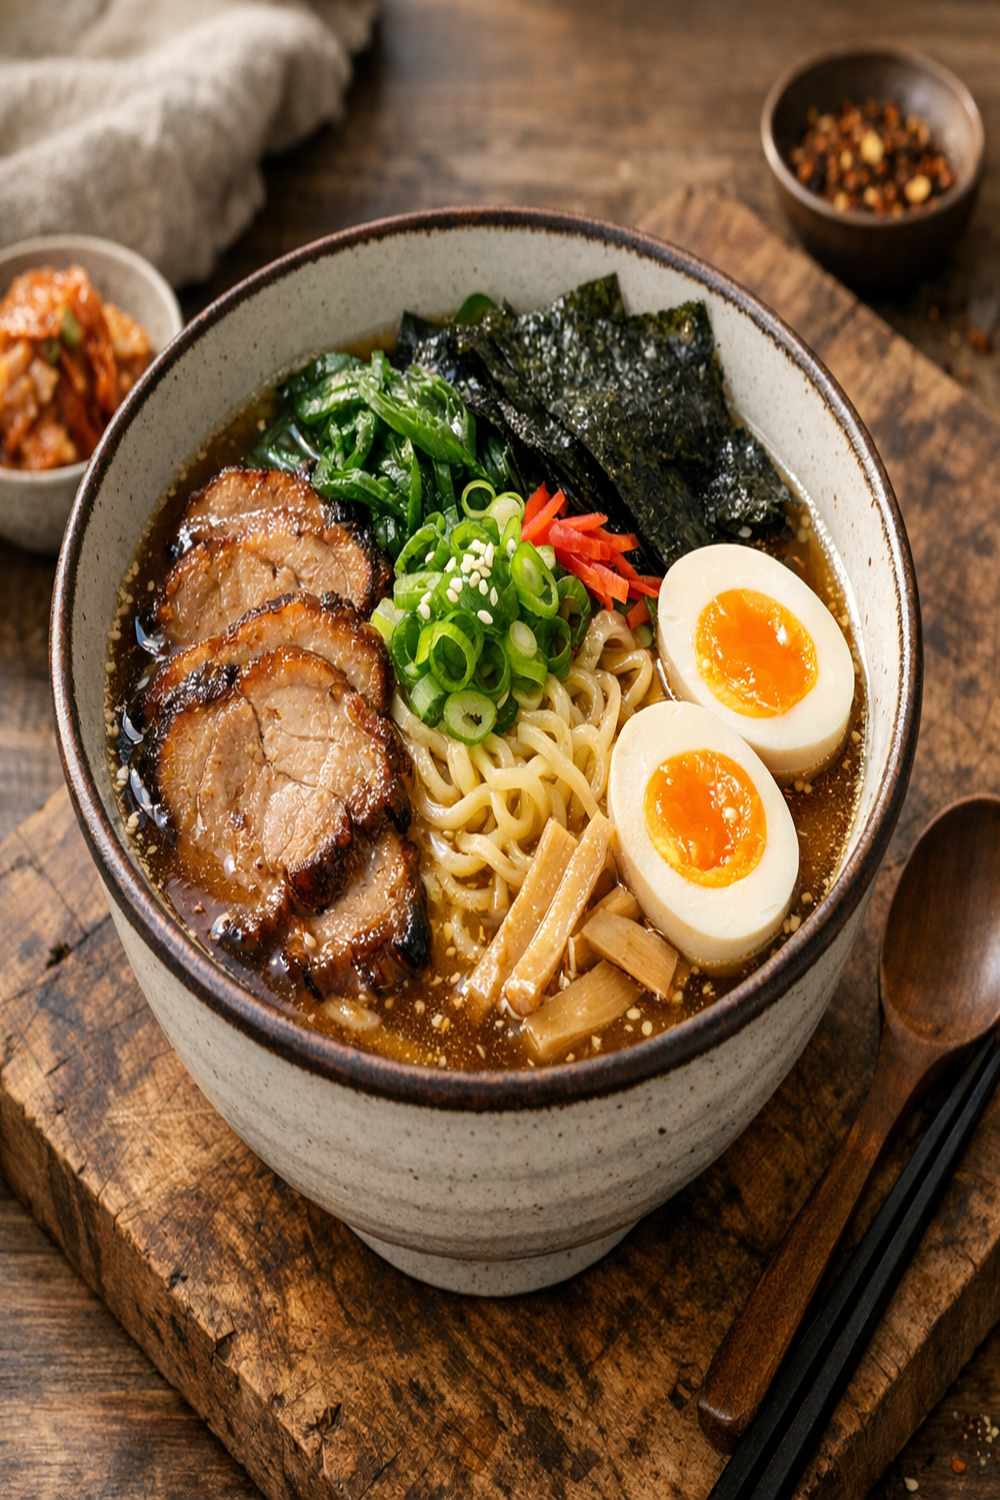
This is where your ramen becomes real. Into each bowl with the cooked noodles, carefully ladle your hot broth, dividing the mushrooms and any remaining aromatics among the four bowls. Top each with a portion of your shredded chicken, one soft-boiled egg sliced in half to show that gorgeous jammy yolk, your wilted greens, and your fresh toppings: the sliced garlic, sliced spring onions, radishes or sprouts.
Finish with a tiny drizzle of sesame oil and a small drizzle of chili garlic oil if you like heat. Taste, and adjust with a splash more soy sauce if needed. The first sip of broth should be savory, slightly sweet, with a warm undertone of ginger and a delicate heat from the chilis. If you’ve made it this far, you’ve made authentic ramen.
How to Tell If You Did It Right
Here’s how you know you’ve succeeded at each stage. These are the signals that matter:
- The chicken sear: When you flip the thighs, the skin should release easily from the pan and be a deep golden brown, not pale or grayish. This is the Maillard reaction telling you flavor is being built.
- The simmering broth: After 30 minutes, the broth should be aromatic and starting to color slightly golden. After 2 hours, it should smell rich and savory, with a visible sheen of fat on top from the chicken skin—this is flavor and mouthfeel you want. The mushrooms, whether dried or fresh, should have softened and contributed earthy sweetness.
- The soft-boiled egg: When you cut it open, the white should be fully set and slightly opaque, and the yolk should jiggle slightly when the bowl moves—that’s the jammy texture you’re after. If the yolk is runny throughout, it needed another 30 seconds. If it’s completely set, it needed 30 seconds less.
- The noodles: They should be tender enough to eat easily but with a slight resistance when you bite through. Not mushy, not crunchy. Definitely not mushy.
- The assembled bowl: The broth should be hot enough to steam, the toppings should remain distinct and colorful, and when you taste it, your first instinct should be to take another spoonful. That’s how you know it’s right.
What Went Wrong? Beginner Fixes
- The broth tastes bland or watery – This usually means the simmering time was too short or the heat was too high, preventing proper flavor development. Solution: Make sure you’re using low-and-slow heat for a full 2 to 2.5 hours. If you realize this partway through, you can simmer longer—it only gets better. Next time, resist the urge to turn up the heat.
- The chicken is tough or stringy – This happens when the initial sear was too aggressive or the final simmer was at a rolling boil instead of a gentle simmer. Boiling denatures proteins too quickly. Solution: If this happens, the broth is still delicious; just use the chicken in smaller amounts. Next time, keep that heat low and maintain just a few lazy bubbles.
- The noodles are mushy – You either cooked them too long or added them too early. Solution: Taste them starting at 3 minutes and drain the moment they’re tender. Cold running water stops the cooking. Use a timer.
- The eggs are hard-boiled when you wanted soft-boiled – You left them in the hot water too long or didn’t get them into the ice bath immediately. Solution: Set a timer for exactly 6.5 minutes and don’t negotiate. Have your ice bath ready before you even start boiling the eggs.
- The broth is too salty – This usually means over-seasoning with soy sauce early on. Solution: You can add a splash of unsalted stock or water to dilute it, but honestly, taste as you go from now on. Soy sauce is powerful.
Your Next Steps After Mastering This
Once you’ve made this ramen successfully, you’ve learned foundational skills that open dozens of doors. You’ve mastered building a flavorful broth with aromatics, understanding low-and-slow cooking, and the importance of the Maillard reaction. These skills transfer directly to making pho, tom kha, any braised dish, or excellent stock from scratch.
You’ve also proven to yourself that you can make restaurant-quality food at home. That confidence matters. From here, you might explore vegetarian ramen by using vegetable stock and adding tofu instead of chicken. You might make a spicy miso broth version. You might try slow cooker tom kha soup, which uses similar aromatics and the same patient approach. Or you might explore authentic beef broccoli to learn quick stir-fry techniques that complement your new broth-building skills.
The point is: you’ve leveled up. Trust that feeling.
Can I Store Authentic Ramen Recipe?
Yes, and I’ll tell you exactly how to manage each component so you can enjoy ramen even when you’re busy.
The broth: Store it separately from the noodles and chicken in an airtight container in the refrigerator for up to 4 days. When you reheat it, do so gently over medium heat, never at a rolling boil. You can also freeze the broth in ice cube trays, then pop the frozen cubes into a freezer bag—you’ll have ramen broth ready to go for up to 3 months. Thaw overnight in the refrigerator before reheating.
The cooked chicken: Store it separately in an airtight container for 3 to 4 days. Reheat gently in a bit of broth or warm water. You can also freeze it for up to 2 months.
The soft-boiled eggs: Peeled eggs keep for 3 days in the refrigerator if stored in a clean container with a small amount of soy sauce or plain water. Unpeeled eggs last slightly longer, about 4 to 5 days.
The noodles: Cooked noodles don’t store well—they become gluey and lose texture. Cook them fresh each time you want to eat. Dried noodles last indefinitely in the pantry.
Smart make-ahead strategy: Make the broth on Sunday and store it. Throughout the week, you can cook fresh noodles, soft-boil an egg, and have restaurant-quality ramen ready in 15 minutes. That’s the real power here.
Expert’s Nutritional Insight
As a registered dietitian, I want to highlight something your grandmother might have known intuitively: the magic of this ramen is in the low-and-slow method. During that 2.5-hour simmer, collagen from the chicken skin breaks down into gelatin and amino acids like glycine and proline. These aren’t just flavor compounds—they’re bioavailable nutrients that support joint health, gut integrity, and skin elasticity.
The mushrooms contribute ergothioneine, a powerful antioxidant that most foods contain in trace amounts, but mushrooms are one of the few concentrated sources. The mirin adds subtle sweetness from fermented rice, providing B vitamins and enzymes your body can use immediately. The ginger and chilis contain gingerols and capsaicin—compounds that reduce inflammation and support digestion.
When you make ramen the way we’re doing it, you’re not just making comfort food. You’re making nutrient-dense medicine. That’s why my grandmother instinctively built her broths this way—she understood that time creates nutrition.
Nutrition Information
Based on USDA data and standard nutrition analysis, one serving of this authentic ramen (approximately 1/4 of the recipe, including broth, noodles, chicken, egg, and vegetables) contains:
- Calories: 480-520 per serving
- Protein: 28-32 grams (primarily from chicken and egg)
- Total Fat: 14-16 grams (mostly from chicken skin and egg yolk)
- Carbohydrates: 52-58 grams (from noodles and small amounts of sugar in the broth seasonings)
- Dietary Fiber: 2-3 grams (from mushrooms and greens)
- Sodium: 1,100-1,400 mg (from soy sauce and stock; use low-sodium stock to reduce this)
- Calcium: 60-80 mg
- Iron: 3-4 mg (from chicken and mushrooms)
This is a complete meal in one bowl—adequate protein for satiety, carbohydrates for energy, and micronutrients from the vegetables and broth. If you’re watching sodium, use low-sodium or no-sodium stock and reduce the soy sauce by 5 milliliters, which will bring the sodium down to approximately 800-900 mg per serving while maintaining flavor through the other seasonings.
What Can I Serve With Authentic Ramen?
Ramen is often a complete meal on its own, but here’s what pairs beautifully alongside:
- Gyoza or pot stickers – These crispy, tender dumplings echo the same careful, slow-cooked philosophy. The contrast between the dumpling skin’s crispness and the ramen’s silky broth is textural perfection.
- Cucumber salad with rice vinegar – A bright, tangy side that cuts through the richness of the broth and cleanses the palate. The acidity is refreshing.
- Edamame – Steamed or roasted with a touch of sea salt, these provide additional protein and a different textural element.
- Steamed buns or fresh bread – Use these to soak up the last of your broth after the noodles are gone. My grandmother taught me that finishing every drop shows respect for the food.
- Simple Asian greens with garlic – Bok choy or gai lan sautéed with garlic adds another vegetable component without competing with the ramen.
- Rice on the side – Some people like a small bowl of plain white rice to add to their broth. Texture preference, really.
You might also pair this with dishes like authentic moo shu, which offers a completely different flavor profile and texture but comes from the same culinary tradition.
Seasonal Variations: Adapt This Recipe Year-Round
Ramen is forgiving and beautiful in its adaptability. Here’s how I adjust it by season:
Spring: Replace some of the mushrooms with fresh bamboo shoots and add a handful of fresh peas to the broth during the last 15 minutes of cooking. Add tender spring greens instead of spinach. The lighter vegetables echo spring’s brightness.
Summer: Serve the broth chilled over ice with the other components as-is, creating a refreshing cold ramen. Add more fresh herbs like mint and Thai basil. The cooling effect of the chilled broth makes this perfect for hot weather, and the herbs bring brightness.
Fall: Add diced butternut squash or kabocha to the broth about 1 hour into cooking, along with a cinnamon stick. The sweetness of these squashes complements the broth’s savory notes. Add crispy fried garlic on top for warmth.
Winter: Make this exactly as written—it’s the ultimate warming bowl. You might increase the chili slightly for internal warmth, or add a splash of warming spices like star anise or clove to the broth. Winter is when broths like this are needed most.
Make-Ahead Guide: Build Your Ramen on Your Schedule
Here’s my professional meal-prep approach for making ramen convenient throughout your week:
Day 1 (Sunday evening): Make the full broth as directed. Once cooled, transfer to airtight containers and refrigerate. This actually improves—flavors settle and develop overnight.
Days 2-4 (Throughout the week): Each time you want ramen, bring a portion of broth to a gentle simmer in a pot. While that heats, boil water for fresh noodles and, if you want, soft-boil a fresh egg. Blanch your greens. This takes about 15 minutes total of active work.
Authentic Ramen Recipe
Ingredients
Equipment
Method
- Pat your four chicken thighs completely dry with paper towels. This matters because water prevents proper browning. Place them on a clean cutting board. In a small bowl, mix together 30 milliliters of mirin and 30 milliliters of dark soy sauce. Add your 2 teaspoons of brown sugar and stir until the sugar dissolves. This marinade is going to coat your chicken, and the sugars will caramelize slightly when the chicken cooks, adding depth to the broth. Pour this marinade over the chicken, making sure every piece gets coated. Let this sit for 10 minutes at room temperature. You're not looking for a long marination—just enough time for the flavors to start adhering to the meat. This is where patience begins.

- While the chicken marinates, prepare your aromatics. Take your 5 whole garlic cloves and leave them unpeeled and whole—they'll infuse the broth more gently this way. Slice your 2-inch piece of ginger into thin coins; you don't need to peel it. Leave your 4 fresh red chilis whole or split them in half lengthwise if you want more heat. Trim your 4 to 5 spring onions by removing the root end and cutting the white and light green parts into 3-inch pieces. Keep the dark green tops separate—you might use them for garnish. Gathering everything in one spot before you start cooking is called mise en place, a French term meaning "everything in its place." This prevents frantic searching once your broth is simmering. Trust me, you'll thank yourself.
- Place your large pot over medium-high heat. Let it warm for 2 minutes—you want it genuinely hot, not just warm. Add a light coating of neutral oil (about 1 tablespoon of vegetable or canola oil). Once the oil shimmers, carefully place your marinated chicken thighs skin-side down into the pot. Don't move them yet. This is crucial. Let them sit undisturbed for 4 to 5 minutes. What's happening is a chemical process called the Maillard reaction—proteins and sugars are bonding and caramelizing, creating hundreds of new flavor compounds. This is why we sear meat. Your kitchen should smell incredible by now. After 4 to 5 minutes, flip each thigh and sear the other side for another 3 to 4 minutes until golden. The skin should be golden brown, the meat cooked about halfway through. You're not trying to fully cook the chicken yet—you're just building flavor.
- Pour your 4 cups of good-quality chicken stock directly into the pot over the seared chicken. The liquid will sizzle and steam—that's perfect. Add all your prepared aromatics: the whole garlic cloves, ginger coins, chili peppers, and spring onion pieces. If you're using the optional 6 dried shiitake mushrooms, add them now. They'll rehydrate and release their umami into the broth. Add 15 milliliters of light soy sauce and another 15 milliliters of mirin to the broth. Add your ¼ teaspoon of cayenne pepper if you want gentle heat. Stir gently, bringing everything to a simmer. Do not boil vigorously—a gentle simmer is what we want. Boiling will make the broth cloudy and can toughen the chicken. Reduce your heat to medium-low, aiming for just a few lazy bubbles breaking the surface every few seconds. This is the beginning of the low-and-slow process. Your broth will now simmer, untouched and undisturbed, for 2 to 2.5 hours. During this time, collagen from the chicken skin breaks down into gelatin, creating a silky mouthfeel. The aromatics infuse deeply. The chicken becomes impossibly tender. This is where the magic happens, and it requires nothing from you but time.
- After about 1.5 hours of simmering, the broth will smell phenomenal and the chicken will be becoming tender. Add your 8 ounces of fresh shiitake mushrooms, which you've already sliced or halved. These fresh mushrooms will cook down during the final 45 minutes to an hour, contributing earthiness and additional umami compounds. Stir gently to distribute them throughout the broth. Taste the broth now. It should be flavorful but perhaps not perfect yet—it's still developing. You can adjust seasoning now if needed, adding a splash more soy sauce or a pinch more salt. Remember, you can always add more, but you can't take it out.
- About 45 minutes before you want to eat, bring a separate small pot of water to a rolling boil. Gently lower your 4 large eggs into the boiling water using a spoon. Set a timer for exactly 6.5 minutes. This timing gives you the perfect soft-boiled egg—a tender, jammy yolk with a fully set white. While the eggs cook, prepare an ice bath by filling a bowl with ice and cold water. When the timer goes off, use a slotted spoon to transfer the eggs directly from the hot water into the ice bath. Let them cool for at least 2 minutes. This stops the cooking immediately and makes them easier to peel. Once cooled, gently tap the eggs all over and roll them to crack the shell, then peel under cool running water, starting from the wider end where the air pocket makes peeling easier. If you're making these ahead, you can keep peeled eggs in a container covered with a mixture of 2 parts soy sauce to 1 part mirin, refrigerated, where they'll marinate and develop flavor over 24 hours.

- About 10 minutes before you plan to eat, bring a large separate pot of water to a rolling boil. Do not add salt—the noodles themselves already contain salt. Add your 4 portions of dried ramen noodles and stir occasionally to prevent sticking. Most dried ramen cooks in 3 to 4 minutes—check the package, as different brands vary slightly. You want them tender but with a slight firmness when you bite through, what the Japanese call al dente. When they're done, drain them in a colander, rinse gently with cool water to stop the cooking, and divide them evenly among your four bowls. The rinsing prevents them from sticking together and removes excess starch.
- Your broth should now be rich, deeply flavored, and have simmered for 2 to 2.5 hours total. Taste it one more time and adjust seasoning if needed—a touch more soy sauce, a pinch of salt, maybe a whisper more cayenne. Using a slotted spoon, carefully remove the chicken pieces and transfer them to a cutting board. Remove the larger pieces of ginger, the whole garlic cloves, chilis, and spring onion pieces—these have done their job and you can discard them. Shred or slice your chicken into bite-sized pieces. Discard the skin if you prefer, though it's flavorful and contributes collagen. In a small bowl, prepare your fresh toppings: the sliced fresh garlic, sliced spring onions, your sliced radishes or bean sprouts, and a small drizzle of sesame oil. Blanch your yu choy or spinach by placing it in a strainer and pouring boiling water from the broth over it for just 30 seconds—this wilts the greens and keeps them tender. Alternatively, you can skip this and serve them raw if you prefer the crunch.
- This is where your ramen becomes real. Into each bowl with the cooked noodles, carefully ladle your hot broth, dividing the mushrooms and any remaining aromatics among the four bowls. Top each with a portion of your shredded chicken, one soft-boiled egg sliced in half to show that gorgeous jammy yolk, your wilted greens, and your fresh toppings: the sliced garlic, sliced spring onions, radishes or sprouts. Finish with a tiny drizzle of sesame oil and a small drizzle of chili garlic oil if you like heat. Taste, and adjust with a splash more soy sauce if needed. The first sip of broth should be savory, slightly sweet, with a warm undertone of ginger and a delicate heat from the chilis. If you've made it this far, you've made authentic ramen.
Notes
Alternative: Freeze components: Freeze the broth in ice-cube trays, then store cubes in a freezer bag. You can thaw just the amount you need. Freeze the chicken separately in portions. When