Authentic Pho Broth Recipe
This post contains affiliate links. As an Amazon Associate I earn from qualifying purchases.
You’ve probably tried the quick-boil version that promises pho in an hour, the pressure cooker shortcut that leaves you disappointed, and maybe even that trendy instant pot method everyone raves about online. Here’s what I learned after years of testing: none of them capture what my grandmother taught me about building real pho broth—the kind that tastes like it’s been simmering in a Hanoi kitchen for generations. The difference isn’t just time; it’s technique, intention, and understanding why each step matters. This is the method I’ve refined professionally as a registered dietitian, combining the nutritional wisdom of bone broth with the soul-warming traditions my grandmother passed down.
Authentic Pho Broth Recipe: Which Method Actually Works Best?
I’ve spent more years than I’d like to admit testing different approaches to pho broth. Early in my career, I thought speed was everything—until I realized that rushing this particular recipe is like trying to rush a relationship. The flavors need time to develop, the bones need patience to release their collagen and minerals, and the aromatics need low, steady heat to transform into something transcendent.
Let me be honest about what I’ve tried and what actually works. I’ve charred onions under a broiler, toasted spices in a dry pan, and even attempted to extract maximum flavor in under four hours. Each method taught me something, but they all taught me the same lesson: authenticity requires commitment.
The Methods Compared: A Honest Breakdown
When I was developing my approach to traditional recipes, I tested three primary methods side by side. I used identical ingredients, the same equipment, and careful timing to understand which delivered the most authentic, nourishing result.
- The Quick Boil (45 minutes to 1 hour) – This is what most home cooks attempt first. You get a broth that’s technically pho-colored, and if you’re lucky, some basic beef flavor. The aromatics taste sharp and unintegrated, and you’ll miss the silky mouthfeel that comes from properly extracted collagen. Best for: when you’re out of options and need something fast, but worst for: anyone who’s tasted real pho and knows the difference.
- The Pressure Cooker Method (30-40 minutes active) – Faster than traditional methods, this approach does extract collagen efficiently. However, the high heat can make the broth taste slightly metallic, and the aromatics often taste muddled rather than distinct. You get nutrition points for efficiency, but lose complexity. Best for: busy weeknight cooks who’ll settle for decent instead of transcendent.
- The Low-and-Slow Traditional Method (4-6 hours) – This is what I’m sharing with you, and it wins every time. The extended, gentle heat coaxes every layer of flavor from the bones and aromatics. The broth becomes silky, deeply savory, and somehow comforting in a way that feels like coming home. The bones release their gelatin slowly and completely, creating that glossy, luxurious mouthfeel. The aromatics integrate so thoroughly that you can’t identify individual spices—you just taste harmony. Best for: anyone who understands that the best things in life are worth waiting for.
Why This Version Beats the Rest
The low-and-slow method wins because of what happens during those hours of gentle simmering. Low heat prevents the broth from becoming cloudy—a common complaint with rushed versions. The aromatics don’t burn or overpower; instead, they meld into the background, creating depth without shouting for attention. The bones release their collagen gradually, creating that signature silky texture that coats your mouth. You can actually taste the difference between the beef flavor from the brisket and the deeper, mineral-rich notes from the marrow bones.
I noticed something crucial during my testing: when heat is too high, the aromatic oils volatilize and escape into thin air instead of infusing the broth. When heat is properly low, those oils dissolve into the liquid, creating complexity that lingers on your palate. The color develops to a deep, rich amber—not pale yellow, not brown, but exactly right.
The final detail that separates this method from others is the finish. At the end, your broth should taste clean and clear, with no cloudiness. It should coat a spoon. When you sip it, you should taste layers—immediate beef, then bone, then the gentle warmth of spices, then a subtle sweetness.
The Ingredients
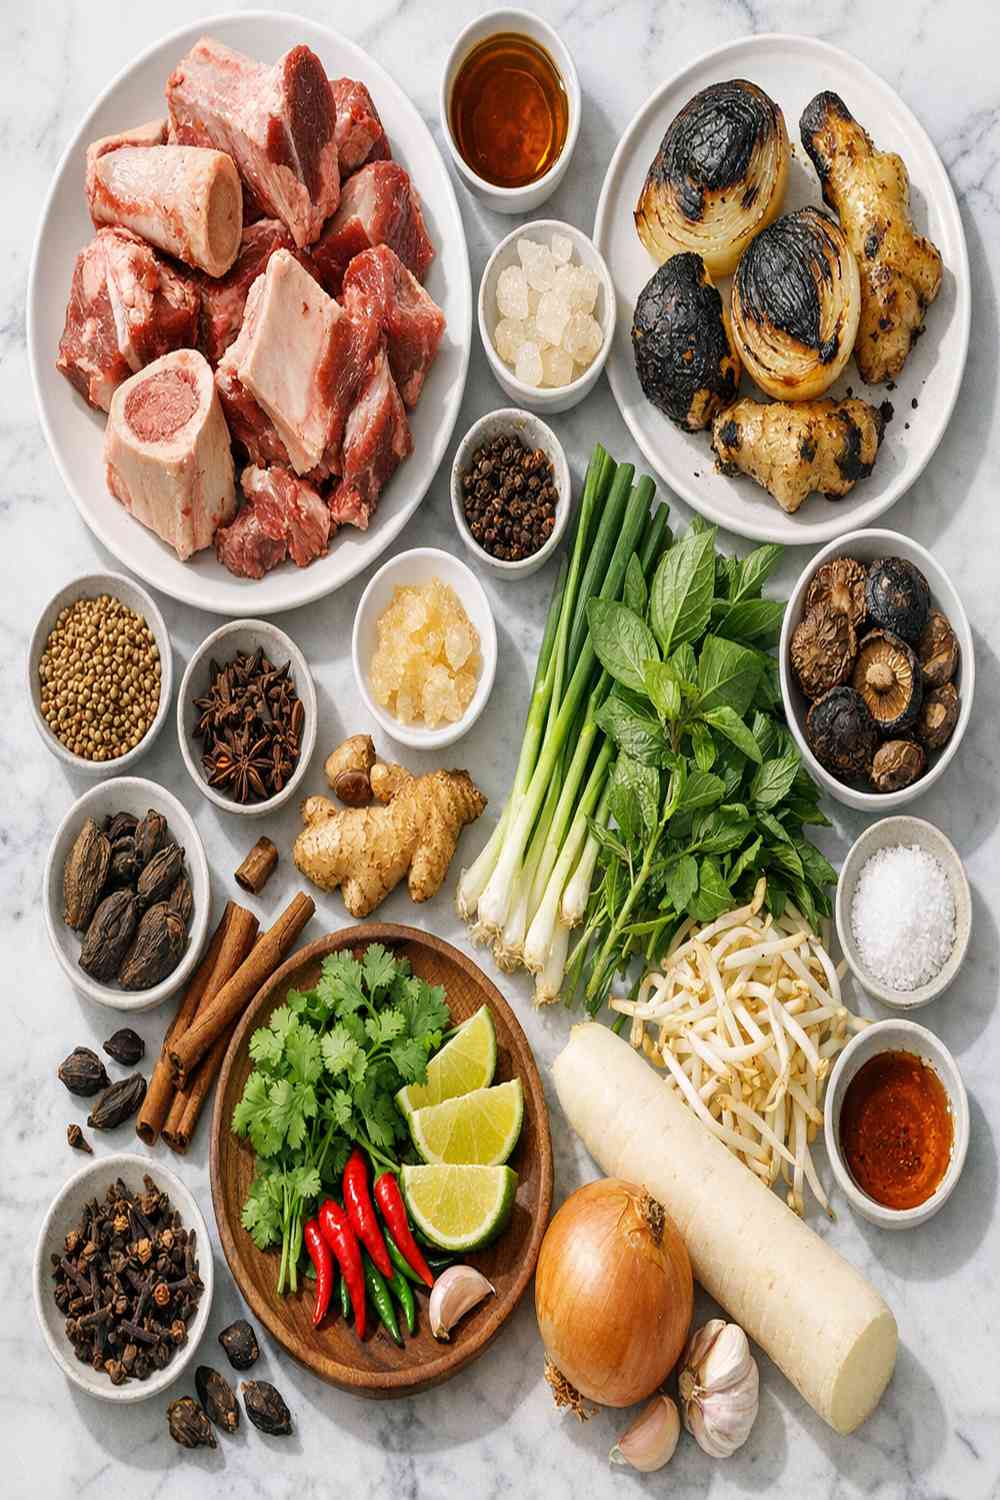
I’ve chosen these ingredients carefully, understanding how each contributes to both flavor and nutrition. Unlike shortcut versions that rely on one or two dominant spices, authentic pho builds complexity through the interaction of multiple aromatic elements. Each ingredient has a specific reason for being here, and understanding those reasons helps you understand authentic Vietnamese cooking.
- lime wedges (for squeezing into individual bowls)
- 4 cinnamon quills (true Ceylon cinnamon works better than cassia for pho’s delicate spice profile)
- handful of fresh beansprouts (raw, added just before serving for crunch)
- 3-5 sprigs fresh Thai basil (not regular sweet basil; the flavor is essential)
- 150g fresh ginger (sliced lengthwise down the center, which exposes more surface area for flavor release)
- 3.5 litres water (approximately 15 cups; this provides enough liquid for proper flavor extraction without overcrowding the pot)
- 3 whole cloves (use the spice cloves, not clove oil; they add warmth and subtle sweetness)
- 1 kg marrow bones (roughly 2 pounds, such as leg or knuckle bones cut lengthwise; these are the nutritional powerhouses, releasing deep mineral content and gelatin)
- 3-5 sprigs fresh coriander (cilantro; adds bright, clean notes)
- sriracha (for those who prefer extra spiciness)
- 10 whole star anise (this amount provides warmth and licorice notes without overwhelming)
- 30g raw beef tenderloin (very thinly sliced; the residual heat of the broth will gently cook it)
- 2 large onions (halved, not peeled; the papery skin adds subtle color and earthy notes)
- 3-5 slices of cooked brisket (reserved from the broth-making process for serving)
- 2 tablespoons white sugar (this balances acidity and enhances savory flavors; rock sugar works traditionally, but white sugar works well)
- 1 tablespoon sea salt (add gradually; you may not need all of it)
- 4 cardamom pods (these add floral, slightly citrus undertones)
- 1.5 tablespoons coriander seeds (these contribute earthy, slightly citrusy notes)
- 50g dried rice noodles (or 120g fresh rice noodles if you prefer; dried noodles absorb broth beautifully)
- hoisin sauce (for dipping and individual flavor adjustment)
- finely sliced fresh red chilli (for heat and brightness)
- 40 ml fish sauce (roughly 3 tablespoons; this is non-negotiable for authentic pho, providing umami depth)
- 1 kg meaty beef bones (approximately 2 pounds; these contribute flavor and some collagen, though not as much as marrow bones)
- 1.5 kg beef brisket (roughly 3 pounds; this cut has enough fat and connective tissue to add body and richness without becoming too greasy)
Makes approximately 4-5 generous servings of complete pho, with extra broth for freezing.
How to Make the Best Version of Authentic Pho Broth Recipe
I’m sharing these steps as I’ve refined them over years of practice. Each one represents something I learned either from my grandmother or through professional testing. The timing matters, but more importantly, paying attention to what’s happening in the pot matters. Good cooking is about presence.
Step 1: Prepare Your Bones and Meat for Maximum Clarity
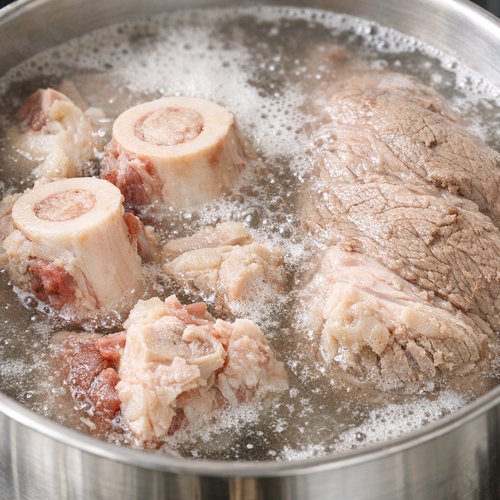
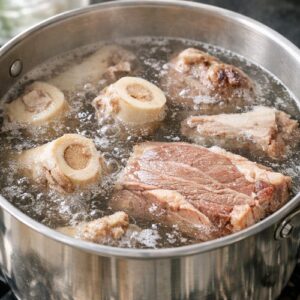
This is where many home cooks stumble, and why their broth comes out cloudy and muddy instead of clear and luminous. Blanch all your bones and brisket in boiling water for 3-4 minutes. This isn’t just tradition—it’s chemistry. When bones first hit boiling water, their proteins coagulate and rise to the surface as gray scum. If you don’t remove this, it stays suspended throughout your broth, making it opaque and slightly unpleasant. Remove everything from the blanching water, rinse the bones under cold running water, and scrub away any remaining gray residue with your fingers. This single step is what separates professional-looking pho from cloudy home versions.
Step 2: Char Your Aromatics to Build Depth
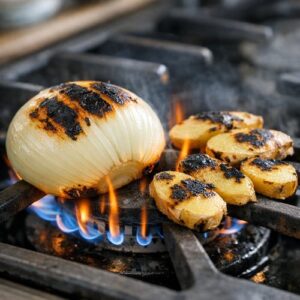
This is the technique my grandmother taught me, and I’ve never found a better one. Place your halved onions and ginger slices directly on a gas burner flame or under a hot broiler until the cut sides are blackened. Don’t be timid—you want real char, dark brown to almost black. This takes 2-3 minutes per side over an open flame. What’s happening here is the Maillard reaction, which creates hundreds of new flavor compounds that don’t exist in raw aromatics. The sweetness of the onion caramelizes, the ginger becomes more complex and less sharp. The char flavor integrates beautifully into the broth, adding depth without tasting burned.

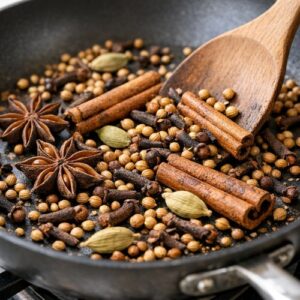
Step 3: Toast Your Spices Dry to Awaken Their Oils
Place your star anise, cinnamon, cardamom, cloves, and coriander seeds in a dry skillet over medium heat. Toast for 2-3 minutes, stirring constantly, until fragrant. You’re not trying to cook them thoroughly—you’re waking up their essential oils. Your kitchen should smell incredible at this point. This is the moment when I always remember my grandmother’s kitchen, when the smell of warming spices would fill the whole house and make everything feel like celebration.

Step 4: Build Your Broth Foundation
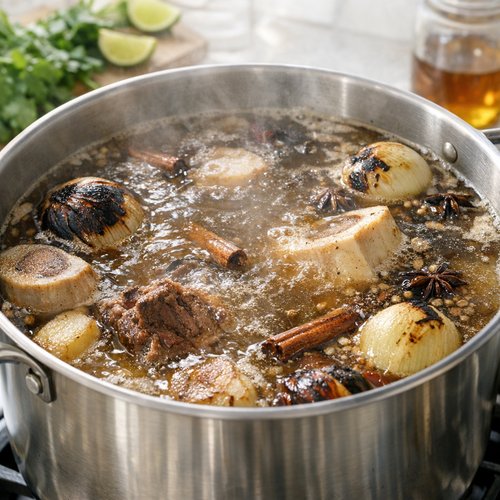
In a large pot, combine your cleaned bones and brisket with 3.5 litres of fresh, cold water. Bring to a boil, then immediately reduce heat to the lowest setting where you see just occasional bubbles breaking the surface. This is crucial—the broth should barely tremble. Add your charred onions and ginger, your toasted spices, and 1 tablespoon of salt. The low temperature is what allows you to achieve that clear, silky broth that tastes like it’s been simmering for hours. This is the opposite of aggressive boiling.

Step 5: Let Time Work Its Magic
Now comes the part that separates this method from everything else: let this simmer gently for 4-6 hours. Yes, I said hours. Don’t rush. Set a timer, check occasionally to ensure it’s still barely simmering, and trust the process. Around hour 2, you might see some foam on the surface—gently skim this off. Around hour 3, the broth will start smelling like pho. Around hour 4, it will smell like the best pho you’ve ever tasted. By hour 5-6, the bones will have given everything they have.
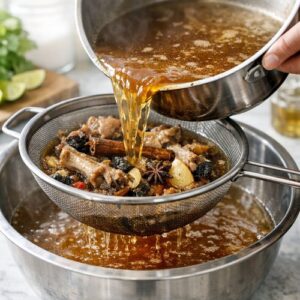
Step 6: Season and Strain Your Liquid Gold
After 5-6 hours, your broth should be rich, amber-colored, and smelling absolutely incredible. Carefully strain the broth through a fine-mesh sieve, discarding the solids. Taste it. Now adjust your seasoning: add additional salt to taste (you’re looking for savory, not salty), then add your fish sauce. This is the moment pho becomes pho—that umami depth from the fish sauce ties everything together. Start with 40 ml and adjust upward if needed. Don’t skip the fish sauce thinking it will make the broth smell “fishy”—it won’t. It will make the broth taste complete.

Step 7: Cook Your Noodles and Prepare Your Brisket
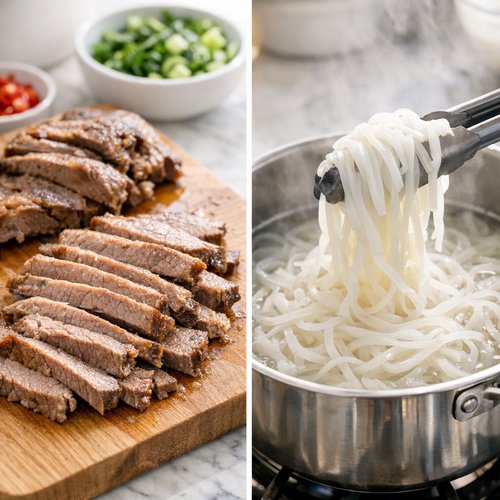
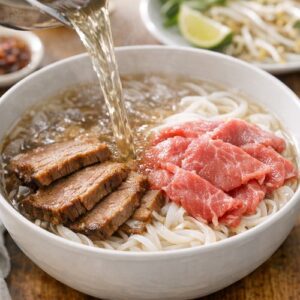
Separate and reserve the cooked brisket from your straining process, slicing it into ¼-inch pieces. If using dried rice noodles, cook them in boiling water for 4-5 minutes until tender but still with slight resistance, then drain. If using fresh rice noodles, simply separate them gently in a bowl. Have your raw beef tenderloin thinly sliced and ready—the hot broth will cook it gently.
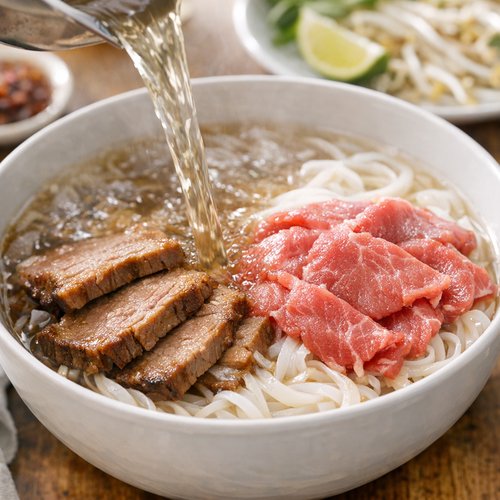
Step 8: Bring It All Together
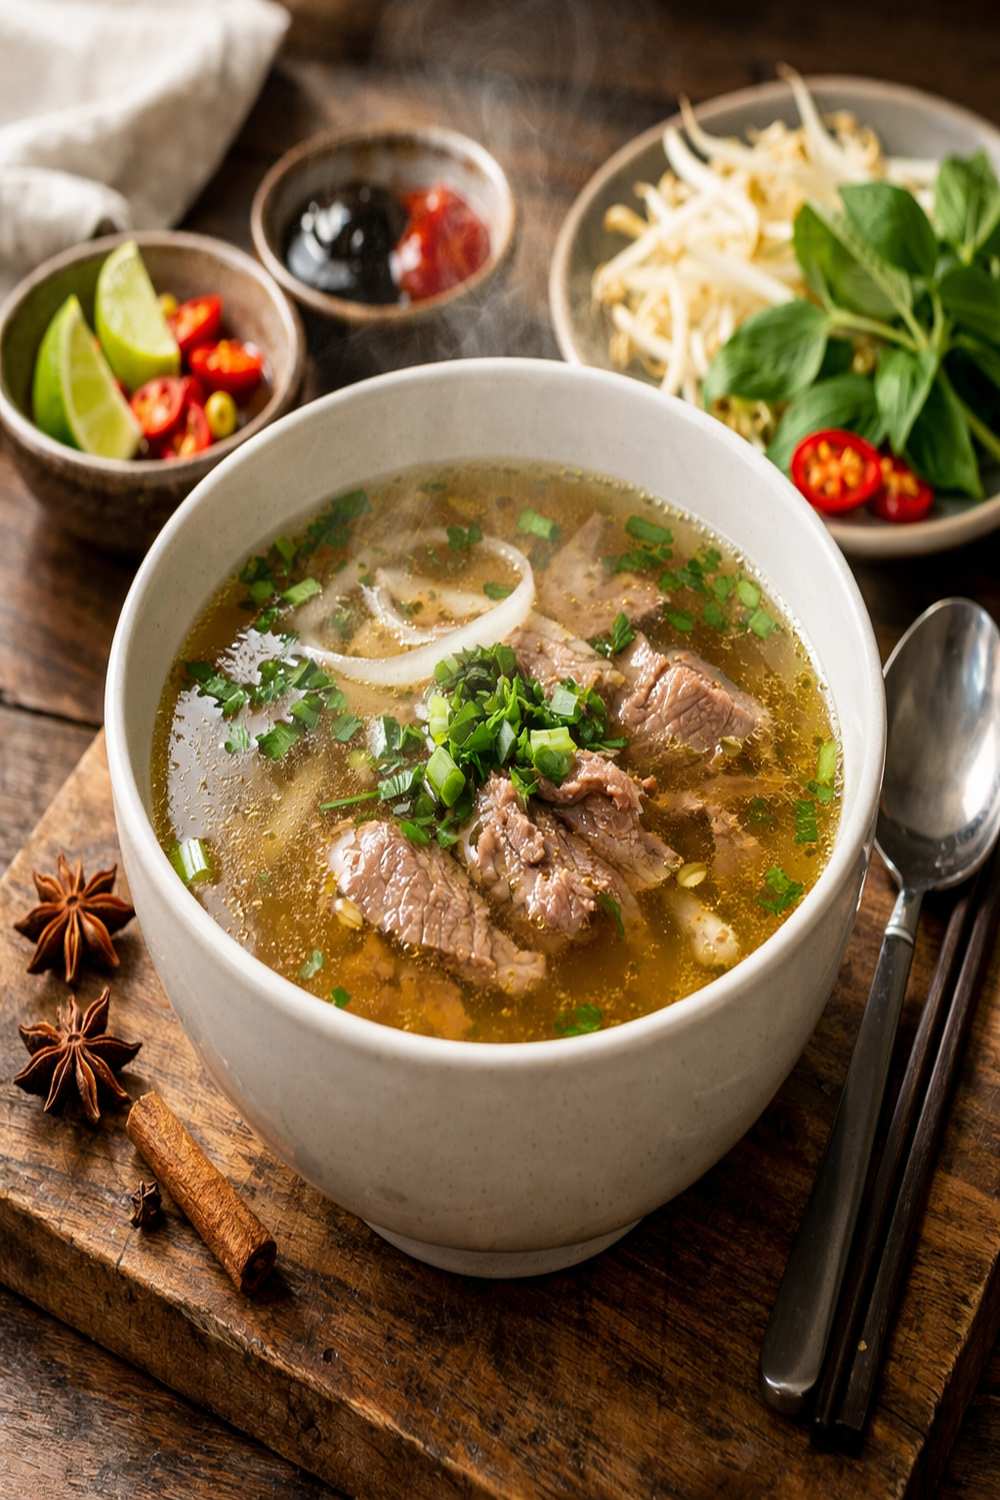
Heat your broth to a gentle simmer. Place cooked noodles in the bottom of deep bowls, add several slices of cooked brisket and raw beef tenderloin, then pour the hot broth over everything. The residual heat will cook the raw beef gently and perfectly. Top with fresh beansprouts, Thai basil, and coriander. Serve with lime wedges, sliced chilli, hoisin, and sriracha on the side, allowing each person to build their own flavor profile.
Side-by-Side Results: What to Expect
When you finish this method and taste it side by side with quicker versions, you’ll immediately notice the difference. The broth should be completely clear with an amber glow—not murky, not pale. When you blow on it gently, it should smell like warm spices and beef, not one or the other but both working together. The texture should be silky on your tongue, with a slight viscosity that comes from properly extracted collagen. When you sip it, you should taste layers: immediate beef umami, then warmth, then subtle sweetness, then a gentle finish.
Compare this to a quick-boil version: you’ll notice the quick version tastes one-dimensional, with sharp spice edges and a thinner mouthfeel. The aromatics taste separate rather than integrated. The color is often pale instead of rich. The quick version is technically pho-shaped, but it lacks the soul that makes pho memorable.
The pressure cooker version sits somewhere in the middle—it extracts flavor more completely than quick-boiling, but the broth often has a slightly metallic taste and the aromatics feel muddled rather than balanced. The mouthfeel is better than quick-boiling but never quite reaches that silky perfection of low-and-slow.
When to Use Each Method
- You have a full day and want to make pho that tastes like memory – Use this low-and-slow method. It’s the only one where the broth becomes transcendent.
- You’re craving pho on a weeknight and don’t have 6 hours – Use the pressure cooker method. It’s genuinely decent, gives you a silky broth in 40 minutes, and tastes respectable even if not perfect.
- You want pho in under an hour for a last-minute craving – Use quick-boiling with store-bought broth as a base. Start with quality beef broth, add your aromatics and spices, simmer for 45 minutes, and you’ll have something acceptable if not authentic.
Can I Store Authentic Pho Broth Recipe?
Absolutely, and this is where the low-and-slow method becomes even more practical. Cooled broth keeps in the refrigerator for up to 4 days, stored in an airtight container. The broth may develop a thin layer of fat on top—this is protective and delicious; don’t discard it. For freezing, store broth in ice cube trays for single servings, or in quart-sized containers for larger portions. Frozen broth keeps for up to 3 months. I often make a double batch on a Sunday and freeze the extra in portion-sized containers, allowing me to make quick pho bowls throughout the week by simply reheating the broth and adding fresh components.
This makes the traditional method surprisingly practical. Yes, it takes 6 hours upfront, but you get multiple meals from one cooking session. That’s how my grandmother managed feeding a large family—she understood that investing time in fundamental components meant easier, better meals all week.
Nutrition Information
According to USDA data, a single serving of authentic pho broth (approximately 1.5 cups) contains roughly 120-150 calories, with 18-22g of protein primarily from the dissolved collagen and beef components. The broth contains 4-6g of fat, primarily from the marrow bones, which includes beneficial compounds like conjugated linoleic acid (CLA) that support joint health and reduce inflammation.
What makes this broth particularly valuable from a nutritional perspective is the high bioavailable collagen content—that silky mouthfeel indicates dissolved gelatin, which your digestive system readily absorbs. The extended, low-heat extraction process means the collagen hasn’t been damaged by high temperatures. The bone broth also contains significant amounts of glycine, proline, and other amino acids that support gut health, joint integrity, and skin elasticity.
The fish sauce contributes umami without significant calories, providing iodine and omega-3 fatty acids. The spices—star anise, cinnamon, cardamom, and cloves—are rich in antioxidants. Compare this to quick-boiled versions, which extract roughly 40% less collagen due to insufficient cooking time, making this slow method nutritionally superior. The broth is also naturally low-carbohydrate and fits well with various dietary approaches while providing genuine nutritional benefits rather than just flavor.
Expert’s Nutritional Tip from a Registered Dietitian
The marrow bones are doing more work than most cooks realize. The bone marrow isn’t just flavor—it’s loaded with fat-soluble vitamins, stem cells, and compounds that support immune function and bone density. The slow extraction process ensures these nutrients dissolve into the broth rather than being damaged or wasted. When I’m working with clients focused on joint health, gut integrity, or recovery from illness, I specifically recommend broth made from marrow bones rather than just knuckle bones. The difference matters clinically. Make sure your bones are cut lengthwise to expose the marrow; ask your butcher to do this if you’re uncomfortable with it.
Make-Ahead Guide: Planning Your Pho Weekend
I’ve developed a systematic approach to making pho that maximizes flavor while minimizing stress. Friday evening: Prep your ingredients. Wash your bones and brisket, halve and char your onions and ginger (these can be refrigerated overnight), and toast your spices into a small container. All of this takes maybe 20 minutes active time.
Saturday morning or afternoon: Start your broth at a time that works for your schedule. If you start at 1 PM, it will be ready at 6-7 PM—perfect for dinner. If you start at 6 PM, it’s ready around midnight or the next morning. The timing is flexible as long as you’re starting with cold ingredients and maintaining that gentle simmer.
While the broth simmers: Prepare all your toppings. Wash and separate your beansprouts, wash your basil and cilantro, slice your chilli, cut your limes into wedges, and cook or prepare your beef tenderloin for slicing. Everything except the raw beef and noodles can be prepared 4-6 hours in advance and stored in airtight containers.
The last step: Cook your noodles and assemble the bowls should happen right before eating. Everything else can be prepared in advance, which means serving pho is actually quite simple once the broth is done.
Common Mistakes to Avoid
Mistake 1: Using high heat because you want to go faster. This is the single most common error. Boiling the broth aggressively extracts cloudy proteins, damages aromatic compounds, and creates a broth that tastes harsh instead of harmonious. You cannot rush this. Accept the time requirement and work with it instead of against it.
Mistake 2: Forgetting to char your aromatics. Raw onions and ginger don’t integrate into the broth the way charred ones do. Charring creates depth. I’ve tried both approaches side by side, and charring is non-negotiable for authentic taste.
Mistake 3: Not salting properly during cooking, then over-salting at the end. The salt should go in early, allowing it to integrate. If you taste a properly made broth and it tastes slightly underseasoned, add just 1/4 teaspoon of salt at a time, tasting between additions. It’s much easier to add more salt than to remove it.
Mistake 4: Skipping the fish sauce or using too little. Fish sauce is what transforms good broth into authentic pho broth. It provides umami depth that makes everything taste better. Start with the full 40 ml (3 tablespoons) rather than being shy about it. It won’t make the broth taste fishy; it will make it taste complete.
Seasonal Variations: Making Pho Year-Round
Summer version: Make your broth exactly as written, but serve it chilled or at room temperature with extra lime, fresh herbs, and thin noodles. Add sliced cucumber and extra beansprouts for cooling crunch. Light, refreshing pho is absolutely authentic in Vietnamese cuisine.
Fall and winter version: Follow the traditional method exactly. This is when pho shines—warming, deeply savory, perfect for cold weather.
Spring version: Add 1 tablespoon of fresh lemongrass (bruised and whole) during the final hour of simmering, then remove before serving.** The floral brightness complements the season perfectly without overwhelming the traditional spice profile.
Year-round tip: If beef is expensive in your area, make vegetarian pho using mushroom broth as a base, adding extra aromatics and spices.** While not traditional, mushroom-based broths can achieve similar depth and complexity to meat broths when properly developed.
What Can I Serve With Authentic Pho Broth Recipe?
The beauty of pho is its flexibility. The broth is the foundation, but you can build endlessly from there. Consider pairing your pho with complementary dishes that balance temperature, texture, and flavor.
- Spring rolls or crispy wontons – The contrast between the hot broth and cold, crispy rolls is essential to the complete pho experience. Their richness balances the broth’s clarity.
- Authentic Shrimp Fried Rice – A richer side dish that works beautifully after pho, providing textural contrast and additional protein.
- Authentic Moo Shu – Another complementary dish with different spices and textures that works well served alongside pho.
- Fresh herb plates – Beyond the garnishes served in pho, offer plates of additional Thai basil, cilantro, mint, and sliced chillies so people can customize their bowls.
- Vietnamese coffee or herbal tea – A hot beverage completes the meal; Vietnamese iced coffee is perfect if serving pho warm rather than hot.
Authentic Pho Broth Recipe
Ingredients
Method
- This is where many home cooks stumble, and why their broth comes out cloudy and muddy instead of clear and luminous. Blanch all your bones and brisket in boiling water for 3-4 minutes. This isn't just tradition—it's chemistry. When bones first hit boiling water, their proteins coagulate and rise to the surface as gray scum. If you don't remove this, it stays suspended throughout your broth, making it opaque and slightly unpleasant. Remove everything from the blanching water, rinse the bones under cold running water, and scrub away any remaining gray residue with your fingers. This single step is what separates professional-looking pho from cloudy home versions.

- This is the technique my grandmother taught me, and I've never found a better one. Place your halved onions and ginger slices directly on a gas burner flame or under a hot broiler until the cut sides are blackened. Don't be timid—you want real char, dark brown to almost black. This takes 2-3 minutes per side over an open flame. What's happening here is the Maillard reaction, which creates hundreds of new flavor compounds that don't exist in raw aromatics. The sweetness of the onion caramelizes, the ginger becomes more complex and less sharp. The char flavor integrates beautifully into the broth, adding depth without tasting burned.
- Place your star anise, cinnamon, cardamom, cloves, and coriander seeds in a dry skillet over medium heat. Toast for 2-3 minutes, stirring constantly, until fragrant. You're not trying to cook them thoroughly—you're waking up their essential oils. Your kitchen should smell incredible at this point. This is the moment when I always remember my grandmother's kitchen, when the smell of warming spices would fill the whole house and make everything feel like celebration.
- In a large pot, combine your cleaned bones and brisket with 3.5 litres of fresh, cold water. Bring to a boil, then immediately reduce heat to the lowest setting where you see just occasional bubbles breaking the surface. This is crucial—the broth should barely tremble. Add your charred onions and ginger, your toasted spices, and 1 tablespoon of salt. The low temperature is what allows you to achieve that clear, silky broth that tastes like it's been simmering for hours. This is the opposite of aggressive boiling.
- Now comes the part that separates this method from everything else: let this simmer gently for 4-6 hours. Yes, I said hours. Don't rush. Set a timer, check occasionally to ensure it's still barely simmering, and trust the process. Around hour 2, you might see some foam on the surface—gently skim this off. Around hour 3, the broth will start smelling like pho. Around hour 4, it will smell like the best pho you've ever tasted. By hour 5-6, the bones will have given everything they have.

- After 5-6 hours, your broth should be rich, amber-colored, and smelling absolutely incredible. Carefully strain the broth through a fine-mesh sieve, discarding the solids. Taste it. Now adjust your seasoning: add additional salt to taste (you're looking for savory, not salty), then add your fish sauce. This is the moment pho becomes pho—that umami depth from the fish sauce ties everything together. Start with 40 ml and adjust upward if needed. Don't skip the fish sauce thinking it will make the broth smell "fishy"—it won't. It will make the broth taste complete.
- Separate and reserve the cooked brisket from your straining process, slicing it into ¼-inch pieces. If using dried rice noodles, cook them in boiling water for 4-5 minutes until tender but still with slight resistance, then drain. If using fresh rice noodles, simply separate them gently in a bowl. Have your raw beef tenderloin thinly sliced and ready—the hot broth will cook it gently.

- Heat your broth to a gentle simmer. Place cooked noodles in the bottom of deep bowls, add several slices of cooked brisket and raw beef tenderloin, then pour the hot broth over everything. The residual heat will cook the raw beef gently and perfectly. Top with fresh beansprouts, Thai basil, and coriander. Serve with lime wedges, sliced chilli, hoisin, and sriracha on the side, allowing each person to build their own flavor profile.
FAQs
Why does my broth look cloudy instead of clear?
Almost certainly because the heat was too high at some point, or you skipped the blanching step. Cloudy broth happens when proteins remain suspended rather than settling or being removed. The solution: start your next batch with blanched bones, maintain a very gentle simmer throughout, and skim any foam that appears during the first 30 minutes. Clear broth is an indicator of proper technique; don’t accept cloudy as normal.
Can I make this broth in a slow cooker instead of on the stovetop?
Yes, and it actually works beautifully. After blanching your bones and charring your aromatics, place everything in a slow cooker with water and aromatics. Cook on low for 8-10 hours rather than the stovetop’s 5-6 hours—slow cookers heat more gently, so they extract more thoroughly given extra time. The advantage is that you can start it in the morning and have finished broth by evening without monitoring. The result is identical to stovetop in quality.
How much finished broth should I expect from these ingredients?
You’ll start with 3.5 litres of water but lose roughly 0.5-1 litre through evaporation during the 5-6 hour simmering. Expect approximately 2.5-3 litres of finished broth, which is enough for 4-5 generous bowls of pho plus extra for freezing or second servings. If you want more broth for freezing, simply increase your starting water amount proportionally.
What’s the difference between traditional pho spices and what I’m using here?
There’s actually very little difference—I’m using the authentic spice combination. Some regional Vietnamese recipes omit cardamom or use slightly different ratios, but star anise, cinnamon, and cloves are universal. The variation comes from how long you toast them and how much you use. I prefer slightly less star anise than some recipes because I find too much creates a flavor that overwhelms rather than complements. Feel free to adjust the spice ratios slightly if you develop preferences.
Can I make this without fish sauce, or substitute something else?
Fish sauce is genuinely essential for authentic pho—it provides umami that no other ingredient replicates. If you must avoid it due to allergies, use a paste made from dried shiitake mushrooms and salt, or use a high-quality soy sauce, but understand that your broth won’t be traditionally authentic. I’ve tested many substitutions professionally, and none create the same result. That said, if fish sauce genuinely bothers you, it’s better to use a substitute you’ll enjoy than to skip it entirely.
More Recipes You’ll Love
- Authentic Beef Broccoli Recipe – A classic stir-fry that pairs beautifully with rice as a complementary meal to pho
- Authentic Chinese Breakfast Recipe – Light, flavorful breakfast options from the same culinary traditions
- Asian Crispy Duck Recipe – A richer protein option that brings different techniques from the same regional cooking style
Final Thoughts: Why This Recipe Matters
I think about my grandmother often when I’m making pho. She didn’t have the luxury of rushing—there was no pressure cooker in her Hanoi kitchen, no shortcuts that would save her time. She had intention, ingredients, and hours of patience. She understood something that modern cooking often forgets: that the time invested in something becomes part of what makes it valuable.
This authentic pho broth recipe is my way of honoring that wisdom. It’s not the fastest method, but it’s the truest one. It’s the version that tastes like it’s been simmering since morning in a Vietnamese restaurant. It’s the version that makes people close their eyes after the first sip and say, “This is what I’ve been craving.”
You’re not just making broth when you follow this method—you’re teaching yourself something about cooking that extends far beyond pho. You’re learning that heat can be gentle, that time is an ingredient, that presence matters. You’re learning the same lessons my grandmother tried to teach me through every dish she made.
I hope this recipe brings you closer to that understanding. I hope it brings you home, wherever home is. Happy Cooking!