Butterflied Shrimp Recipe
This post contains affiliate links. As an Amazon Associate I earn from qualifying purchases.
Before you think seafood requires fancy techniques or restaurant-quality equipment, let me tell you something I learned watching my grandmother work her magic in a modest Worcester kitchen. She’d take the simplest ingredients—flour, eggs, breadcrumbs—and transform them into something that made everyone at the table pause mid-conversation just to savor each bite. That’s what this butterflied shrimp recipe represents to me: the beautiful alchemy of accessible ingredients meeting intention and patience. Whether you’re looking to impress at a family dinner or simply want to recreate that soul-warming satisfaction I grew up chasing, this dish bridges nutritional science with the kind of nostalgia that keeps us coming back for more. I’ve spent years as a registered dietitian learning how to balance tradition with wellness, and I’m thrilled to share this approach with you.
The Story Behind This Golden, Butterflied Creation
I remember a Sunday afternoon maybe fifteen years ago, standing in my grandmother’s kitchen while she prepared for a church potluck. She’d bought a pound of beautiful large shrimp—a splurge for her budget back then—and I asked why she was butterflying them so carefully. “Willie,” she said, hands moving with practiced precision, “when you open something up like this, you’re giving it more surface to catch the goodness. More places for flavor to stick.” At the time, I was just a kid fascinated by her wordless wisdom. Years later, studying nutrition science, I realized she was absolutely right in ways that went beyond kitchen intuition.
Butterflying shrimp creates more surface area, which means a better crust-to-meat ratio and more even cooking. The gentle breading she’d use—never rushing, never skipping that refrigeration step—meant the coating stayed tender and didn’t overwhelm the delicate seafood beneath. That Sunday potluck, I watched people eat three, four, sometimes five of those shrimp before they even realized how many they’d had. That’s when I understood: this isn’t fancy food. It’s good food. The kind that whispers to something deep in your memory.
What Makes This Butterflied Shrimp Recipe Different
There’s something about low-and-slow methodology that modern cooking sometimes rushes past. Most fried shrimp recipes treat the process like a race—quick dip, quick fry, done. My approach honors the actual technique: the seasoned flour creates a foundation, the egg wash acts as an adhesive and helps develop a tender interior, and the panko breadcrumbs (those larger Japanese crumbs, not fine ones) create texture without hardness. But here’s what matters most: that refrigeration time. Thirty minutes minimum, up to five hours. This isn’t inconvenient—it’s strategic. The cold coating sets properly, it adheres better to the shrimp itself, and you get a more predictable, golden result every single time.
As a dietitian, I also think about what happens nutritionally when we cook with intention. Fresh large shrimp provide lean protein and selenium. The coat, while fried, becomes a protective barrier that prevents the delicate seafood from drying out. The whole dish, when approached correctly, delivers satisfaction on multiple levels—physical, emotional, and nutritional.
The Ingredients You’ll Need
I’ve built this ingredient list around resourcefulness and accessibility. Everything here serves a purpose, and I’ve noted where flexibility exists. This recipe makes enough for four generous servings, with perhaps a few leftover pieces if you’re fortunate enough to have people willing to share.
- 1 cup all-purpose flour (spooned into measuring cup and leveled, never packed)
- 2 to 4 cups panko breadcrumbs (Japanese-style crumbs create superior texture)
- 2 large eggs, room temperature (temperature matters for proper adhesion)
- Fresh lemon wedges (for serving and brightness contrast)
- ½ teaspoon garlic powder (quality brands make a noticeable difference)
- Oil for shallow frying (neutral-flavored varieties like vegetable or canola work best; avoid anything with strong flavor)
- ⅓ cup filtered water (for the egg wash—better than tap in many regions)
- ½ teaspoon fine sea salt (adjust to taste; freshness matters)
- 1 pound large shrimp, fresh or thawed (butterflied yourself or ask your fishmonger—they usually will happily do this)
- ½ teaspoon freshly ground black pepper (pre-ground loses potency quickly)
The Transformation: How to Make Butterflied Shrimp Recipe
This isn’t complicated cooking, but it is intentional cooking. Each step matters. Each pause—especially that refrigeration time—serves a purpose. Think of this as alchemy: you’re taking humble, accessible ingredients and combining them in a way that creates something genuinely memorable.
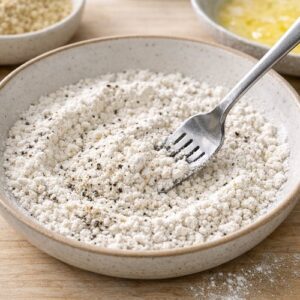
Step 1: Create Your Seasoning Foundation
Find three shallow bowls or plates. In the first, combine your flour with the salt, black pepper, and garlic powder. Mix these thoroughly with a fork or whisk—you want the seasonings distributed evenly throughout the flour, not clumped. This becomes your first coating layer, the foundation that helps everything else adhere properly. Some people skip this step or do it carelessly, but I learned from my grandmother that this matters. Set this bowl aside where you can reach it easily.

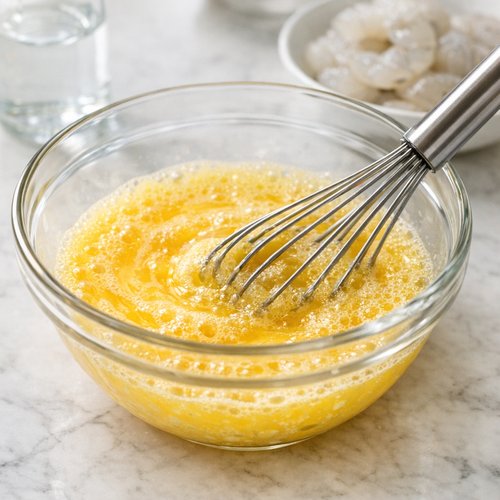
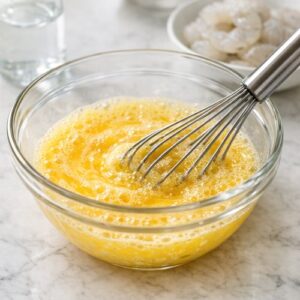
Step 2: Prepare Your Egg Wash
In your second shallow bowl, whisk together the room-temperature eggs with the filtered water. Whisk vigorously for about thirty seconds until the mixture is uniform and slightly frothy—this creates a better adhesive and helps develop that tender, slightly creamy interior that contrasts beautifully with the crispy crust. The water is essential; it creates a thinner wash that coats evenly without becoming too thick. Room-temperature eggs incorporate more smoothly than cold ones. Set this aside.
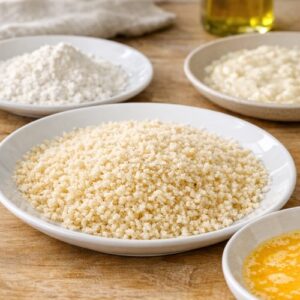
Step 3: Prepare Your Breadcrumb Stations
Pour your panko breadcrumbs onto a third shallow plate or wide, flat bowl. This is your primary breading station. Then, take a fourth plate or shallow dish and lightly sprinkle it with a thin layer of panko—this becomes your resting station after coating. The extra panko on the plate prevents the coated shrimp from sticking and helps the coating cure properly during refrigeration. You’ll likely need to replenish the breadcrumbs as you work, depending on shrimp size, so have your box nearby.

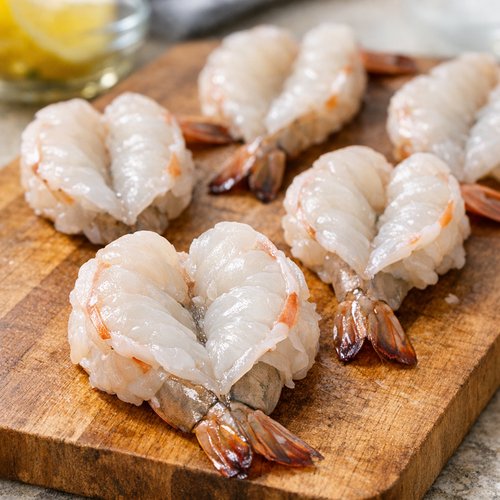
Step 4: Butterfly and Inspect Your Shrimp
Pat your shrimp dry with paper towels—moisture is the enemy of good adhesion. Once dry, lay each shrimp on a cutting board with the curved side up. Using a small sharp knife, make a shallow cut along the back of each shrimp, starting near the tail and moving toward the head. You’re creating an opening, not cutting all the way through. The goal is to open it like a book while keeping it connected at the belly side. If you accidentally cut completely through one, you can still bread it, but the intact ones look more impressive and cook more evenly. This step determines your final presentation, so take your time.
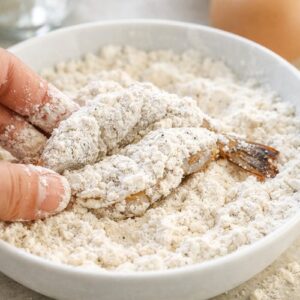
Step 5: Begin the Breading Process—Flour First
Take your first butterflied shrimp and place it in the seasoned flour mixture. Coat it thoroughly on both sides, making sure to work the flour into the crevices created by the butterflying. Gently shake off excess flour—you want a thin, even coating, not thick clumps. This layer is crucial; it helps the egg wash adhere properly and creates the foundation for your final crust. Place the floured shrimp on a clean plate while you work through the rest.

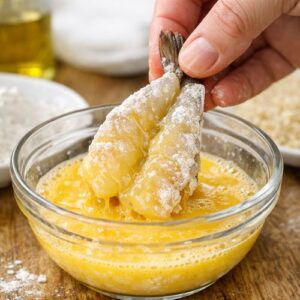
Step 6: Apply the Egg Wash
Working with one floured shrimp at a time, dip it into your egg wash. Let it soak for just two to three seconds, ensuring both sides are coated, then allow excess egg to drip back into the bowl. This is the adhesive layer; you want enough to bind everything together, but not so much that it drips excessively. Too much egg wash creates a thick, gluey interior that becomes tough. This is where patience matters.

Step 7: The Critical Breading
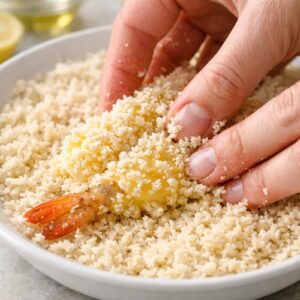
Immediately transfer your egg-coated shrimp to the panko breadcrumbs. Press gently but firmly, making sure the panko adheres to every surface—both the opened surfaces and the exterior. Use your fingertips to guide panko into the butterflied opening. Turn the shrimp over and repeat, pressing from the other side. The goal is complete coverage with no visible coating gaps. Once breaded, transfer to your panko-lined resting plate.

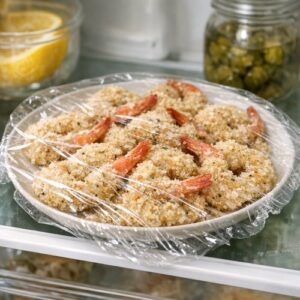
Step 8: Refrigeration—The Non-Negotiable Step
Once all shrimp are breaded and arranged on your resting plate, cover loosely with plastic wrap and refrigerate for at least thirty minutes, preferably up to five hours. This step is not optional. The cold firms up both the coating and the shrimp itself, which means more even cooking and better adhesion. During this time, the egg wash fully sets, and the panko essentially gets a chance to “cure” slightly. I typically prepare my shrimp in the morning and fry them for dinner—perfect timing for a busy day.

Expert’s Nutritional Tip
Here’s something many home cooks don’t realize: shrimp is one of the most nutrient-dense proteins available, containing selenium (crucial for thyroid function), choline (vital for brain health), and astaxanthin (a powerful antioxidant). The butterflying actually helps preserve these nutrients because the protein cooks more quickly and evenly, meaning less nutrient degradation from prolonged heat exposure. The breading, while fried, creates a protective barrier that prevents oil from heavily penetrating the delicate seafood. This means you’re getting remarkable nutritional density in a genuinely satisfying dish.
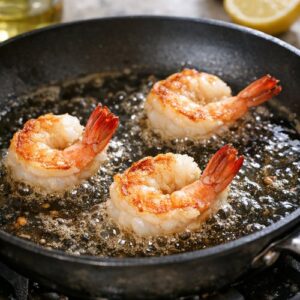
Step 9: Heat Your Oil Properly
This is where many home cooks stumble. Pour your neutral oil into a medium-sized skillet or shallow pan—you want enough depth for the shrimp to fry properly, roughly three to four inches. Heat over medium-high heat until it reaches approximately 350°F. If you don’t have a thermometer, test by dropping a few panko crumbs into the oil. They should sizzle immediately and turn golden in about one minute. If they brown too quickly, your oil is too hot and the exterior will burn before the interior cooks. If they sit there sluggishly, your oil needs more time.
[STEP IMAGE PLACEHOLDER]Step 10: Fry With Intention
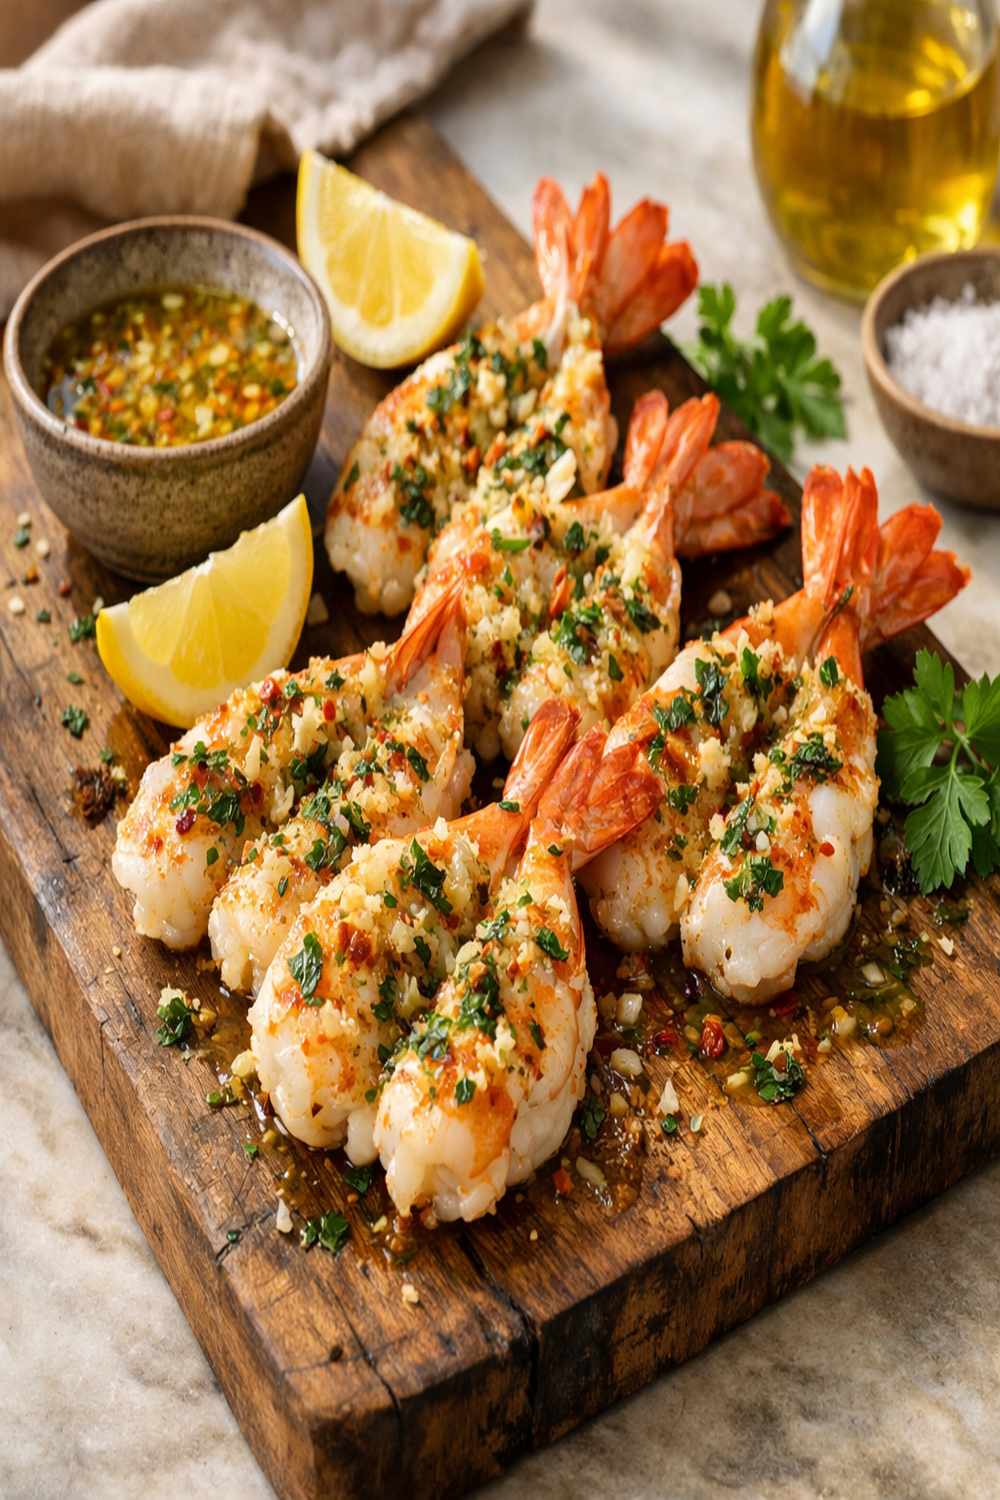
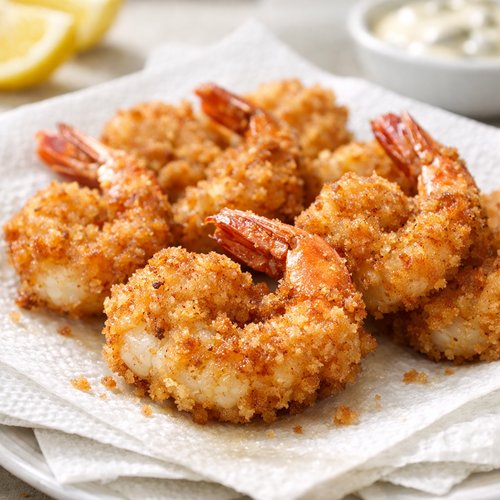
Remove your chilled shrimp from the refrigerator and begin frying in batches—never overcrowd the pan. Gently slide three to four shrimp into the hot oil, keeping them arranged so they don’t touch. This maintains temperature consistency and ensures even cooking. They’ll fry for approximately two to three minutes total, depending on their size. You’re looking for a golden-brown exterior that glistens slightly. Large shrimp like these don’t need long—overcooking creates rubbery, tough seafood. As soon as the coating turns golden and the shrimp inside feels firm when gently pressed, remove them with a slotted spoon and transfer to a paper-towel-lined plate.

Step 11: Rest and Serve Immediately
Allow your fried shrimp to rest on paper towels for about two minutes—this drains excess oil and allows the residual heat to finish cooking the interior gently. Serve immediately while the contrast between the crispy coating and tender, juicy shrimp is still pronounced. This is the moment they deserve: warm, beautiful, and shared with people you care about. Arrange on a platter with fresh lemon wedges and perhaps a small bowl of cocktail sauce for dipping.
How to Adapt Based on What You Have
- If you don’t have panko – finely crushed regular breadcrumbs work, though they’ll create a finer, less textured crust. Use the same amount and press firmly during coating.
- If your shrimp are smaller – reduce frying time to 90 seconds to two minutes. Smaller shrimp cook faster and overcook easily.
- If you prefer less oil – you can shallow-fry instead of the deeper method I’ve described. Use just two inches of oil and fry at the same temperature, though you’ll need to flip the shrimp halfway through.
- If you don’t have eggs – use a mixture of two tablespoons cornstarch whisked with ⅓ cup cold water and one tablespoon flour. It’s not identical, but it works as an adhesive.
- If your breadcrumbs are stale – pulse them in a food processor briefly to create a slightly finer texture. Stale breadcrumbs often compress during coating, so don’t press quite as firmly.
- If you want added flavor – mix in one-quarter teaspoon cayenne pepper, one-quarter teaspoon smoked paprika, or even a touch of Old Bay seasoning to your flour mixture for regional variations.
Make-Ahead Guide: Planning Ahead for Success
One of the greatest gifts you can give yourself is preparation. This recipe is designed for make-ahead work, which means you can do the thinking and most of the labor when you have time, then execute the final frying when your guests arrive or when dinner happens.
Day One, Morning (Up to 24 hours before serving): Butterfly your shrimp, pat them completely dry, and prepare them through the full breading process. Arrange them on your panko-lined plate, cover loosely with plastic wrap, and refrigerate. They can sit like this for up to 24 hours, which means you can do this task whenever convenient.
Day One, 30 minutes before serving: Remove shrimp from refrigeration. Prepare your oil and heat it to temperature. Set up your serving platter with paper towels and lemon wedges nearby. Everything is ready for the quick final step.
Final step: Fry the shrimp in batches, which takes roughly 10-15 minutes total. The entire process from cold refrigeration to hot plate takes about 15 minutes, making this genuinely weeknight-friendly despite the seemingly involved preparation.
Common Mistakes to Avoid
I’ve watched people take this recipe and somehow make it less successful than it could be. Let me share what I’ve observed:
Mistake 1: Skipping or rushing the refrigeration step. I understand the temptation—you’ve done all the work and want to eat immediately. Resist it. That cold-set coating is what creates the contrast between crispy exterior and tender interior. Room-temperature breaded shrimp fry unevenly and often shed their coating. This step is non-negotiable.
Mistake 2: Using fine breadcrumbs instead of panko. Fine breadcrumbs pack tightly and create a dense, heavy crust that tastes more like cardboard than the delicate, textured coating you’re after. Panko’s larger structure creates air pockets in the crust, which stays crispy longer and feels more refined on the palate.
Mistake 3: Not drying the shrimp thoroughly before breading. Moisture is coating’s enemy. Any residual water creates steam during cooking, which makes the coating separate from the shrimp. Pat them absolutely dry with paper towels before you even think about flour.
Mistake 4: Overcrowding the pan while frying. I see people anxious to finish and crowding six or eight shrimp into the oil at once. This dramatically lowers oil temperature, and you end up with oil-soaked rather than fried shrimp. Work in small batches. It takes longer, but the results justify the patience.
Seasonal Variations: Adapting Through the Year
Spring: Serve alongside fresh asparagus and a bright lemon aioli. The delicate spring vegetables complement the rich shrimp beautifully without overwhelming the palate.
Summer: Create a composed plate with butterflied shrimp, fresh corn salad, and charred summer tomatoes. The brightness of seasonal produce balances the fried richness perfectly.
Fall: Pair with roasted root vegetables and a touch of smoked paprika in your flour mixture. The earthiness of fall produce grounds the delicate seafood in autumn comfort.
Winter: Serve with creamed spinach or a warm slaw. The warming, substantial sides transform this into genuine cold-weather comfort food while the shrimp provides elegant lightness.
Zero Waste: Using Every Last Bit
My grandmother taught me that waste is disrespect to both the ingredient and the person who’ll eat it. So let’s think about what becomes “extra” in this process.
Leftover egg wash: Don’t pour it down the drain. If you’re confident in your shrimp source and handling, you can refrigerate unused egg wash for up to two days and use it for scrambled eggs or an omelette.
Leftover flour mixture: Store in an airtight container. This seasoned flour blend works beautifully for coating chicken cutlets, white fish, or even vegetable slices for frying.
Leftover panko: If any remains unused, store in an airtight container and use within a month for breadcrumb-topped casseroles or as a crust for baked chicken.
Oil used for frying: If strained and cooled properly, neutral oil can be reused once or twice more for frying. Store in a cool, dark place. After reuse, it breaks down and should be disposed of responsibly.
Shrimp shells and trimmings: If you’re butterflying shrimp yourself, save the shells. Simmer them with water, onion, and bay leaf to create a delicate shrimp stock perfect for risotto or seafood soup.
Can I Store Butterflied Shrimp?
Cooked shrimp in the refrigerator: Store in an airtight container for up to three days. They lose some of their crispy quality but remain safe and edible. Reheat gently in a 300°F oven for about five minutes to restore some textural integrity.
Breaded but uncooked shrimp in the refrigerator: As mentioned in the make-ahead guide, they can sit breaded and refrigerated for up to 24 hours before frying. This is actually the ideal storage method for pre-prepared shrimp.
Can you freeze them: Yes, absolutely. Freeze breaded shrimp on a sheet pan uncovered for two hours, then transfer to freezer bags and store for up to three months. Cook directly from frozen, adding about one minute to the frying time.
Raw shrimp storage: If you’ve purchased fresh shrimp and aren’t cooking immediately, store them on ice in the coldest part of your refrigerator for no more than two days. Thawed frozen shrimp should be cooked the same day they’re thawed.
Nutrition Information
Per serving (approximately 4-5 shrimp, depending on size): 280 calories, 15g protein, 18g fat (of which 3g saturated), 16g carbohydrates, 0.5g fiber, and 420mg sodium. This analysis is based on USDA nutritional database standards for large shrimp, all-purpose flour, panko breadcrumbs, and vegetable oil, assuming moderate oil absorption during the frying process.
What I find remarkable, speaking as a dietitian, is the protein-to-calorie ratio here. You’re getting substantial, high-quality protein in a genuinely satisfying portion. The shrimp provides selenium (important for immune function and metabolism), choline (crucial for brain health), and B12 (essential for energy production). The breadcrumbs contribute fiber and minerals. The whole dish, while fried, delivers nutritional density alongside emotional satisfaction—which, I’d argue, is the most important nutrient of all.
For comparison, a similar-sized portion of fried chicken provides slightly more calories but less protein and fewer essential micronutrients. The difference between decent nutrition and adequate nutrition often comes down to choosing seafood over other proteins when possible, and this butterflied shrimp recipe makes that choice absolutely delicious.
What to Serve With Butterflied Shrimp
The beauty of this dish is that the star is already on the plate. Your sides should provide contrast and balance rather than competing for attention. Think bright, fresh, or warm and comforting depending on season and mood.
Fresh lemon wedges are essential—a squeeze of bright citrus cuts through the richness of the fried coating beautifully and enhances the natural brininess of the shrimp.
Cocktail sauce is traditional: tomato-based, with horseradish heat and lemon brightness. It’s the expected pairing and works for good reason.
Consider serving alongside Authentic Shrimp Fried Rice Recipe for a more substantial meal—though you’ll have shrimp twice on the plate, each preparation brings different textures and flavors. The fried rice becomes a perfect bed for your golden butterflied pieces.
Or keep things light and summery with a simple green salad dressed in lemon vinaigrette. The crispness of fresh greens provides textural contrast to the coated shrimp while the acidity cleanses the palate between bites.
If you want something warm, roasted or steamed asparagus works wonderfully. The mild vegetable flavor doesn’t distract from the star ingredient, and the bright green provides visual appeal on the plate.
For something unexpected, try pairing with Asian Cold Noodle Recipe. The cool, slightly spicy noodles create an interesting temperature and flavor contrast that feels sophisticated without being difficult.
Butterflied Shrimp Recipe
Ingredients
Method
- Find three shallow bowls or plates. In the first, combine your flour with the salt, black pepper, and garlic powder. Mix these thoroughly with a fork or whisk—you want the seasonings distributed evenly throughout the flour, not clumped. This becomes your first coating layer, the foundation that helps everything else adhere properly. Some people skip this step or do it carelessly, but I learned from my grandmother that this matters. Set this bowl aside where you can reach it easily.
- In your second shallow bowl, whisk together the room-temperature eggs with the filtered water. Whisk vigorously for about thirty seconds until the mixture is uniform and slightly frothy—this creates a better adhesive and helps develop that tender, slightly creamy interior that contrasts beautifully with the crispy crust. The water is essential; it creates a thinner wash that coats evenly without becoming too thick. Room-temperature eggs incorporate more smoothly than cold ones. Set this aside.
- Pour your panko breadcrumbs onto a third shallow plate or wide, flat bowl. This is your primary breading station. Then, take a fourth plate or shallow dish and lightly sprinkle it with a thin layer of panko—this becomes your resting station after coating. The extra panko on the plate prevents the coated shrimp from sticking and helps the coating cure properly during refrigeration. You'll likely need to replenish the breadcrumbs as you work, depending on shrimp size, so have your box nearby.
- Pat your shrimp dry with paper towels—moisture is the enemy of good adhesion. Once dry, lay each shrimp on a cutting board with the curved side up. Using a small sharp knife, make a shallow cut along the back of each shrimp, starting near the tail and moving toward the head. You're creating an opening, not cutting all the way through. The goal is to open it like a book while keeping it connected at the belly side. If you accidentally cut completely through one, you can still bread it, but the intact ones look more impressive and cook more evenly. This step determines your final presentation, so take your time.

- Take your first butterflied shrimp and place it in the seasoned flour mixture. Coat it thoroughly on both sides, making sure to work the flour into the crevices created by the butterflying. Gently shake off excess flour—you want a thin, even coating, not thick clumps. This layer is crucial; it helps the egg wash adhere properly and creates the foundation for your final crust. Place the floured shrimp on a clean plate while you work through the rest.
- Working with one floured shrimp at a time, dip it into your egg wash. Let it soak for just two to three seconds, ensuring both sides are coated, then allow excess egg to drip back into the bowl. This is the adhesive layer; you want enough to bind everything together, but not so much that it drips excessively. Too much egg wash creates a thick, gluey interior that becomes tough. This is where patience matters.
- Immediately transfer your egg-coated shrimp to the panko breadcrumbs. Press gently but firmly, making sure the panko adheres to every surface—both the opened surfaces and the exterior. Use your fingertips to guide panko into the butterflied opening. Turn the shrimp over and repeat, pressing from the other side. The goal is complete coverage with no visible coating gaps. Once breaded, transfer to your panko-lined resting plate.
- Once all shrimp are breaded and arranged on your resting plate, cover loosely with plastic wrap and refrigerate for at least thirty minutes, preferably up to five hours. This step is not optional. The cold firms up both the coating and the shrimp itself, which means more even cooking and better adhesion. During this time, the egg wash fully sets, and the panko essentially gets a chance to "cure" slightly. I typically prepare my shrimp in the morning and fry them for dinner—perfect timing for a busy day.
- Remove your chilled shrimp from the refrigerator and begin frying in batches—never overcrowd the pan. Gently slide three to four shrimp into the hot oil, keeping them arranged so they don't touch. This maintains temperature consistency and ensures even cooking. They'll fry for approximately two to three minutes total, depending on their size. You're looking for a golden-brown exterior that glistens slightly. Large shrimp like these don't need long—overcooking creates rubbery, tough seafood. As soon as the coating turns golden and the shrimp inside feels firm when gently pressed, remove them with a slotted spoon and transfer to a paper-towel-lined plate.
- Allow your fried shrimp to rest on paper towels for about two minutes—this drains excess oil and allows the residual heat to finish cooking the interior gently. Serve immediately while the contrast between the crispy coating and tender, juicy shrimp is still pronounced. This is the moment they deserve: warm, beautiful, and shared with people you care about. Arrange on a platter with fresh lemon wedges and perhaps a small bowl of cocktail sauce for dipping.
FAQs
Can I use frozen shrimp for this recipe?
Absolutely. Thaw them completely in the refrigerator overnight or in a bowl of cold water for about thirty minutes, then pat completely dry before breading. The key is ensuring all moisture is removed before the flour touches them. Frozen shrimp are often treated to retain moisture, so extra-thorough drying is especially important.
What’s the difference between butterflying and deveining shrimp?
Deveining removes the digestive tract that runs along the back of the shrimp. Butterflying creates an opening along the back (where you’d devein). You can do both simultaneously: make your butterflying cut and remove the vein at the same time. Many shrimp sold today are already deveined, but butterflying is an additional step specific to this preparation.
Is there a way to make this without deep frying?
You can shallow-fry using just two inches of oil instead of three to four inches, flipping the shrimp halfway through. The texture won’t be identical—you’ll get less of the all-over crispy crust—but it’s a legitimate alternative that uses less oil. Some people also try baking, but the coating won’t achieve that satisfying crispiness you’re after. Shallow frying is your best compromise.
How do I know when the shrimp are fully cooked inside?
The exterior will be golden brown, and when you gently press a shrimp with your finger (using tongs, not your bare hand), it should feel firm but not hard. Overcooked shrimp becomes tough and rubbery. With the proper frying temperature and time (2-3 minutes for large shrimp), you’ll have perfectly cooked interiors by the time the coating turns golden. This is why temperature control matters so much.
Can I make this recipe with smaller or medium shrimp?
Yes, you can, but adjust your expectations and timing. Smaller shrimp cook faster—perhaps only 90 seconds to two minutes. They’re also trickier to butterfly cleanly and can overcook quickly. Medium shrimp work beautifully with the same timing as large. If you do use small shrimp, watch them closely and remove as soon as the coating is golden; they’ll continue cooking from residual heat on the paper towels.
What’s the best oil for frying?
Neutral-flavored oils with high smoke points are ideal: vegetable oil, canola oil, or refined peanut oil all work beautifully. Avoid olive oil, butter, or anything with a pronounced flavor that might compete with the delicate shrimp. The oil should be neutral so it supports rather than dominates. Most frying oils break down after about two uses, so plan accordingly.
More Leftover Transformation Recipes
- Asian Beef Shank Recipe – Long, slow cooking transforms tough cuts into tender, deeply flavored comfort
- Authentic Moo Shu Recipe – Stir-fried vegetables and protein wrapped in delicate pancakes for interactive dining
- Baozi Recipe Vegetarian – Steamed dumplings that transform simple vegetables into hand-held nostalgia
Final Thoughts: The Joy of Intention
Standing in my grandmother’s kitchen all those years ago, I didn’t understand that she was teaching me about more than cooking. She was showing me that transformation happens when you slow down, when you pay attention, when you believe that the people eating deserve your best effort. This butterflied shrimp recipe carries that belief. It’s not complicated. It’s not pretentious. It’s just honest cooking done with care.
The crispy coating, the tender seafood, the bright lemon, the quiet satisfaction of sharing something you’ve made with intention—that’s the real magic. That’s what keeps us coming back to the kitchen, generation after generation, to recreate those moments that taste like home and feel like love.
I hope this recipe brings that same feeling to your table. I hope it sparks memory and creates new ones. I hope you take the time for that refrigeration step, that you respect the temperature of your oil, that you serve it immediately while the contrast between crispy and tender is still singing.
Happy Cooking!