Chinese Pepper Steak And Onion Recipe
This post contains affiliate links. As an Amazon Associate I earn from qualifying purchases.
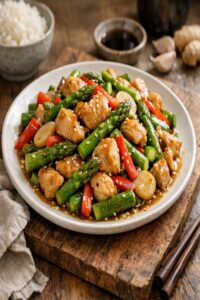
This pepper steak and onion doesn’t just taste incredible—it stops people in their tracks. The moment that glossy, mahogany-tinted sauce clings to jewel-bright peppers and caramelized onions, you know you’ve created something special. I learned early on that the best meals aren’t just about flavor; they’re about that split second when someone sees what you’ve made and their whole face changes. That’s the magic I chase in my kitchen, and that’s exactly what happens when you serve this dish. Whether you’re exploring authentic beef broccoli recipes or discovering classic stir-fry techniques, understanding how to build these layered, balanced flavors is fundamental to great cooking.
The Most Beautiful Pepper Steak and Onion You’ll Ever Make (And It’s Easier Than It Looks)
I remember the first time my grandmother made something that genuinely stopped the conversation at the dinner table. I was maybe seven years old, watching her work at the old stove in her Worcester kitchen. She’d seared thin strips of beef until they were just kissed with color, then tossed in these vibrant peppers and golden onions swimming in the most gorgeous mahogany glaze. My grandfather actually put his fork down and just looked at the plate for a moment before eating. That’s when I understood: food that looks beautiful tastes better because we eat with our eyes first.
This Chinese pepper steak and onion recipe captures that same magic. It’s rooted in Cantonese home cooking—the kind of dish that appears on family tables across Asia, adapted, loved, and passed down. What makes it special isn’t complexity; it’s technique combined with the right balance of ingredients working in harmony. The beef becomes impossibly tender through a process called velveting, the peppers stay bright and slightly crisp, and the sauce clings to everything with a silky sheen that makes the whole dish irresistible.
The Visual Elements That Make This Dish Stunning
Before we even talk about how to cook this, let’s talk about why it looks so spectacular. As a registered dietitian, I notice that the most beautiful dishes are often the most nutritious ones—nature’s colors signal nutritional density. This pepper steak and onion exemplifies that principle perfectly. Every visual element serves a purpose beyond appearance.
- Deep mahogany glaze and umami richness – The combination of oyster sauce, both light and dark soy sauce, and sesame oil creates a sauce that’s almost jewel-like in color. This isn’t just pretty; those deeper soy tones mean increased mineral content and umami depth that makes your mouth water.
- Jewel-bright bell peppers – Green and red peppers provide visual contrast and nutritional complexity. Green peppers offer a slightly grassy, vegetal brightness, while red peppers bring sweetness and additional vitamin C. The color contrast is literally the difference between nutrients.
- Caramelized golden onions – These aren’t just background players. When onions caramelize slowly, their natural sugars concentrate, creating those burnished edges that add depth to both flavor and appearance. This is where patience creates beauty.
Choosing Ingredients for Maximum Visual Impact
Every ingredient in this dish was chosen for its role in creating something that’s both nutritionally complete and visually stunning. I think about each component’s contribution to the final plate—not just in terms of taste, but in terms of the story the colors tell about what your body will receive.
For the Beef Preparation
- 2 teaspoons cornstarch (helps create that silky coating)
- 1½ tablespoons filtered water (for the velveting marinade)
- 2 teaspoons oyster sauce (adds umami depth even in the marinade)
- 2 teaspoons Shaoxing wine (Chinese rice wine, cannot be substituted with cooking wine)
- ¼ teaspoon baking soda (the secret ingredient that tenderizes tougher cuts)
- 2 teaspoons neutral oil such as vegetable or canola (for tenderizing)
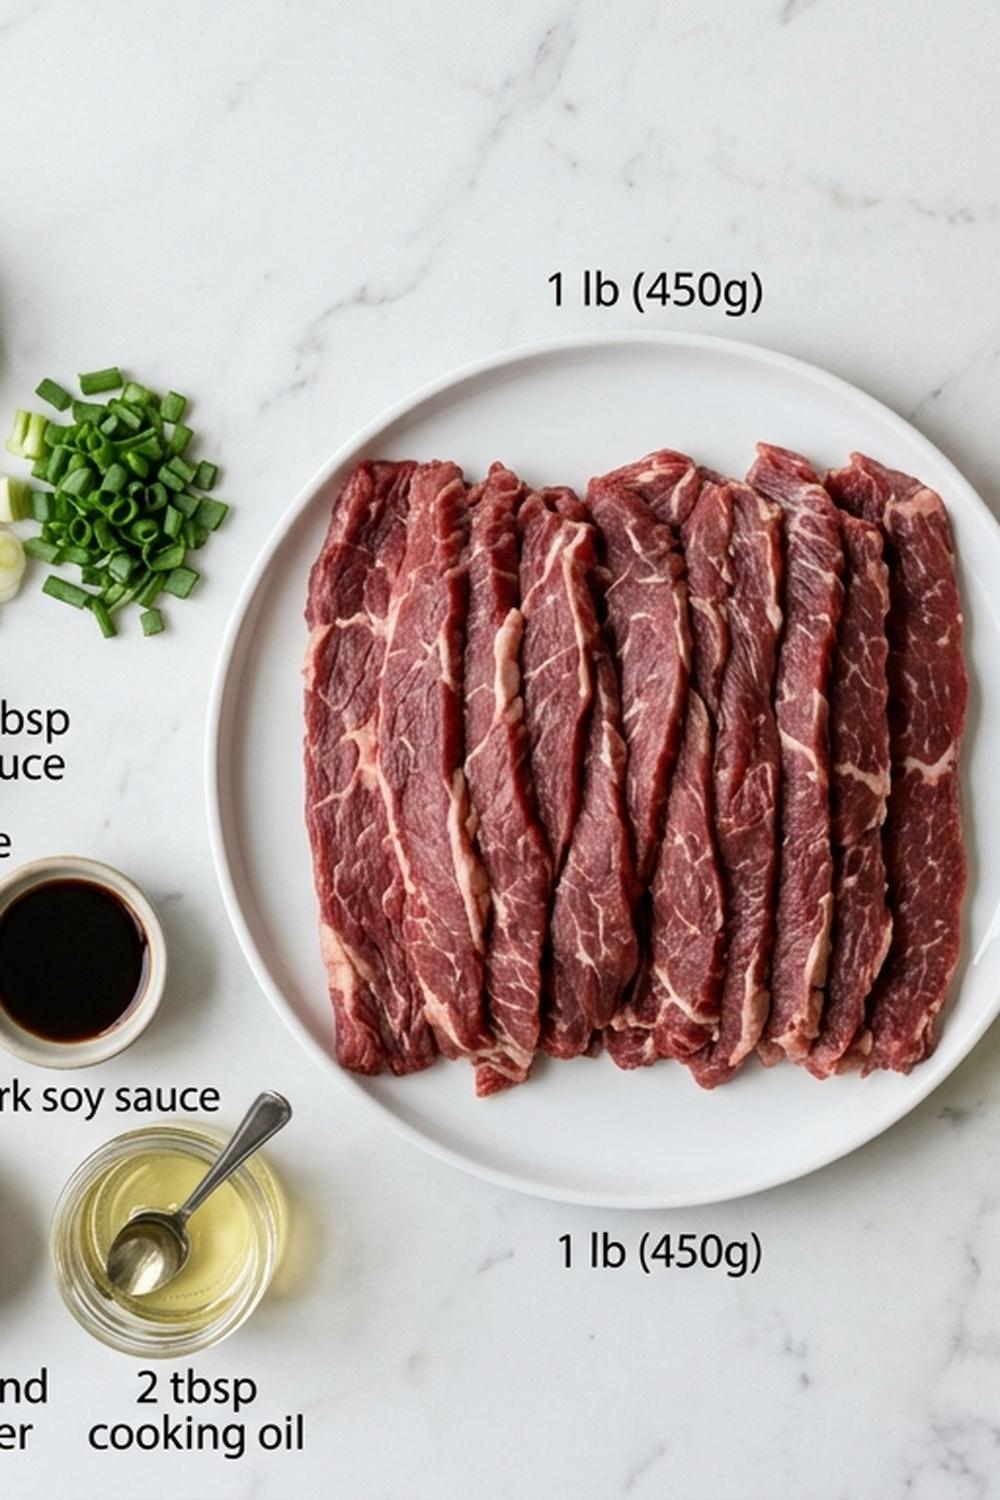
- 12 ounces flank steak (or London broil or chuck roast, thinly sliced across the grain)
For the Sauce
- 1 tablespoon Shaoxing wine (adds complexity and body)
- ½ cup low-sodium chicken stock (building a lighter, cleaner profile)
- ½ teaspoon sesame oil (aromatic finishing touch)
- 1 tablespoon cornstarch (the thickening agent that creates that glossy coat)
- 1 tablespoon light soy sauce (the salt and color component)
- ½ teaspoon sugar (balances the savory elements)
- 1½ tablespoons oyster sauce (the backbone of authentic flavor)
- ⅛ teaspoon white pepper (or more to taste, for subtle heat)
- 1 teaspoon dark soy sauce (concentrated flavor and deeper mahogany hue)
For the Vegetables and Aromatics
- 1 teaspoon sesame seeds (optional garnish, adds nuttiness and visual appeal)
- 2 cloves garlic (minced, for savory depth)
- 2 green onions (sliced thin, for freshness and color contrast)
- 1 medium yellow onion (caramelizes beautifully and adds natural sweetness)
- ½ teaspoon minced fresh ginger (optional, but adds aromatic complexity)
- 1 large green bell pepper (cut into 1-inch pieces, provides grassy brightness)
- 2 tablespoons neutral oil (divided, for high-heat cooking)
- ½ red bell pepper (adds sweetness and visual warmth)
Serves: 4 as a main course with rice | Prep time: 35 minutes (including marinade) | Cook time: 8-10 minutes
How to Make Picture-Perfect Pepper Steak and Onion
This is where we transform individual ingredients into something greater than their parts. I’m going to walk you through each step not just as instructions, but as moments where technique creates both flavor and beauty. Think of this less as a recipe and more as creating edible art—because that’s genuinely what happens when you approach cooking with intention.
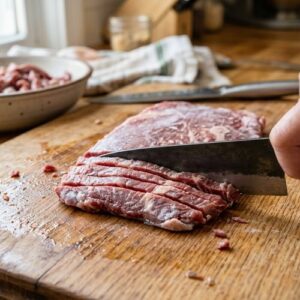
Step 1: Prepare the Beef Through Velveting
Start with your beef partially frozen—about 45 minutes in the freezer is perfect. This matters more than people realize. When beef is slightly firm, it slices much more cleanly and evenly, which means it’ll cook at the same rate and create that uniform, restaurant-quality appearance. Slice against the grain into pieces about 3 inches long and ⅛ to ¼ inch thick. This thickness is crucial; too thin and it falls apart, too thick and it won’t tenderize properly.

Now here’s the magic: velveting. Combine your sliced beef with the water, cornstarch, neutral oil, oyster sauce, Shaoxing wine, and baking soda in a medium bowl. This isn’t just a marinade—it’s a transformative process. The cornstarch creates a protective coating, the oil begins breaking down the muscle fibers, and that baking soda? It’s alkaline, which actually opens up the protein structure, making even tougher cuts (like chuck roast or London broil) impossibly tender. Let this sit for at least 30 minutes, though overnight in the refrigerator is genuinely better, especially for tougher cuts. I always do mine overnight because I plan ahead—one of the secrets to stress-free cooking.
Step 2: Build Your Sauce in Advance
While your beef marinates, combine all your sauce ingredients in a small bowl: the chicken stock, cornstarch, oyster sauce, Shaoxing wine, light and dark soy sauces, sugar, sesame oil, and white pepper. Whisk this together until the cornstarch is fully dissolved. This step, done in advance, means you’re never scrambling during the actual cooking. Set it aside at room temperature. The cornstarch will want to settle, which is fine—you’ll stir it again right before adding it to the wok.
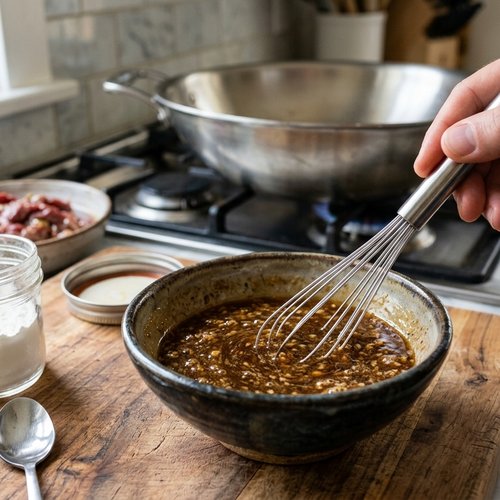
This is one of my cardinal rules of balanced cooking: mise en place, the French technique of having everything prepared before you begin cooking. It’s not just professional habit; it changes everything about how calm and confident you feel in the kitchen.
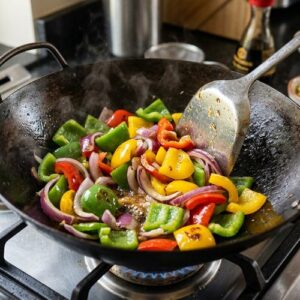
Step 3: Cut Your Vegetables for Even Cooking
Cut both bell peppers and your onion into roughly 1-inch pieces. The key here is consistency—if some pieces are twice the size of others, they’ll cook unevenly, and you’ll end up with some vegetables mushy while others are still raw. I usually cut the peppers lengthwise into strips, then cut those strips into chunks. For the onion, I cut it in half first, then slice vertically, creating pieces that stay together a bit better during the high-heat tossing.
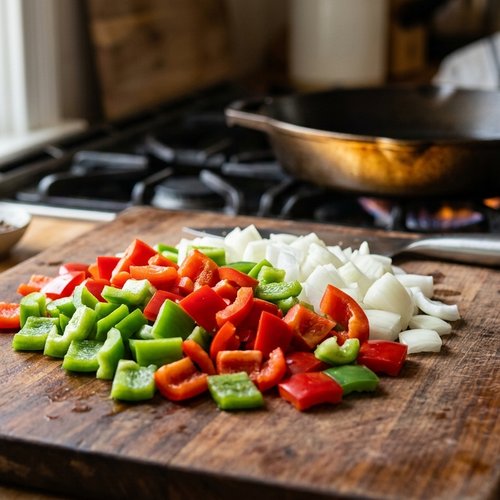
The visual element matters here too. Uniform pieces not only cook better but also look more intentional and beautiful on the final plate. It’s the difference between “homemade” looking and “restaurant-quality” looking.
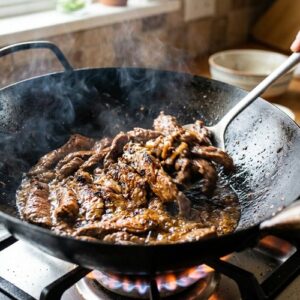
Step 4: The Critical Sear—Building Color and Flavor
Heat your wok (or large skillet if you don’t have a wok) over high heat until it’s smoking—literally, you should see wisps of smoke coming off it. This temperature is non-negotiable; it’s what creates that beautiful, caramelized exterior on the beef. Add 1 tablespoon of your neutral oil and let it heat for just 10-15 seconds until it shimmers.

Working in batches if necessary (don’t overcrowd the wok), add your marinated beef in a single layer. Don’t move it for about 30 seconds—this is where the Maillard reaction happens, creating those gorgeous browned edges. Flip each piece and sear the other side for another 30 seconds. The beef should be about 80% cooked at this point; it’ll finish cooking when you add it back later. Transfer the beef back to your marinating bowl with all its juices. This is important: those juices contain flavor.
Step 5: Create Aromatic Magic with Ginger and Garlic
Reduce your heat to medium-high and add the remaining tablespoon of oil. If you’re using ginger, add it now and let it toast for about 10 seconds—just enough for the aroma to become evident without letting it burn. Then add your minced garlic. This 10-15 second window is when those aromatics release their essential oils, perfuming the entire dish. You want to smell that garlic, but you don’t want it brown or bitter.

Step 6: Stir-Fry the Vegetables to Brightness
Immediately add your pepper and onion pieces. Stir constantly for about 1 minute. What you’re looking for is vegetables that have started to soften slightly but still have a slight firmness when you bite into them—this texture contrast is part of what makes the dish feel alive and fresh. The onions will begin to pick up some color on their edges, which is exactly what you want.

This is where experience teaches you to trust your senses. You’re not aiming for raw vegetables, and you’re not aiming for fully cooked vegetables either. You’re aiming for that middle ground where everything still has personality.
Step 7: Bring Everything Together
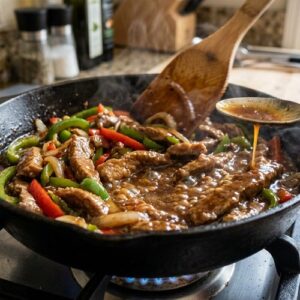
Add your seared beef back to the wok along with any juices that collected in the bowl. Stir everything together for about 15 seconds, making sure the beef and vegetables are evenly distributed. The wok should be a riot of color at this point—deep mahogany beef, bright green peppers, warm red pepper, golden caramelized onions.
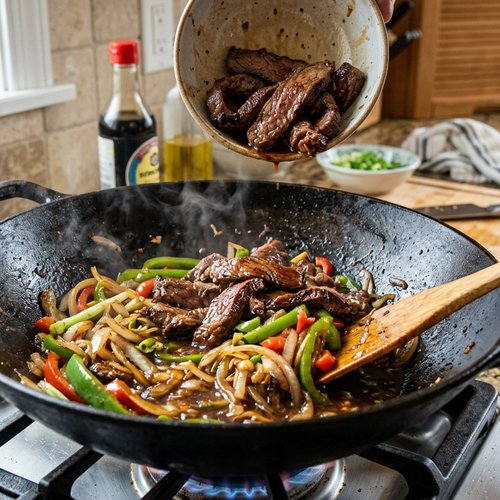
Now increase your heat back to high. Take your prepared sauce and give it a good stir (the cornstarch will have settled) and pour it into the wok. This is the moment where the magic happens. The cornstarch hits the heat and immediately begins thickening, creating that silky glaze that clings to every piece of beef and vegetable.
Step 8: The Final Toss and Sauce Adjustment
Stir constantly for about 30-45 seconds while the sauce thickens. You’re looking for a sauce that coats a spoon but still flows slightly—not so thin it runs off everything, and not so thick it’s gluey. If your sauce looks too thick, add a splash of chicken stock or water (a tablespoon at a time). If it’s too thin, let it cook for another 10-15 seconds and check again.

The sauce should be glossy and slightly thickened, clinging to the beef and vegetables in that beautiful way that makes your mouth water before you even taste it.
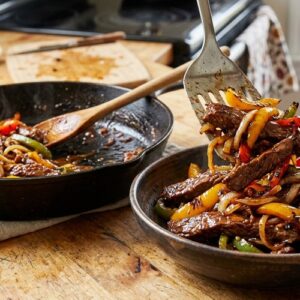
Step 9: Plating for Maximum Impact
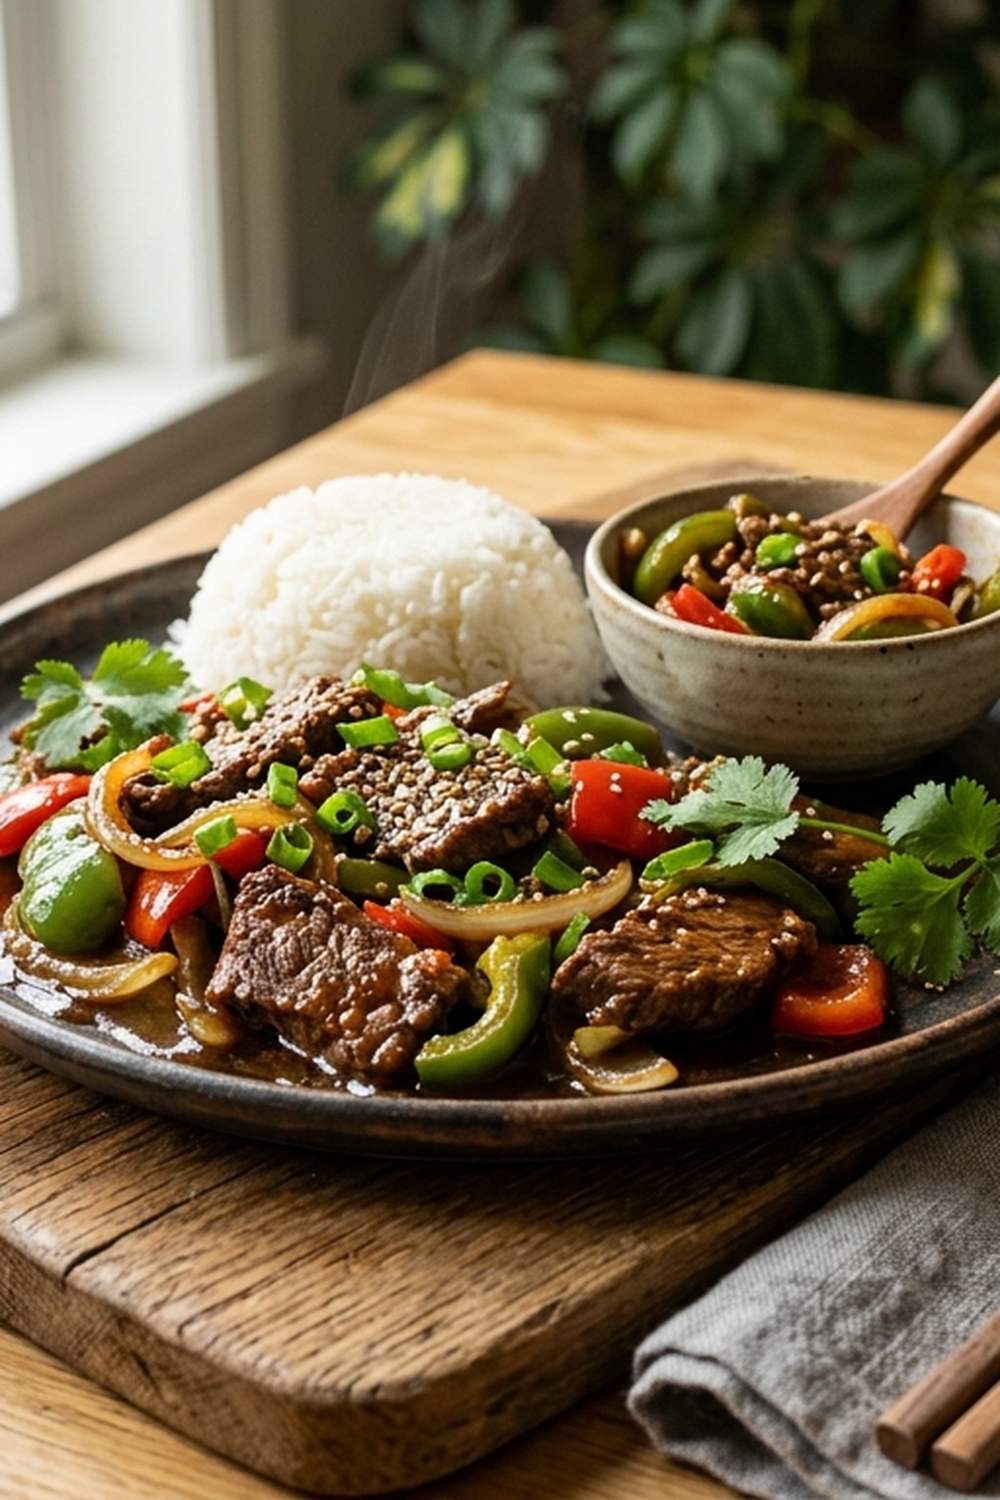
Transfer everything to your serving plate or bowl while it’s still hot. This is crucial: the temperature and the shine of the sauce fade quickly, so serve immediately. If you have sesame seeds, sprinkle them over the top now. If you have sliced green onions, add them for color and freshness. The white and green provide a visual pop against the mahogany sauce.

Serve alongside steamed jasmine or white rice, which provides a neutral canvas for the rich, glossy beef and vegetables. The rice also helps balance the sodium and umami intensity of the sauce—a nutritional consideration that’s also a practical one.
The Plating Masterclass
I spent years learning professional plating techniques, and while this is fundamentally a humble, family-style dish, the principles of beautiful plating still apply. The difference between food that looks good and food that looks extraordinary is often just thoughtfulness about presentation.
- Height and depth through layering – Rather than spreading everything flat, pile your beef and vegetables so there’s actual vertical dimension. Nestle the beef and vegetables at different heights; this creates shadow and dimension that photographs beautifully and makes the plate feel more intentional. When light hits a flat plate, nothing stands out. When it hits different levels, everything becomes three-dimensional.
- Sauce placement and shine – Pool some of that gorgeous mahogany sauce on the plate itself, not just on top of the ingredients. This technique, called “swooshing,” creates visual interest and shows off that glossy, reduced sauce. The shine of the sauce is part of the dish’s beauty; don’t hide it under the ingredients.
- Negative space and breathing room – Don’t overcrowd the plate. Leave a margin of white or colored plate around your mound of beef and vegetables. This breathing room makes the dish feel intentional rather than heaped. It also means people can actually see what they’re eating, which affects appetite and enjoyment.
Photography Tips for This Dish
If you’re going to make something this beautiful, you might as well capture it. Here’s what I’ve learned about photographing this particular dish so it looks as good in photos as it does in person.
- Natural light from the side – This dish shines (literally) in natural light from a 45-degree angle. The side lighting catches the gloss of the sauce and creates shadows that show texture. Harsh overhead light flattens everything. If you’re photographing indoors, position your plate near a window where light comes from the side. The time just before golden hour (that last 30-60 minutes before sunset) creates the most flattering, warm light.
- Shoot immediately after plating – The sauce is most glossy in the first 2-3 minutes after plating. The beef stays at its most beautiful right when it comes off the heat. Wait too long and everything looks tired and dull. Have your camera ready before you even finish plating.
- Use a shallow depth of field – If you have any ability to control your camera (even on a smartphone), focus on the foreground beef and let the background slightly blur. This draws the eye to what matters and makes the photo feel more professional and intentional.
Expert’s Nutritional Insight: Why This Dish Is More Balanced Than It Seems
As a registered dietitian, I spend a lot of time helping people understand that food doesn’t have to be boring to be nutritious. This pepper steak and onion dish is a perfect example of how traditional cooking methods can create meals that are genuinely well-balanced.
The velveting process, which seems indulgent (baking soda, cornstarch, oil), is actually a nutritional win. By tenderizing the beef this way, you’re using much less oil than you would if you had to cook it longer to break down the muscle fibers. A 3-ounce serving of beef in this dish contains about 26 grams of protein, with complete amino acid profiles. The cornstarch in the sauce gets distributed throughout, meaning you’re not adding a huge amount to any single serving.
The bell peppers aren’t just color—they’re delivering. One medium bell pepper contains nearly 200% of your daily vitamin C, plus antioxidants. Green peppers offer additional chlorophyll, while red peppers contain lycopene. The onion contributes quercetin, a powerful antioxidant, plus prebiotics that feed your healthy gut bacteria. The garlic and ginger offer antimicrobial and anti-inflammatory compounds that have been used in traditional medicine for thousands of years.
The sauce, made with low-sodium chicken stock and relatively small amounts of soy sauce, keeps the sodium reasonable (about 400-500mg per serving, depending on portion size). The sesame oil provides omega-3 fatty acids and aromatic compounds that enhance both flavor and satisfaction.
This is food that looks indulgent, tastes incredible, and is genuinely nutrient-dense. That’s the sweetest spot in cooking.
Make-Ahead Guide: Cooking Smart and Stress-Free
One of my favorite parts about this dish is how forgiving it is with make-ahead planning. I run a busy life, and I’ve learned that great home cooking doesn’t have to mean cooking when you’re exhausted.
- The marinade: 24 hours ahead – Velvet your beef up to 24 hours in advance. I usually do this the night before I plan to serve the dish. The beef actually becomes more tender the longer it marinates, so this is where tougher cuts like chuck roast really shine. Store it in an airtight container in the refrigerator.
- The sauce: 4 hours ahead – Mix your sauce ingredients and store in a jar or container at room temperature. This is genuinely helpful because you can do this right before you leave work, and dinner comes together in 10 minutes once you’re home.
- The vegetables: 2 hours ahead – Cut your peppers and onion and store in separate airtight containers in the refrigerator. Don’t mix them together or they’ll start to weep moisture.
- Everything cooked: Store in the refrigerator for up to 2 days – If you cook the entire dish ahead (which I sometimes do on Sunday for the week), store it in an airtight container. To reheat, warm gently in a wok or skillet over medium heat for 2-3 minutes, stirring occasionally. Add a splash of chicken stock if the sauce has thickened too much during storage.
Common Mistakes to Avoid
I’ve been teaching cooking for long enough to know what people struggle with when making this dish. Here are the most common mistakes I see, and how to avoid them:
- Skipping the velveting process or rushing it – I get it. Marinating overnight feels like extra work. But this is where the magic happens. If you skip this step or only marinate for 5 minutes, you’ll end up with tough, chewy beef no matter how perfectly you cook it. The velveting isn’t optional; it’s essential. Even 30 minutes helps, but overnight is genuinely better, especially for tougher cuts.
- Overcrowding the wok during the sear – When you add too much beef at once, the temperature drops and the beef steams instead of sears. Work in batches if you need to. This is one place where patience creates better results.
- Not having the wok hot enough – I cannot stress this enough: high heat is your friend here. The wok should be smoking. If it’s not hot enough, nothing browns properly and you end up with gray, sad-looking beef instead of that gorgeous caramelized exterior.
- Adding the sauce too early or too late – The beef should be about 80% cooked when you set it aside, and your vegetables should be in that sweet spot of just-barely-softened. The sauce comes in at the very end and finishes the cooking gently. If you add it too early, everything overcooks and becomes mushy. If you add it too late, the flavors don’t have time to meld properly.
Seasonal Color Variations
While this dish is delicious year-round, you can adapt it seasonally for visual variety and to take advantage of what’s at peak flavor and nutrition.
- Spring version – Use a combination of sweet mini peppers in yellows and oranges along with your green pepper. Add some sliced fresh pea shoots or baby bok choy in the last 30 seconds of cooking. The bright yellows and tender greens create a lighter, fresher appearance that matches spring’s energy.
- Summer version – Add some thinly sliced summer squash or zucchini (also cut into 1-inch pieces) along with your peppers and onions. The pale green and yellow adds visual warmth and brings in summer’s abundance. A handful of fresh Thai basil stirred in at the very end adds fragrance and visual freshness.
- Autumn version – Incorporate orange bell peppers and add a tablespoon of balsamic vinegar to your sauce for deeper color and warmth. Use a heavier hand with the ginger. Everything feels richer and more grounded, which matches autumn’s energy.
- Winter version – Stick with the classic red and green peppers, but add finely julienned carrots to the mix. They add warmth and sweetness, and that orange color feels nourishing in the colder months. A tiny pinch of five-spice powder in the ginger step adds subtle warming notes.
Can I Store Pepper Steak and Onion?
One of the best things about this dish is that it keeps beautifully, and leftovers are honestly just as satisfying as the first meal.
Refrigerator storage: up to 3 days – Store any leftovers in an airtight container in the coldest part of your refrigerator. The sauce will thicken slightly as it cools, which is fine. To reheat, warm gently over medium heat in a wok or skillet for 2-3 minutes, stirring occasionally. Add a splash of chicken stock or water if the sauce has become too thick.
Freezer storage: up to 2 months – You can freeze the cooked dish in a freezer-safe container or even in ice cube trays if you want portion control. Thaw overnight in the refrigerator before reheating using the method above. Note that the vegetable texture will be softer after freezing; this is fine for eating over rice, but if you’re particular about texture, I’d recommend making this fresh.
Pro tip for make-ahead meals – If you’re planning to freeze this, slightly undercook the peppers and onions (reduce the initial stir-fry time by about 15 seconds). They’ll soften a bit more during freezing and reheating, so you’ll end up with a better final texture.
Nutrition Information
Based on USDA data for a single serving (¼ of the total recipe, served with 1 cup cooked white rice):
- Calories: approximately 420
- Protein: 28g
- Carbohydrates: 45g
- Fat: 8g (including 2.5g from sesame oil and 5.5g from cooking oils)
- Fiber: 2.5g
- Sodium: 520mg (from low-sodium stock and measured soy sauce)
- Iron: 2.8mg (from the beef and sesame)
- Vitamin C: 85mg (primarily from the bell peppers)
- Vitamin A: 650 IU
The colorful bell peppers signal the presence of carotenoids and flavonoids—antioxidants that support eye health and reduce inflammation. The deep color of the sauce comes from soy sauce compounds that include isoflavones, which have been studied for potential bone health benefits. This is food where nutritional diversity is literally visible in the colors on your plate.
What to Serve Alongside for a Complete Visual Spread
While this dish shines on its own, pairing it with complementary dishes creates a meal that’s both visually stunning and nutritionally complete. Here are my recommendations:
- Steamed jasmine or white rice – The neutral, pale rice provides a perfect canvas for the mahogany sauce. It also absorbs the sauce beautifully, which your guests will appreciate.
- A simple cucumber and sesame salad – Thinly slice cucumbers and toss with rice vinegar, a touch of sugar, and white sesame seeds. The cool, crisp, acidic salad provides textural and temperature contrast that balances the rich sauce.
- Stir-fried bok choy with garlic – The tender-crisp greens add a fresh element and a different texture. Try the Banh Mi Burger Recipe for inspiration on how to build complementary flavors, or explore our Authentic Beef Broccoli Recipe for another stir-fry approach that uses similar techniques.
- Edamame with sea salt – The bright green soybeans add both visual interest and a contrast in temperature and texture. They’re also protein-rich, which rounds out the meal nutritionally.
Frequently Asked Questions
Can I use a regular skillet instead of a wok?
Absolutely. While a wok’s curved sides make tossing easier, a large skillet (12-14 inches) works just fine. The key is ensuring it’s hot enough and has enough surface area so you’re not overcrowding. Use the same high-heat technique and you’ll get excellent results. You might find the sauce doesn’t distribute quite as evenly with a skillet, so stir a bit more frequently.
What if I can’t find Shaoxing wine?
Shaoxing wine is a specific ingredient I’d really encourage you to seek out—it has a particular flavor profile that dry sherry or sake can’t fully replicate. That said, if it’s genuinely unavailable, dry sherry is your next best option. Use it in a 1:1 ratio. Avoid “cooking wine” from regular grocery stores; it often contains salt and added ingredients that will throw off your flavor balance.
Is the baking soda really necessary?
For tender results, especially with tougher cuts, yes. The baking soda is what makes chuck roast or London broil become tender. For flank steak, it’s less critical but still beneficial. If you have concerns about the baking soda (some people worry about the slight metallic taste), I promise you won’t notice it—the amount is tiny and the marinade time balances it out. The marinade needs time to work though; rushing this step won’t give you the same results.
Can I make this without oyster sauce?
Oyster sauce is pretty central to the authentic flavor of this dish. If you absolutely can’t have it, increase your soy sauce by 1 tablespoon total and add ½ teaspoon of fish sauce (which also has umami depth). It won’t be identical, but it’ll be closer. Skip it entirely and you’ll lose a lot of depth.
Why does my sauce break or separate instead of thickening smoothly?
This happens when the cornstarch isn’t fully dissolved before the sauce hits the heat, or when you’re not stirring constantly while it thickens. Always whisk your sauce ingredients together before adding them to the wok, and keep stirring once you add it. The constant motion ensures the cornstarch distributes evenly and doesn’t clump.
How do I know when the vegetables are cooked perfectly?
Taste them. Seriously. You want them to have a slight firmness in the center but be clearly cooked—not raw, not mushy. This usually takes about 1 minute of stir-frying if your wok is properly hot. The best way to learn your preference is to taste as you go a few times. Everyone has a different texture preference, and that’s completely valid.
More Visually Stunning Recipes
- BBQ Chinese Pork Recipe – Another showstopper with similar sauce techniques and glossy presentation
- Asian Beef Shank Recipe – Demonstrates low-and-slow cooking that creates deep, complex flavors
- Bamboo Sprouts Recipe – A delicate vegetable-forward dish that pairs beautifully alongside this beef
- Baked Pork Chop Rice Recipe – Another one-dish approach to creating complete, balanced meals with minimal cleanup
Chinese Pepper Steak And Onion Recipe
Ingredients
Method
- Start with your beef partially frozen—about 45 minutes in the freezer is perfect. This matters more than people realize. When beef is slightly firm, it slices much more cleanly and evenly, which means it'll cook at the same rate and create that uniform, restaurant-quality appearance. Slice against the grain into pieces about 3 inches long and ⅛ to ¼ inch thick. This thickness is crucial; too thin and it falls apart, too thick and it won't tenderize properly. Now here's the magic: velveting. Combine your sliced beef with the water, cornstarch, neutral oil, oyster sauce, Shaoxing wine, and baking soda in a medium bowl. This isn't just a marinade—it's a transformative process. The cornstarch creates a protective coating, the oil begins breaking down the muscle fibers, and that baking soda? It's alkaline, which actually opens up the protein structure, making even tougher cuts (like chuck roast or London broil) impossibly tender. Let this sit for at least 30 minutes, though overnight in the refrigerator is genuinely better, especially for tougher cuts. I always do mine overnight because I plan ahead—one of the secrets to stress-free cooking.
- While your beef marinates, combine all your sauce ingredients in a small bowl: the chicken stock, cornstarch, oyster sauce, Shaoxing wine, light and dark soy sauces, sugar, sesame oil, and white pepper. Whisk this together until the cornstarch is fully dissolved. This step, done in advance, means you're never scrambling during the actual cooking. Set it aside at room temperature. The cornstarch will want to settle, which is fine—you'll stir it again right before adding it to the wok. This is one of my cardinal rules of balanced cooking: mise en place, the French technique of having everything prepared before you begin cooking. It's not just professional habit; it changes everything about how calm and confident you feel in the kitchen.

- Cut both bell peppers and your onion into roughly 1-inch pieces. The key here is consistency—if some pieces are twice the size of others, they'll cook unevenly, and you'll end up with some vegetables mushy while others are still raw. I usually cut the peppers lengthwise into strips, then cut those strips into chunks. For the onion, I cut it in half first, then slice vertically, creating pieces that stay together a bit better during the high-heat tossing. The visual element matters here too. Uniform pieces not only cook better but also look more intentional and beautiful on the final plate. It's the difference between "homemade" looking and "restaurant-quality" looking.

- Heat your wok (or large skillet if you don't have a wok) over high heat until it's smoking—literally, you should see wisps of smoke coming off it. This temperature is non-negotiable; it's what creates that beautiful, caramelized exterior on the beef. Add 1 tablespoon of your neutral oil and let it heat for just 10-15 seconds until it shimmers. Working in batches if necessary (don't overcrowd the wok), add your marinated beef in a single layer. Don't move it for about 30 seconds—this is where the Maillard reaction happens, creating those gorgeous browned edges. Flip each piece and sear the other side for another 30 seconds. The beef should be about 80% cooked at this point; it'll finish cooking when you add it back later. Transfer the beef back to your marinating bowl with all its juices. This is important: those juices contain flavor.
- Reduce your heat to medium-high and add the remaining tablespoon of oil. If you're using ginger, add it now and let it toast for about 10 seconds—just enough for the aroma to become evident without letting it burn. Then add your minced garlic. This 10-15 second window is when those aromatics release their essential oils, perfuming the entire dish. You want to smell that garlic, but you don't want it brown or bitter.

- Immediately add your pepper and onion pieces. Stir constantly for about 1 minute. What you're looking for is vegetables that have started to soften slightly but still have a slight firmness when you bite into them—this texture contrast is part of what makes the dish feel alive and fresh. The onions will begin to pick up some color on their edges, which is exactly what you want. This is where experience teaches you to trust your senses. You're not aiming for raw vegetables, and you're not aiming for fully cooked vegetables either. You're aiming for that middle ground where everything still has personality.
- Add your seared beef back to the wok along with any juices that collected in the bowl. Stir everything together for about 15 seconds, making sure the beef and vegetables are evenly distributed. The wok should be a riot of color at this point—deep mahogany beef, bright green peppers, warm red pepper, golden caramelized onions. Now increase your heat back to high. Take your prepared sauce and give it a good stir (the cornstarch will have settled) and pour it into the wok. This is the moment where the magic happens. The cornstarch hits the heat and immediately begins thickening, creating that silky glaze that clings to every piece of beef and vegetable.

- Stir constantly for about 30-45 seconds while the sauce thickens. You're looking for a sauce that coats a spoon but still flows slightly—not so thin it runs off everything, and not so thick it's gluey. If your sauce looks too thick, add a splash of chicken stock or water (a tablespoon at a time). If it's too thin, let it cook for another 10-15 seconds and check again. The sauce should be glossy and slightly thickened, clinging to the beef and vegetables in that beautiful way that makes your mouth water before you even taste it.
- Transfer everything to your serving plate or bowl while it's still hot. This is crucial: the temperature and the shine of the sauce fade quickly, so serve immediately. If you have sesame seeds, sprinkle them over the top now. If you have sliced green onions, add them for color and freshness. The white and green provide a visual pop against the mahogany sauce. Serve alongside steamed jasmine or white rice, which provides a neutral canvas for the rich, glossy beef and vegetables. The rice also helps balance the sodium and umami intensity of the sauce—a nutritional consideration that's also a practical one.
Notes
There’s something profoundly satisfying about creating a dish that feeds both eyes and soul simultaneously. I think about my grandmother often when I’m cooking—how she understood that the most important ingredient in any meal is the care you put into it. This pepper steak and onion recipe carries that philosophy forward. It’s accessible enough for any home cook, but sophisticated enough to make you feel proud to serve it. The technique teaches you skills that transfer to a hundred other dishes. The flavors ground you in tradition while the nutrition supports your body. And the presentation? It stops conversations and creates memories